|
|
 06-05-2015, 11:40 PM
|
#1
|
|
Platinum Member
Join Date: Dec 2014
Location: East of world famous Sedro Woolley, west of Concrete
Posts: 210
|
 Building Annie: A Campervan Conversion
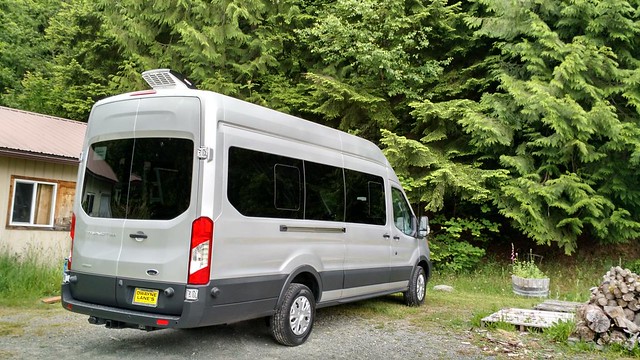
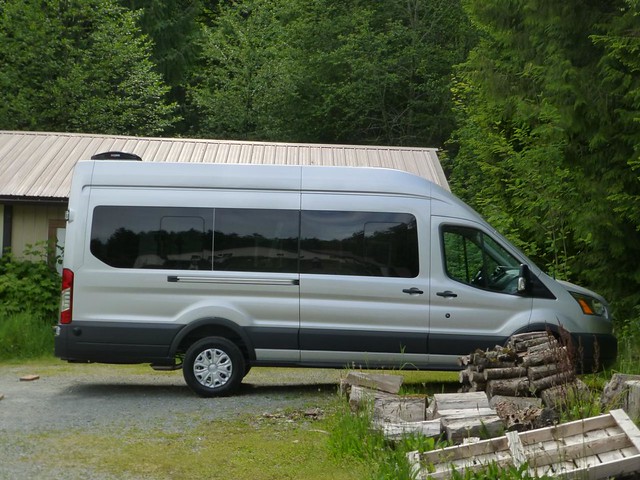
Our Annie the Van came home on 21 May., looking thus:
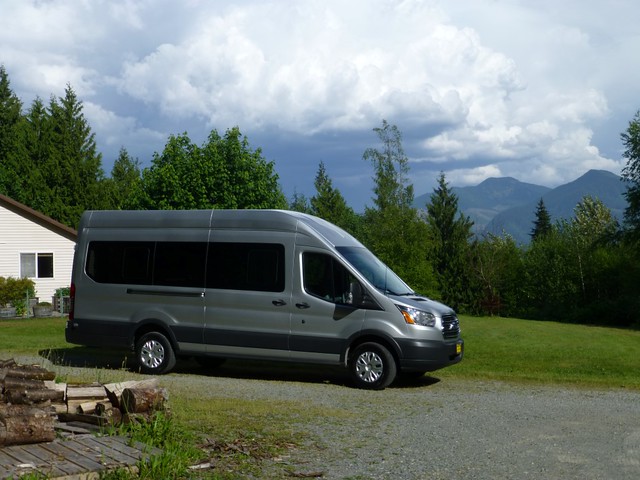 Annie is home! Annie is home! by stan, on Flickr
So, it's now time to start documenting the build. The documenting pictures will be viewable at
https://www.flickr.com/photos/skagit...57653213165316
There will likely be some photos there that I don't post here.
This arrival was followed by a couple of days of head scratching, then ordering and picking up a bunch of supplies for the upcoming project.
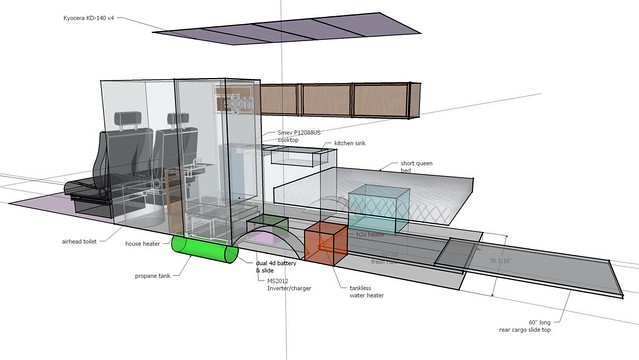
The layout will look something like this rough sketch:
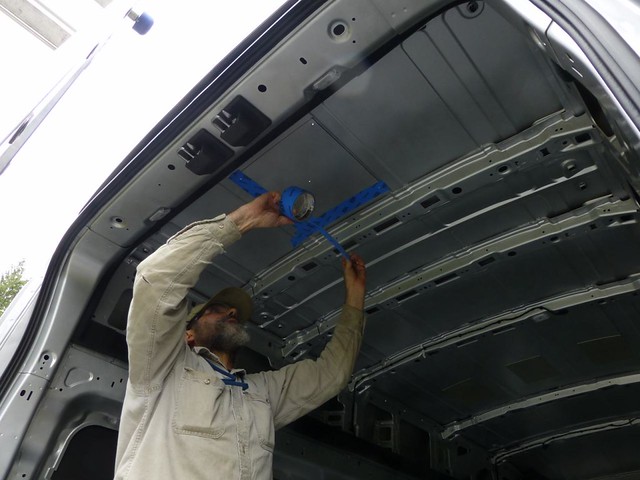
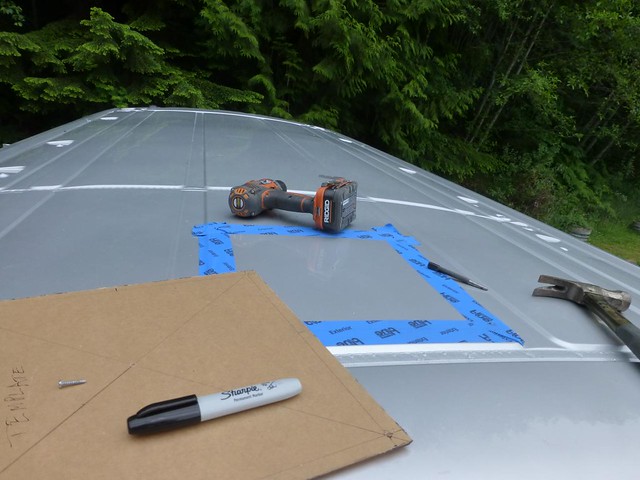
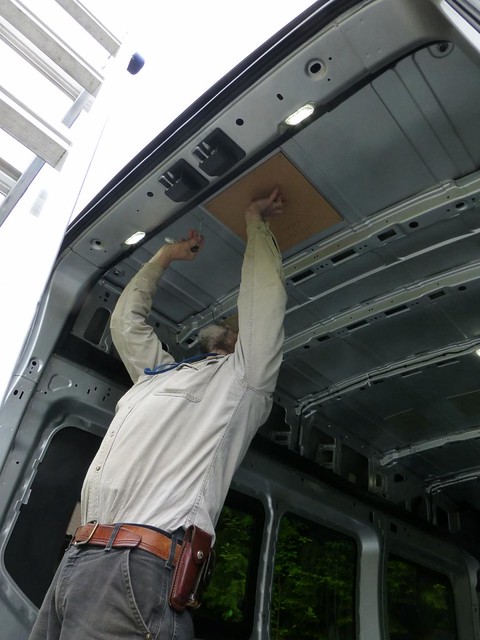
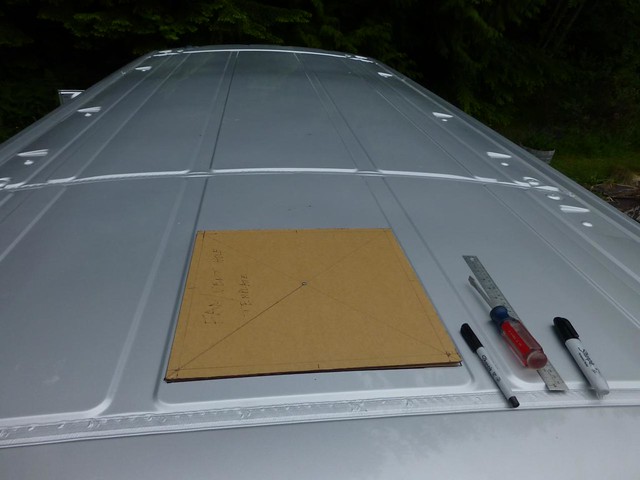
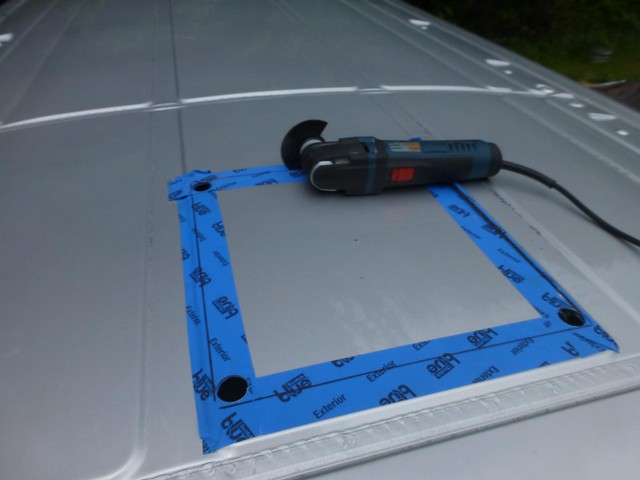
The first project is to install a Maxxair fan.
We started by making a template for the opening, locating where the hole will go from the inside, drilling a template center-hole through the roof, and using that to position the template on the outside. The Maxxair's frame corners have about a .5" radius, so I use a 1""punch.
continued after the pic limit break
__________________
Turning a 2015 Ford Transit into a camper. Her name is Annie.
You can watch it all happen here:
https://anniebuild.blogspot.com/
Now, with trip reports!!!! 
|

|

|
|
06-05-2015, 11:41 PM
|
#2
|
|
Platinum Member
Join Date: Dec 2014
Location: East of world famous Sedro Woolley, west of Concrete
Posts: 210
|
installing the Maxxair continued
__________________
Turning a 2015 Ford Transit into a camper. Her name is Annie.
You can watch it all happen here:
https://anniebuild.blogspot.com/
Now, with trip reports!!!!
|
|
|
|
|
06-05-2015, 11:42 PM
|
#3
|
|
Platinum Member
Join Date: Dec 2014
Location: East of world famous Sedro Woolley, west of Concrete
Posts: 210
|
Using a dull scalpel, I cut along the hole outline
Thus creating a place for rain to go if we ever want to turn the sleeping bed into a garden bed
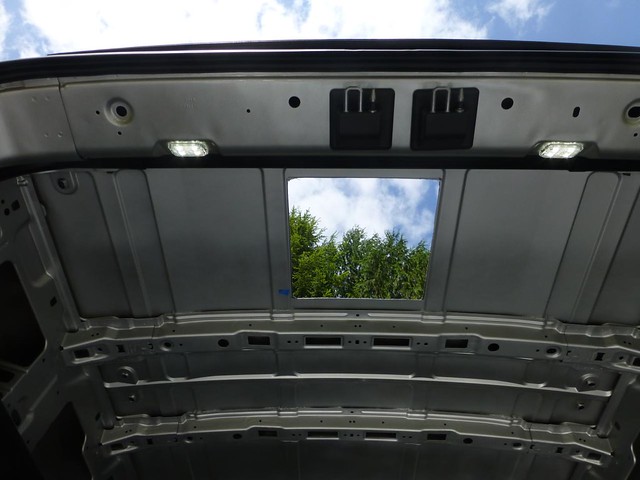
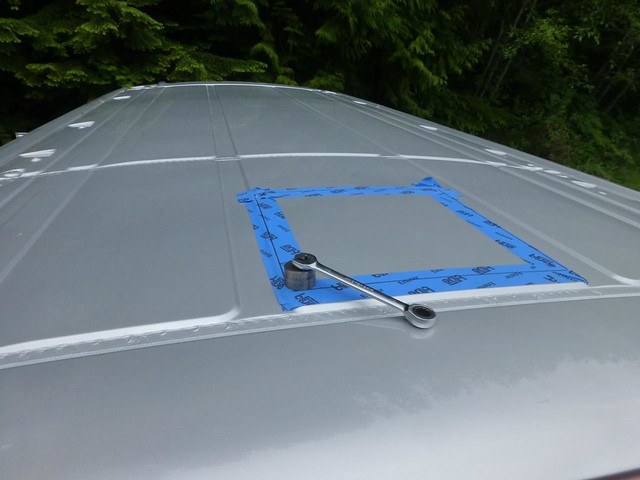
After a bit of smoothing rough cutout edges, and ant-rust painting the raw edges, the frame fits
Cleanup and beer break
continued
__________________
Turning a 2015 Ford Transit into a camper. Her name is Annie.
You can watch it all happen here:
https://anniebuild.blogspot.com/
Now, with trip reports!!!!
|
|
|
|
|
06-05-2015, 11:44 PM
|
#4
|
|
Platinum Member
Join Date: Dec 2014
Location: East of world famous Sedro Woolley, west of Concrete
Posts: 210
|
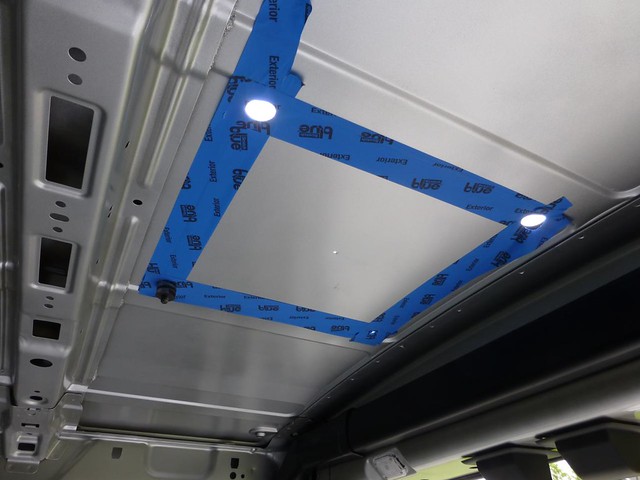
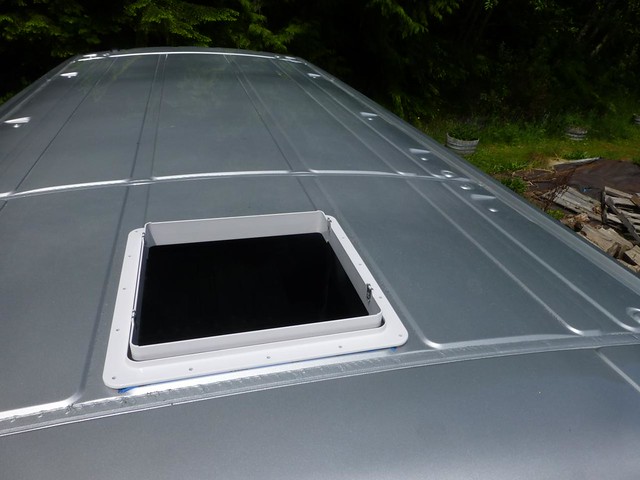
The frame is screwed through the roof into plywood strips. The strips are being held to the roof by VHB tape, so I gave the tape a good squeeze to make sure there is good roof contact. The screws are stainless, so there should be no electrolysis issues screwing through the roof. There are strips on the other 2 sides as well, but no pics of that.
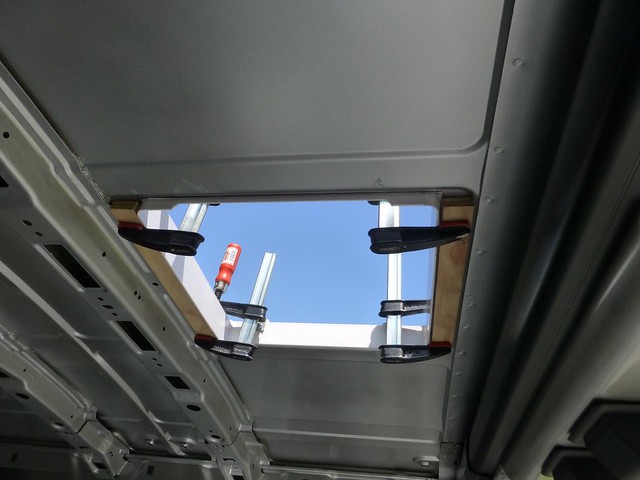
The frame is screwed in over several layers of caulking strip, squashed out excess is trimmed off, and we cover the thing in vanilla icing (actually a copious amount of lap sealant). Don't hire me if you want a neat job squirting sealant (or cake icing).

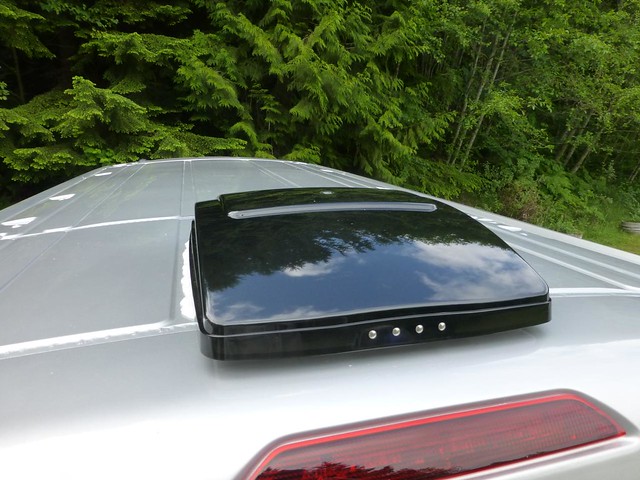
Finally, mounted the fan in the frame
Closed the fan, and we're done.
__________________
Turning a 2015 Ford Transit into a camper. Her name is Annie.
You can watch it all happen here:
https://anniebuild.blogspot.com/
Now, with trip reports!!!!
|
|
|
|
|
06-05-2015, 11:45 PM
|
#5
|
|
Platinum Member
Join Date: Dec 2014
Location: East of world famous Sedro Woolley, west of Concrete
Posts: 210
|
finished fan
Next steps were going to be insulating the floor and walls, installing the solar,installing the propane tank, then insulating the roof.
__________________
Turning a 2015 Ford Transit into a camper. Her name is Annie.
You can watch it all happen here:
https://anniebuild.blogspot.com/
Now, with trip reports!!!!
|
|
|
|
|
06-05-2015, 11:46 PM
|
#6
|
|
Platinum Member
Join Date: Dec 2014
Location: East of world famous Sedro Woolley, west of Concrete
Posts: 210
|
Next steps...starting the floor
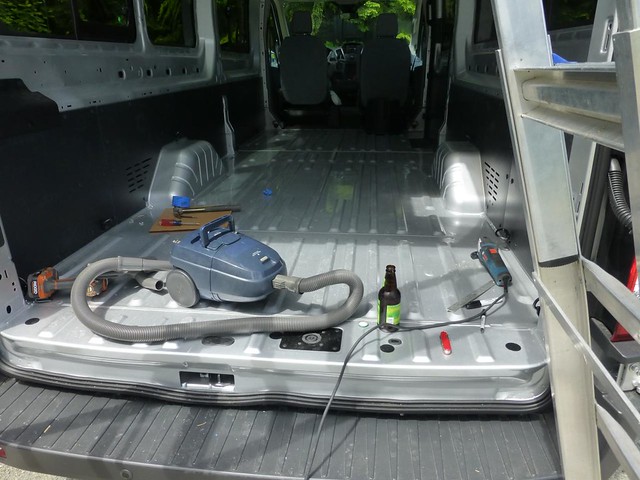
But, the solar, some of the insulation, and propane equipment hadn't yet arrived, so I started some interior work
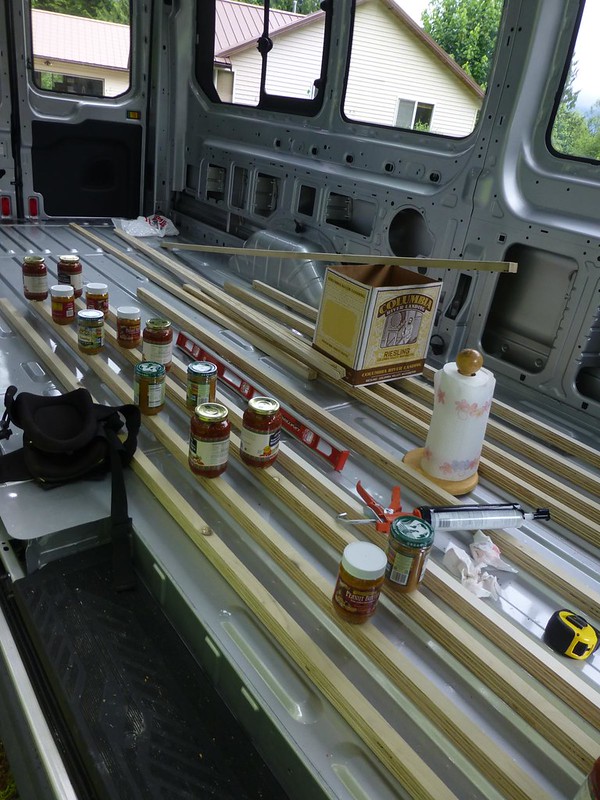
I removed the wall panels & started floor construction.
The floor will consist of 1.5" thick joists glued to the Transit's floor ribs, rigid foam insulation glued between the joists, a Reflectex blanket, then .5" plywood panels screwed into the joists. There will be PEX lines running through, possibly a gray water line as well, one propane line, and some wiring in electric conduit.
I will cut or notch the joists once I have line locations settled.
The joists are made from 1" rips of a 3/4" ply sheet. Two ripped strips are glued together.
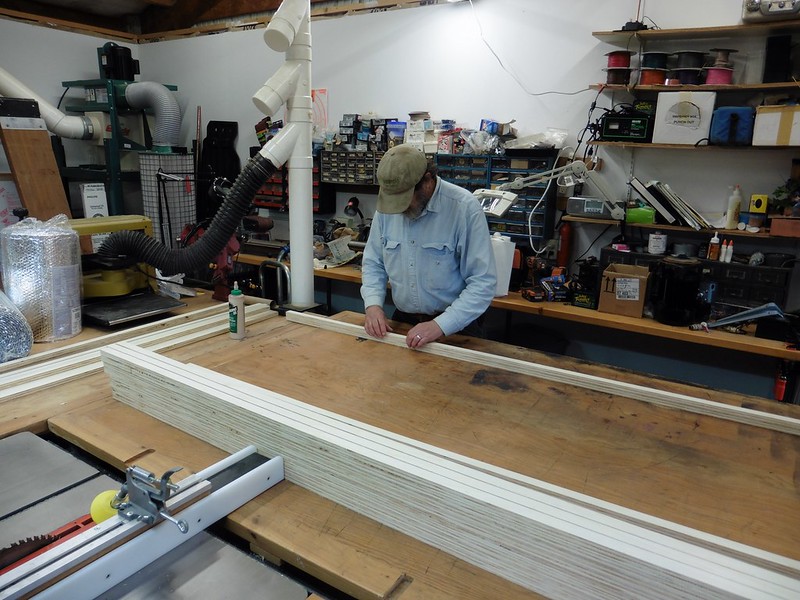
Starting to glue in the strips. I'm using silicon to keep the joint flexible. I have a silly theory that the impedance mismatch between the joists and the metal floor will aid in reducing road noise coupled to & through the plywood floor. The flexibilty of the glue should aid here (if I'm not just being silly.)
Children are starving just so I can hold down the joists while the glue sets up. 
It'll be dry for the next few days and the panels and tank have arrived. Tomorrow, I'll finish the joists, then start looking at the solar.
Now it's tomorrow, and the floor joists are in.
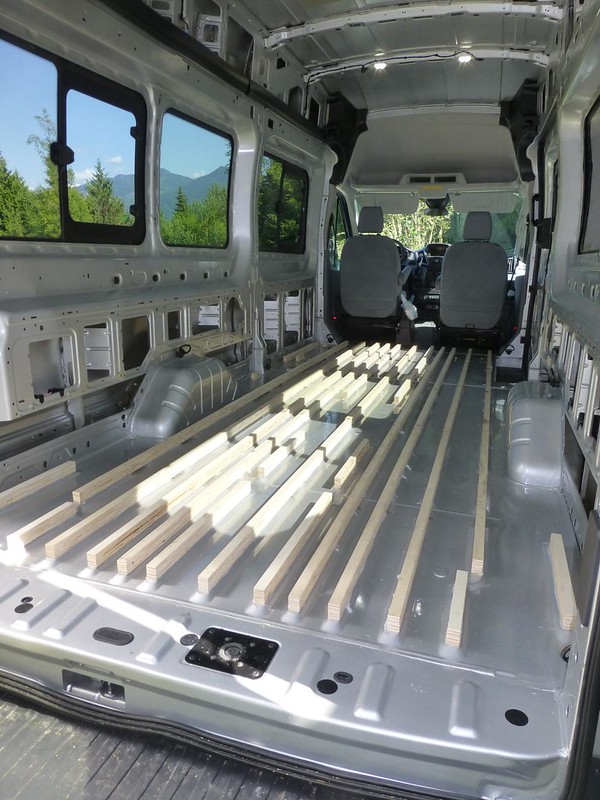
I'll be adding some additional support joists in the floor valley around the perimeter
__________________
Turning a 2015 Ford Transit into a camper. Her name is Annie.
You can watch it all happen here:
https://anniebuild.blogspot.com/
Now, with trip reports!!!!
|
|
|
|
|
06-06-2015, 01:32 AM
|
#7
|
|
Platinum Member
Join Date: Sep 2012
Posts: 978
|
Thank you for these pictures. This definitely will be a help and gives me ideas for when I go for a Transit upfit.
|
|
|
|
|
06-06-2015, 06:53 AM
|
#8
|
|
Platinum Member
Join Date: May 2015
Location: San Diego
Posts: 320
|
I love your attention to detail. Looks great. Is the reason for the subfloor just to run propane, fresh and grey lines?
|
|
|
|
|
06-06-2015, 12:03 PM
|
#9
|
|
Platinum Member
Join Date: Oct 2006
Location: New Brunswick, Canada
Posts: 8,828
|
Radius edges, painting bare metal after the cutout - nice work! That's an advantage of DIY. You get to take care of the details.
I really like your floor joist idea. That will make it easier to route plumbing & electrical etc. to either side of the coach and also keep it all inside the van.
|
|
|
|
|
06-06-2015, 12:37 PM
|
#10
|
|
Platinum Member
Join Date: Dec 2014
Location: East of world famous Sedro Woolley, west of Concrete
Posts: 210
|
Quote:
Originally Posted by Jostalli

I love your attention to detail. Looks great. Is the reason for the subfloor just to run propane, fresh and grey lines?
|
Thanks all!
Another major reason is to provide non-load bearing space for the rigid foam insulation and Reflectex that will go in between the joists.
__________________
Turning a 2015 Ford Transit into a camper. Her name is Annie.
You can watch it all happen here:
https://anniebuild.blogspot.com/
Now, with trip reports!!!!
|
|
|
|
|
06-06-2015, 07:07 PM
|
#11
|
|
Platinum Member
Join Date: Jun 2012
Location: SoCal
Posts: 792
|
Rock on my brother.
|
|
|
|
|
06-06-2015, 08:24 PM
|
#12
|
|
Platinum Member
Join Date: May 2014
Location: Greer, South Carolina
Posts: 2,611
|
Really exciting stuff! Keep us posted.
|
|
|
|
|
06-07-2015, 03:55 AM
|
#13
|
|
Platinum Member
Join Date: Dec 2006
Location: Kansas City, Ks. Suburb
Posts: 896
|
What wincrasher said....good to see you over here from the Transit forum
__________________
Bob & Sharon
2019 Winnebago Travato K (2018 Chassis)
Past RV's: 2013 WGO ERA 70A, Chevy PW Lexor
Itasca Navion, 29' Jayco 5th Wheel
|
|
|
|
|
06-08-2015, 02:33 AM
|
#14
|
|
Platinum Member
Join Date: Sep 2012
Posts: 978
|
Excellent reading. I wonder a few things:
What did you use for anti-rust around the edges when cutting out the rooftop fan?
Also, I assume this is a high-roof van? I do like how you raise the floor an inch or so. That provides not just room for insulation, but you can do some pretty clever systems for wiring, LP gas routing, and plumbing. One Sportsmobile upfit had a shunt from the water heater that fed back into the FW tank, so when it was cold, there was some recirculation happening at all times. Of course, the insulation possibilities are excellent. Hushmat/Dynamat/FatMat, Styrofoam sheeting, and Reflectix all come to mind for that.
|
|
|
|
|
06-13-2015, 02:41 PM
|
#15
|
|
Platinum Member
Join Date: Dec 2014
Location: East of world famous Sedro Woolley, west of Concrete
Posts: 210
|
Quote:
Originally Posted by mlts22
Excellent reading. I wonder a few things:
What did you use for anti-rust around the edges when cutting out the rooftop fan?
Also, I assume this is a high-roof van? I do like how you raise the floor an inch or so. That provides not just room for insulation, but you can do some pretty clever systems for wiring, LP gas routing, and plumbing. One Sportsmobile upfit had a shunt from the water heater that fed back into the FW tank, so when it was cold, there was some recirculation happening at all times. Of course, the insulation possibilities are excellent. Hushmat/Dynamat/FatMat, Styrofoam sheeting, and Reflectix all come to mind for that.
|
I had a can of some Rustoleum anti-rust black paint sitting around. I used that.
Yes Annie is high roof, and I will be running utility lines in the floor space.
Stan
__________________
Turning a 2015 Ford Transit into a camper. Her name is Annie.
You can watch it all happen here:
https://anniebuild.blogspot.com/
Now, with trip reports!!!!
|
|
|
|
|
06-13-2015, 02:42 PM
|
#16
|
|
Platinum Member
Join Date: Dec 2014
Location: East of world famous Sedro Woolley, west of Concrete
Posts: 210
|
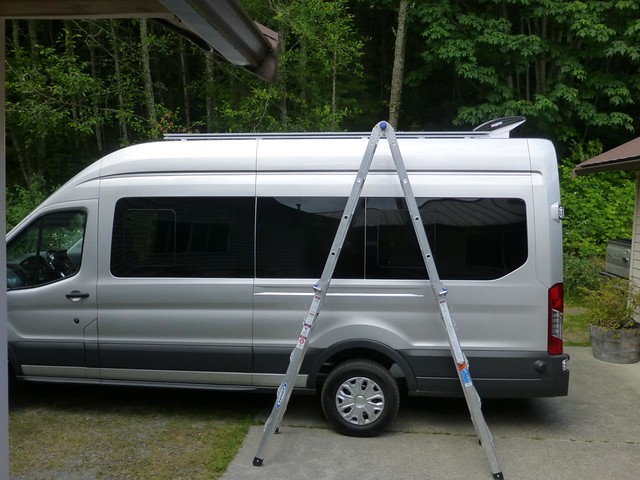
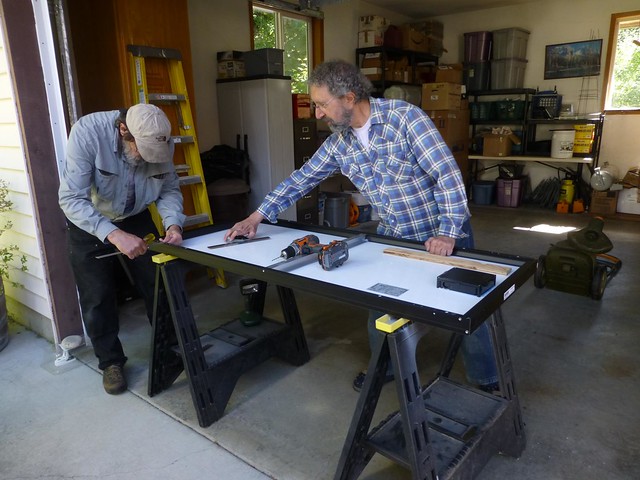
For the last few day's I've been working on mounting the solar panels.
There will be 4 Kyocera KD-140SX panels
The panels are about 27"x 59". According to calculation, the 59" direction fits nicely across the roof, without any overhang. Four of the panels widths fit nicely aft of the drivers compartment, and before the rear fan.
First step is figuring out how to mount the panels in real life.
The solar panels need to clear the roof line.
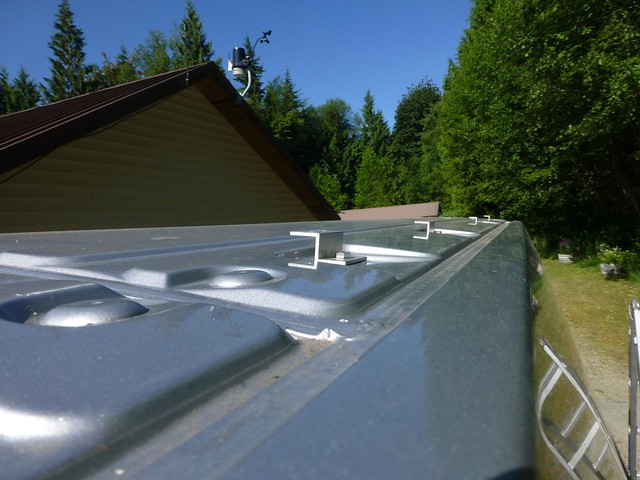
Clearly, the Z brackets provided with the panels won't make it.
But they will nicely support some kind of rail.
We are going to use 10' lengths of barn-door channel from Lowe's. This will allow about .5" to .75" panel clearance above the roof high point.
Measure, then drill the channel for attachment to the Z brackets.

Assemble the brackets and channels, then dry fit. Everything is bolted together, with Nylock nuts. It was a bitch to get a wrench to hold the nuts inside the channel
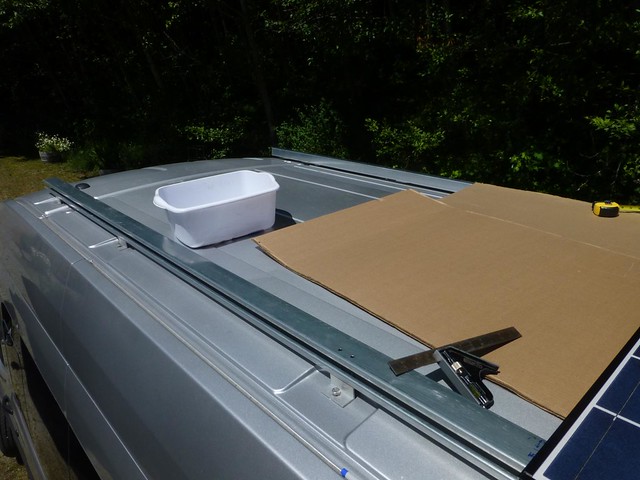
Measure to drill Panel hole mounts in the channel

__________________
Turning a 2015 Ford Transit into a camper. Her name is Annie.
You can watch it all happen here:
https://anniebuild.blogspot.com/
Now, with trip reports!!!!
|
|
|
|
|
06-13-2015, 02:44 PM
|
#17
|
|
Platinum Member
Join Date: Dec 2014
Location: East of world famous Sedro Woolley, west of Concrete
Posts: 210
|
Of course, there are always gotcha's. In this case, the Transit L&R rack mount points are not parallel to each other. The mount points are flatter than the roof curve, so why couldn't they have gone all the way and made 'em almost flat??
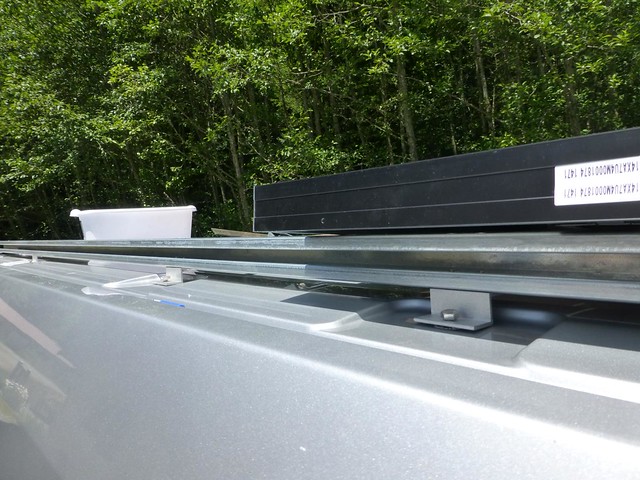
So we'll need to add shims. I'll do some thin shimming at the roof, and some thing thicker between the panels and the channels. I want to add some amount of cushion between the panels and the channels.
The channels are primed, painted, and installed in line with my philosophy that "You can't have too much lap sealant"
Pre-installed the bolts for the panels, 'cause they are too long to do later.
I was happy to avoid cutting holes or drilling into the roof. Annie is getting ready to channel power, and is hopefully immune to holey water.
Next step will be to drill and pre-wire the panels, in prep for installation on the roof.
Stan
__________________
Turning a 2015 Ford Transit into a camper. Her name is Annie.
You can watch it all happen here:
https://anniebuild.blogspot.com/
Now, with trip reports!!!!
|
|
|
|
|
06-14-2015, 02:07 AM
|
#18
|
|
Platinum Member
Join Date: Oct 2006
Location: New Brunswick, Canada
Posts: 8,828
|
Dicor right? It'll keep shrinking and soon won't look like too much I bet 
|
|
|
|
|
06-15-2015, 10:04 PM
|
#19
|
|
Platinum Member
Join Date: Dec 2014
Location: East of world famous Sedro Woolley, west of Concrete
Posts: 210
|
Installing the solar panels
Started installing the solar panels .
First steps are to measure and drill the mounting holes. My buddy Mike (visiting from California) has been assisting during the whole project.

Then wire up the panel (first pre-measure the wire length)
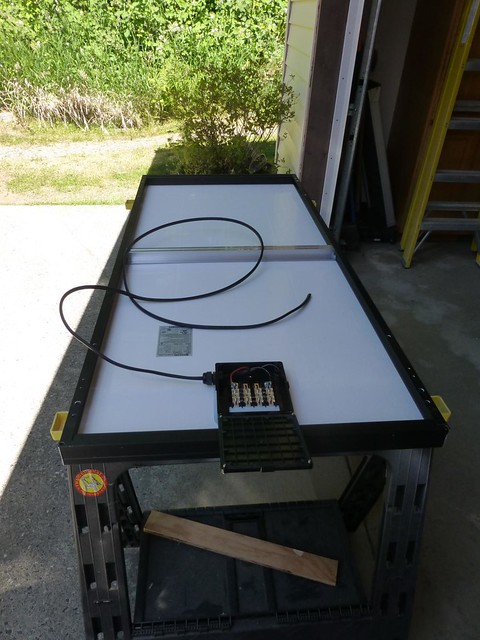
First panel is mounted (not tightened). I was VERY relieved that our hole measurements worked out!
__________________
Turning a 2015 Ford Transit into a camper. Her name is Annie.
You can watch it all happen here:
https://anniebuild.blogspot.com/
Now, with trip reports!!!!
|
|
|
|
|
06-15-2015, 10:07 PM
|
#20
|
|
Platinum Member
Join Date: Dec 2014
Location: East of world famous Sedro Woolley, west of Concrete
Posts: 210
|
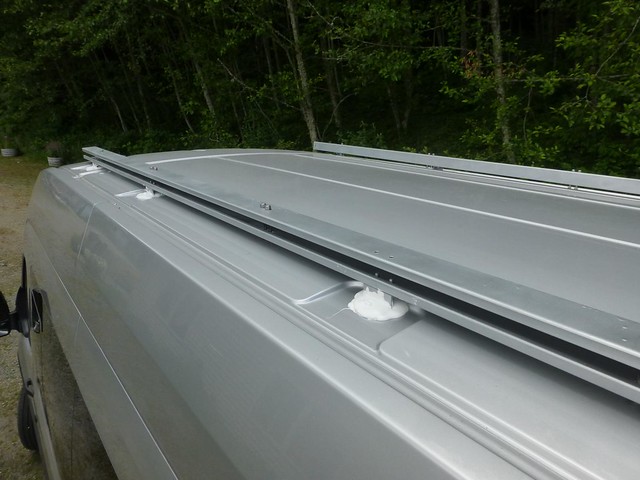
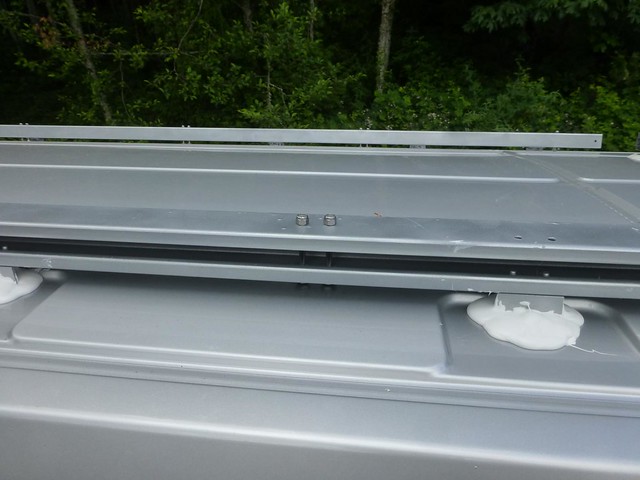
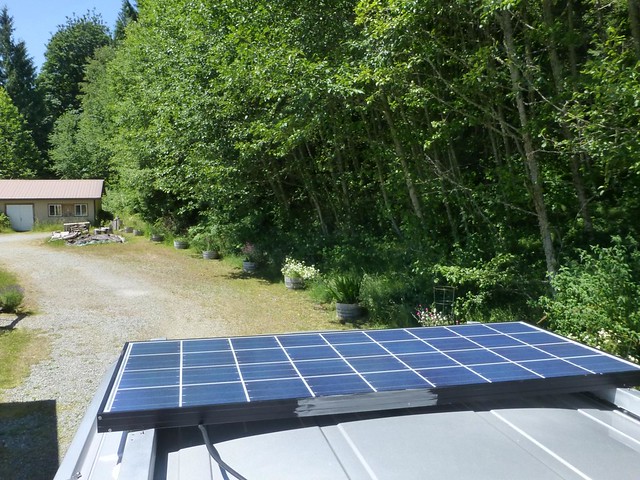
Three panels are in. The downfeed gland is also installed. There will be a combiner box under the last panel. Its output line will go to the downfeed. The hole in the roof was just a tiny bit too small to fit a standard .5" conduit thread. Must be metric. Anyway, I enlarged it to 13/16" with a hole punch, which nicely fits the conduit.
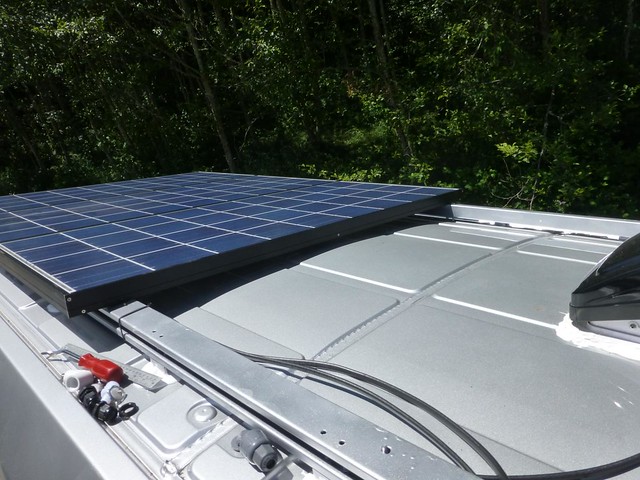
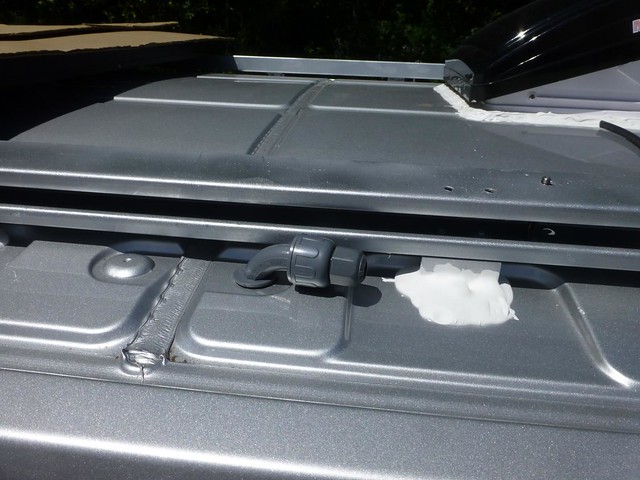
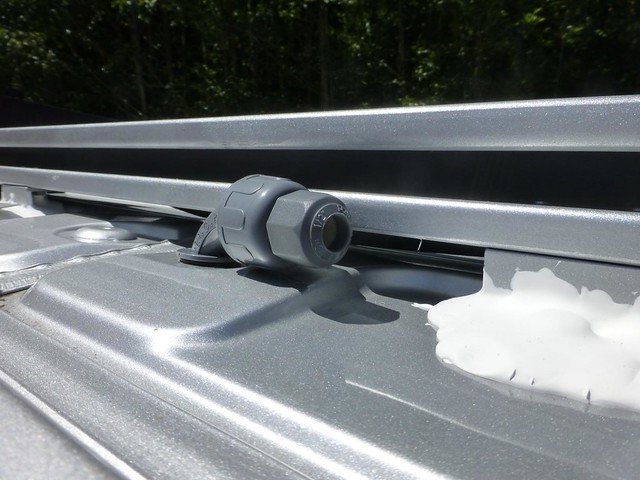
I modified a waterproof bulkhead angle conduit coupler and a wire gland to make the downfeed gland. I didn't want the gland facing up to reduce the chance of leaks. Also, there was not enough clearance between a vertical gland and the rack channel.
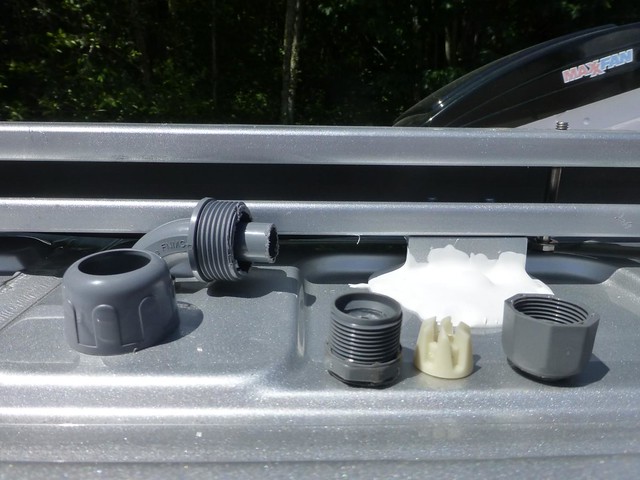
The downfeed assembled It still need lap sealant, but that will wait until the cable is run.
Next steps are to install and wire in the combiner box aft of the last panel, install that panel, shim the panels, and tighten 'em down.Originally, I was going to place the combiner under the last panel, but I decided it was a better idea to leave it accessible.
__________________
Turning a 2015 Ford Transit into a camper. Her name is Annie.
You can watch it all happen here:
https://anniebuild.blogspot.com/
Now, with trip reports!!!!
|
|
|
|
|
|
| Thread Tools |
|
|
| Display Modes |
 Linear Mode Linear Mode
|
 Posting Rules
|
You may not post new threads
You may not post replies
You may not post attachments
You may not edit your posts
HTML code is Off
|
|
|
|
 » Recent Threads
 |
|
|
|
|
|
|
|
|
|
|
|
|
|
|
|
|
|
|
|
|
|
|
|
|
|
|
|
|
|
|
|
|
|