 |
 09-10-2018, 04:34 AM
|
#1
|
|
Platinum Member
Join Date: May 2018
Location: California
Posts: 331
|
 Hitch Mounted Cargo Carrier
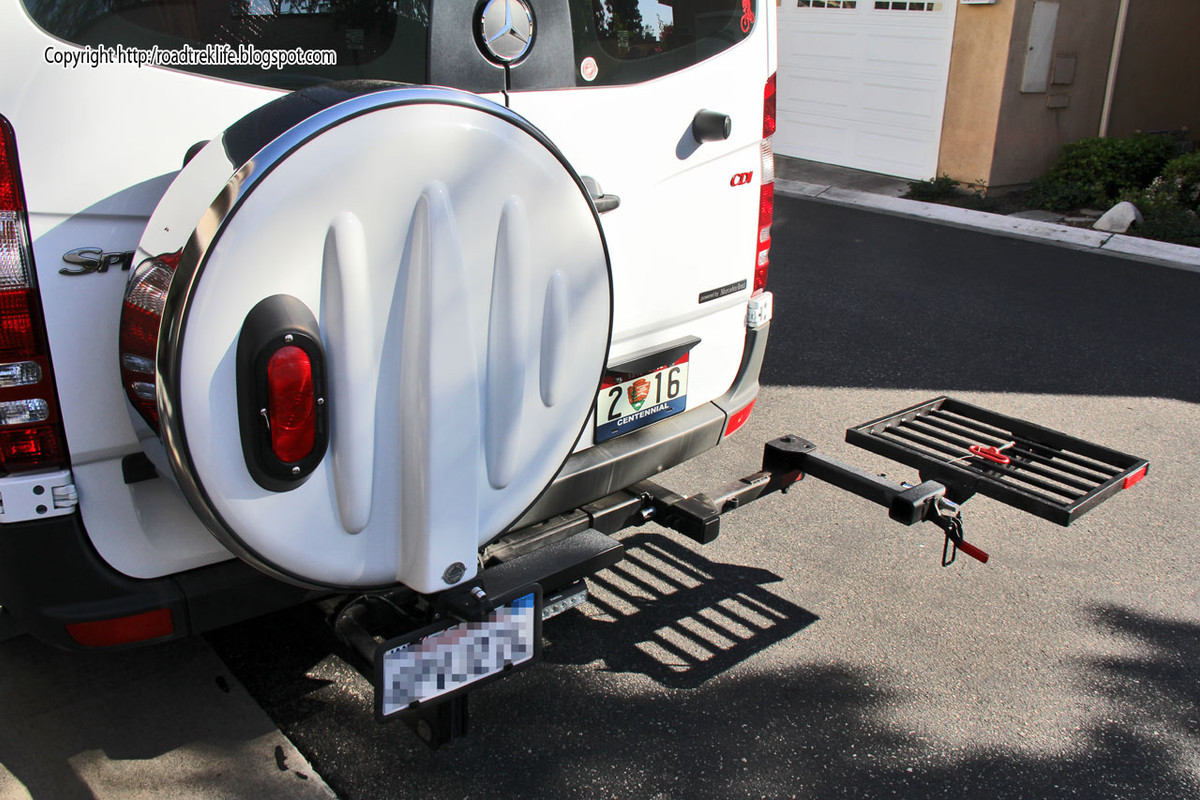
It's been an iterative process, but I now have a hitch mounted cargo carrier that I'm happy with.
I purchased an inexpensive 500-lb rated unit from Harbor Freight, along with their nylon cargo carrier. Initially, I had a problem: the cargo carrier wouldn't fit into the hitch receiver deeply enough to engage the locking pin because the continental kit spare tire was in the way. A Curt hitch extender fixed that issue.
Then, when I fully loaded the cargo carrier, I obscured the license plate. So, I added an illuminated trailer license plate holder to the cargo carrier and wired it into the 7-wire plug on the RV. Now, when I need to fully load the carrier, I move the license plate to the carrier to remain legal.
I use the carrier to haul chairs, a table, rugs, and outdoor cooking equipment including a small LPG tank and a stove. This is all stuff I unload first anyway, which is a good thing because when the carrier is loaded, I can't open the back door wide enough to escape a fire.
I estimate the weight I'm carrying back there to be about 150-lbs, and it has no noticeable effect on vehicle handling. As this is all stuff I carry anyway; I've added no weight to the rig.
|

|

|
|
09-10-2018, 11:45 AM
|
#2
|
|
Platinum Member
Join Date: Oct 2017
Location: Ontario
Posts: 449
|
I bought a similar one - in aluminum, quite light wt. I will only carry about 75# of light wt stuff but will be using in in combination with a four bike RV approved hanging type carrier.
Everything will be on a 350# capacity swinging Wilco Off Road "Hitchswing" that I have on order and all should be comfortably within rated capacities. Hope it works out ok - we get our new B van later this month!
I was concerned the license plate issue and am thinking that I might try to rig something up so that both on the van and on the back of the cargo carrier, the plate could be secured with a bunch of extra strong magnets to allow a quick switch - could be an annoyance otherwise! I would still put some screws on the plate to give it teh appearance of being fastened on! Should work ok - either magnets or industrial strength velcro!
I did wonder if I could buy an extra plate for the rack - but not sure that is possible - and even if it was, could be $$$ !
Brian.
|
|
|
|
|
09-10-2018, 12:16 PM
|
#3
|
|
Platinum Member
Join Date: Oct 2014
Location: League City, TX
Posts: 1,168
|
.
Picture?
|
|
|
|
|
09-10-2018, 12:46 PM
|
#4
|
|
Platinum Member
Join Date: May 2016
Location: East
Posts: 2,483
|
.
Be careful . . .
when you add an extender, the "calculated" weight is increased.
You do not have the same hitch capacity anymore.

__________________

|
|
|
|
|
09-10-2018, 03:37 PM
|
#6
|
|
Platinum Member
Join Date: Mar 2017
Location: Oklahoma
Posts: 438
|
Years ago I bought a hitch carrier at Walmart that was something like this:
https://www.walmart.com/ip/Highland-...Black/21801761
To fit our Roadtrek 210 and not wanting to use a hitch extender because it would have required an extension of about a foot to get past the continental kit on our model, I modified the carrier by cutting it down its length, moving the hitch tongue off center towards the spare tire and then adding a second tongue to the thing made out of 1" heavy square tubing on the other side of the carrier. Thus, I had a carrier that was only about 42 inches wide but full depth, cleared the side of the continental kit and allowed the carrier to be up close to the bumper of the chassis.
I made a receiver for the 1" tubing out of 1 1/4 heavy steel tubing (found the tubing at Tractor Supply) and bolted it to the frame on the right side of the chassis.
I thus ended up with a carrier that only extended about five inches beyond the continental kit, was off center but supported by the original RT receiver and my new receiver on the right. When I had finished, I stood up on the carrier and my 185 pounds was just fine. My new custom carrier was about 42" by 19" as I recall. It was plenty strong to carry what I wanted to carry which was some bulky but not heavy things like a small screen house, my 8 gallon water carrier for camping, etc. I always just kept the weight under 60 or so pounds and it all worked perfectly.
I don't have any pictures and I quit using the carrier because we decided to B or not to B meant shrinking down our junk and we learned to carry less stuff. Given the fact that our 2007 RT 210P has twin beds, there is a large storage area accessible from the rear van doors and with the large outdoor storage compartment on drivers side and two smaller outside storage compartments, we learned to take less and hassle less.
I wish I had a picture to share but I don't have one. BBQ's point a couple of posts above is the very reason I built this contraption. The continental spare on a 190 or 210 (at least mine) adds almost a foot in length to the coach and an extender would then put a carrier way out there and add its depth as well, which is usually 18-20 inches.
Looking at the pictures of the Sprinter and its spare, it really appears to not be stuck out nearly as far as on on the 210 and an extender is probably not nearly as long as I would have needed.
|
|
|
|
|
09-10-2018, 03:53 PM
|
#7
|
|
Platinum Member
Join Date: May 2018
Location: California
Posts: 331
|
Quote:
Originally Posted by Doneworking

I don't have any pictures and I quit using the carrier because we decided to B or not to B meant shrinking down our junk and we learned to carry less stuff. Given the fact that our 2007 RT 210P has twin beds, there is a large storage area accessible from the rear van doors and with the large outdoor storage compartment on drivers side and two smaller outside storage compartments, we learned to take less and hassle less.
|
I like the "B or not to B" idea. I'm working to reduce the weight we carry by purging things we don't use and not carrying much water if we're not boon docking.
The problem I'm trying to solve is mainly volumetric. We hate the folding sling-type chairs and have more comfortable, but still lightweight chairs that take up space. I have a favorite place for them-- behind the rear seat back, between it and the rear doors-- but as soon as I fold down the bed, that space is gone. I've gotten in the habit of making the bed before we leave, so that space is no longer available. Having a place, elsewhere, to carry the chairs is ideal. Plus, now I no longer have to worry too much about whether the chairs are wet or dirty when I pack up to go.
I like your idea of trimming the width of a carrier, as you've done, but I really value the full size of the one I've gone with.
|
|
|
|
|
09-10-2018, 04:39 PM
|
#8
|
|
Platinum Member
Join Date: Mar 2017
Location: Oklahoma
Posts: 438
|
rvsprinterguy, there is no question if my spare was mounted like yours in your picture I would have done what you did. I modified out of necessity and the narrow result met our needs but was a significant compromise. But, if anyone has a RT 190 or 210 and has the continental spare (which most do have) it is a thought and solution that will work but it is certainly not ideal.
By the way, we bought these chairs a few years ago and really like them. They fit nicely underneath the left twin bed from the outside of the van on the Chevy 210.
https://www.harborfreight.com/foldab...air-62314.html
We had a couple of these in different sizes we also used on the carrier:
https://www.amazon.com/Rubbermaid-11...ox+-+48+gallon
We had heavier, better made chairs but they just took up too much room. We sometimes put them in a plastic construction waste bag (to protect the walls and floor) and put them in the bathroom for transit if we are not going too far.
|
|
|
|
|
09-10-2018, 04:58 PM
|
#9
|
|
Silver Member
Join Date: Nov 2011
Posts: 59
|
Quote:
Originally Posted by Doneworking
To fit our Roadtrek 210 and not wanting to use a hitch extender because it would have required an extension of about a foot to get past the continental kit on our model, I modified the carrier by cutting it down its length, moving the hitch tongue off center towards the spare tire and then adding a second tongue to the thing made out of 1" heavy square tubing on the other side of the carrier. Thus, I had a carrier that was only about 42 inches wide but full depth, cleared the side of the continental kit and allowed the carrier to be up close to the bumper of the chassis.
|
I have same off center cargo carrier that swings out to allow opening of the rear doors, all DIY though. The carrier only extends few inches past the Continental spare tire carrier.

|
|
|
|
|
09-10-2018, 05:56 PM
|
#10
|
|
Platinum Member
Join Date: Dec 2017
Location: Arizona
Posts: 1,138
|
RT.SS
You mention that it's all DIY, but did you start with a particular, commercially available carrier and modify it? Or is it a ground-up DIY? It's exactly the type of storage that I'm looking for.
thx.glenn
|
|
|
|
|
09-10-2018, 07:35 PM
|
#11
|
|
Silver Member
Join Date: Nov 2011
Posts: 59
|
Quote:
Originally Posted by GallenH
You mention that it's all DIY, but did you start with a particular, commercially available carrier and modify it? Or is it a ground-up DIY? It's exactly the type of storage that I'm looking for.
thx.glenn
|
It is all ground-up DIY. The swing-out arm is part of my fabricated hitch mounted vertical bike carrier, which I posted here: Click here.
The offset mounted hitch receiver and carrier build: Click here.
|
|
|
|
|
09-16-2018, 04:15 PM
|
#12
|
|
Gold Member
Join Date: Feb 2017
Location: Los Angeles, CA
Posts: 97
|
Ohh, nice build. I don’t have the tools or skills to weld up something like that.
|
|
|
|
|
09-16-2018, 04:32 PM
|
#13
|
|
Gold Member
Join Date: Feb 2017
Location: Los Angeles, CA
Posts: 97
|
For the plate I got two steel license plate brackets. I installed one in the plate cutout on the van and another one onto the hitch carrier.
Dorman Help! 68148 Front License Plate Bracket https://www.amazon.com/dp/B000CO7DZ4..._l4NNBb4JZAN48
I got a set of those magnets that the car dealers use to attach temporary plates:
Two (2) Rubber Coated Magnetic License Plate Holder, Magnet, Tag, Plate, Test Drive, Dealer https://www.amazon.com/dp/B01KGAS5JQ..._K6NNBb2XE83XG
When I want to switch the plate I pull it off and move it.
I thought it would make the plate look more inviting the thieves, but it looks exactly the same. You can’t see that it’s magnetically mounted at all. Just for funzies I’ve considered putting some high-security screws on there 
Picture one shows the steel bracket screwed into the plate cutout. Picture two shows the magnets. Picture three shows how it looks normally.
|
|
|
|
|
09-16-2018, 04:41 PM
|
#14
|
|
Platinum Member
Join Date: Oct 2014
Location: League City, TX
Posts: 1,168
|
There are a number of threads on this topic; I've previously posted this pic below, but let me do it again for the benefit of later readers.
We, too, did a total DIY hitch carrier to fit our specific needs (instructions here). It variably carries our Yeti cooler, chain saw gasoline can (that's on a sub-bracket that can be totally unscrewed and removed if necessary), pressure washer, or other mechanical equipment on the street side.
The flat part in front of the curbside door is a permanent back door step, or bulk equipment can be lashed to it. At the campsite, it makes a nice table or seat or above-ground storage space. I call it my "back porch" because I often sit inside the back door with my feet on it.
I had originally been sold on the swing-away concept, but after assessing our needs more closely, we fabbed this instead. I'm so glad! This works much better for multiple applications.

|
|
|
|
|
09-16-2018, 08:22 PM
|
#15
|
|
Bronze Member
Join Date: Oct 2017
Location: Lost State of Franklin
Posts: 44
|
Here is the one I built for the front but it would work on the back also. I had a cross the bed tool box not in use and bought the aluminum open carrier Harbor Freight sells for parts. It is shown on an F250 but I have since moved it to an E250 Jayco, I just haven't taken new pictures.
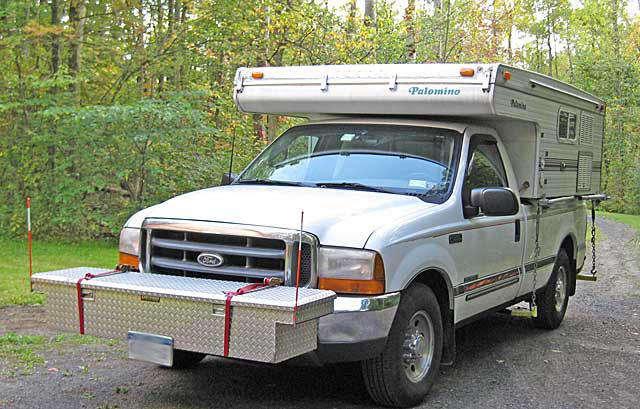
The extra straps are to stabilize the box and transfer some of the weight to the bumper. On the E250 they go from the top of the bumper to the chain loops on the front hitch.

Here is the inside of the box and the main part I used from the HF carrier. I put a plate on the outside bottom to reinforce the mount. The square holes on the front and back for the hitch mount were cut in with a plasma cutter by a friend.
I added some small steel skid feet so it sat flat when it was off the truck and could be slid a round on hard surfaces.
Jim...
|
|
|
|
|
09-17-2018, 02:08 PM
|
#16
|
|
Platinum Member
Join Date: May 2018
Location: California
Posts: 331
|
[QUOTE=InterBlog;81065]There are a number of threads on this topic; I've previously posted this pic below, but let me do it again for the benefit of later readers.
We, too, did a total DIY hitch carrier to fit our specific needs (instructions here).
Hi Interblog,
I just read your blog entries on your custom cargo carrier and rear door screen. Very impressive!
I've put together a bug screen for the side door using two "as seen on TV" magnetic screens cut and sewn together. It cost a bit more than what you estimate using your backdoor screen method would, but I skipped the hassle of sewing around strong magnets. I use strong velcro to attach the screen. The only magnets are the original ones holding the "door" together.
|
|
|
|
|
| Thread Tools |
|
|
| Display Modes |
 Linear Mode Linear Mode
|
 Posting Rules
|
You may not post new threads
You may not post replies
You may not post attachments
You may not edit your posts
HTML code is Off
|
|
|
|
 » Recent Threads
 |
|
|
|
|
|
|
|
|
|
|
|
|
|
|
|
|
|
|
|
|
|
|
|
|
|
|
|
|
|
|
|
|
|


