 |
|
 12-09-2010, 09:58 PM
|
#41
|
|
Platinum Member
Join Date: Mar 2008
Location: Gig Harbor, WA
Posts: 372
|
 Re: Photog's Lifted 2009 Roadtrek 190V
Thanks. 
If it is anything like the truck (and it may not be), the shocks stop the down-travel before it hits the stops. If that is true, you may be able to get another 1.5-2 inches.
__________________
Brian
2009 Roadtrek 190V, 5" lift - Build Thread
2004 Toyota 4Runner
2014 Honda CR-V
1965 Dodge Coronet 440
|

|

|
|
12-09-2010, 10:44 PM
|
#42
|
|
Platinum Member
Join Date: Aug 2010
Location: Minnesota
Posts: 11,987
|
Re: Photog's Lifted 2009 Roadtrek 190V
Although we only have about 1000 miles on it since the lift (to normal height), I have not noticed any issue with the drop travel being to small. If it is like all the other vehicles I have had, if you wind up at full drop in the front, you hear the clunk (from a big dip or bump) and feel it shake the steering wheel. We haven't seen anything like that at all, so I think we are good with that amount.
|

|
|
|
12-11-2010, 10:39 PM
|
#43
|
|
Platinum Member
Join Date: Aug 2010
Location: Minnesota
Posts: 11,987
|
Re: Photog's Lifted 2009 Roadtrek 190V
Update on the sway bar install. The bar fit very well into the brackets I had previously located using a wooden dowel. Cleared the diffy, and all the other various things that are in the way with plenty of room
I put on the arms at normal ride height, parallel to the ground, and then let the axel drop to maximum drop, to see if the arms would hit the axle tube and need to be jogged around them. The arms cleared the axle tubes by about 3/8" when I rotated them back up to where the end links would hold them, so no cutting and welding on the arms needed, woohoo!.
I made end mounts for the links to go on the arms, and brackets to hold the other end of the links to mount to the frame. The only holes that needed to be drilled were 3 on each side to mount the end link brackets to the inside face of the van frame (a huge pain to drill and tap on the drivers side because of the gas tank location).
At the end of today, the bar is completely in place, with arms and end links mounted and attached. The fit is good and was very consistent side to side, as long as I had 10 psi more in the passenger airbag than the drivers side. (it is how we need to run to be level, also, so that is a good thing). The end links tighten up at the identical distance, so no bar preload to worry about.
Everything is just tack welded and rough cut, so I have a bunch of welding, gusseting, cutting, and grinding to do to get the finished parts to paint, but it is now almost certain that the bar will fit, and hopefully function, as I had anticipated.
I will get pics and description put together when I finish the parts and do the final install.
|
|
|
|
|
12-13-2010, 05:22 PM
|
#44
|
|
Platinum Member
Join Date: Mar 2008
Location: Gig Harbor, WA
Posts: 372
|
Re: Photog's Lifted 2009 Roadtrek 190V
Wow, that sounds great!! 
Now I really want to see pics of the whole set up. It sounds complex, but clean.
Oh, the anticipation is as bad a Christmas.
__________________
Brian
2009 Roadtrek 190V, 5" lift - Build Thread
2004 Toyota 4Runner
2014 Honda CR-V
1965 Dodge Coronet 440
|
|
|
|
|
12-14-2010, 04:44 PM
|
#45
|
|
Platinum Member
Join Date: Aug 2010
Location: Minnesota
Posts: 11,987
|
Re: Photog's Lifted 2009 Roadtrek 190V
OK--here we go!
Paint dried, so I put the bar back in today. Looks good so far.
Here is what the bar assembly looks like assembled on the bench.

Closeup of the diffy mount.

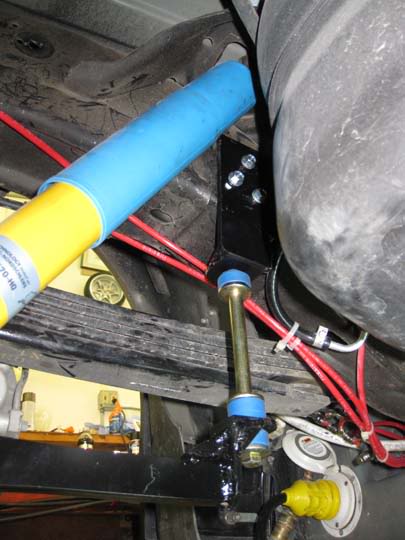
Closeup of link.

Diffy mount in place.

Then add the bar and mounts.

Upper mount on the passenger side.

Drivers side, these were really tough to drill and tap because of the gas tank.

Add the arms.

With links drivers side.

Passenger side.

Front mount detail.

Other side.
Diffy clearance.

Closeup.

Side/rear view drivers side.

Swaybar, airbags, Bilsteins all fit, passenger side.

Drivers side.

Side view from under.

Although it could have been done with the genny exhaust where it was, I wanted to move it anyway, as it came out right under a window we like to have open. I took the exhaust out the rear. It didn't take any new tubing, just cutting and reusing the existing stuff.


All that is left is to make a couple of plastic spacers to put between the arms and the mounts to keep the bar centered, grease up the bushings and links, and put on the nylok nuts in place of the regular ones I used for setup.
My net conclusion is that this is a very doable, but putsy, project. Not much for tools required. Hand tools, hacksaw, drills, small wire welder or stick welder. I have about 30 hrs total in it.
All in all, I think it turned out well. Hopefully, it will also work well. One good thing is that I can by bars that will drop right in with no modification, if I want to change rate.
|
|
|
|
|
12-14-2010, 05:08 PM
|
#46
|
|
Platinum Member
Join Date: Mar 2008
Location: Gig Harbor, WA
Posts: 372
|
Re: Photog's Lifted 2009 Roadtrek 190V
Jim,
That is sweet. Nicely done. 
Thanks for posting all the pics. Very helpful.
Now to see how it improves the road manners of the R/T.
I have been thinking about the genny exhaust also. I need to add the muffler to ours, and I can have the system re-routed at the same time. As I recall, the muffler is specific to the genny. Which muffler did you use?
If I can move the genny exhaust, I can tuck my swaybar up closer to the diffy, and out of harm's way. 2"-3" will make a lot of difference in that area.
__________________
Brian
2009 Roadtrek 190V, 5" lift - Build Thread
2004 Toyota 4Runner
2014 Honda CR-V
1965 Dodge Coronet 440
|
|
|
|
|
12-14-2010, 05:17 PM
|
#47
|
|
Platinum Member
Join Date: Aug 2010
Location: Minnesota
Posts: 11,987
|
Re: Photog's Lifted 2009 Roadtrek 190V
Quote:
|
Originally Posted by Photog
Jim,
That is sweet. Nicely done.
Thanks for posting all the pics. Very helpful.
Now to see how it improves the road manners of the R/T.
I have been thinking about the genny exhaust also. I need to add the muffler to ours, and I can have the system re-routed at the same time. As I recall, the muffler is specific to the genny. Which muffler did you use?
If I can move the genny exhaust, I can tuck my swaybar up closer to the diffy, and out of harm's way. 2"-3" will make a lot of difference in that area. |
The muffler on ours is the Onan specific resonator that they sell for the 2.8. It doesn't make the genny quiet by any measure, but it does take the nasty harshness out of the noise. I am hoping that aiming the outlet toward the ground will also mellow it a bit compared to horizontal and aimed right at our camping neighbors. I will also be removing a bit of rubber from the double hanging mount I used at the rear. Those mounts are designed to carry much more weight (automotive) so they are a bit stiff for this setup. Since the genny is free to "dance" within the case, I would think the exhaust mount should also be pretty loose and easy to move around.
|
|
|
|
|
12-16-2010, 04:19 PM
|
#48
|
|
Platinum Member
Join Date: Aug 2010
Location: Minnesota
Posts: 11,987
|
Re: Photog's Lifted 2009 Roadtrek 190V
Finished it off yesterday, spacers, grease, final tightening. Now the wait till spring to see if it helps.
Since everything is in place and fit, time to get rid of the previous airbags that were in the way of the swaybar.
These are the Firstone Sport Rite, 1000 miles on them, hoses and fill valves (from the Airlift kit). You shouldn't need any other parts to install, unless you want ot add a compressor. Fit Chevy Express.
Sell for 1/2 of the lowest price you can find them new.
|
|
|
|
|
12-23-2010, 06:31 PM
|
#49
|
|
Bronze Member
Join Date: Oct 2010
Posts: 21
|
Re: Photog's Lifted 2009 Roadtrek 190V
Wow, great info guys. I've been following this thread for a while now. I think this is next on my mod list, probably next spring. When everything is squared away would it be possible to post a final part list? I like the idea of replacing front/rear springs, front/rear shocks, rear swaybar, and brakelines for a 4 inch lift from factory sag.. have I got everything covered?
Thanks again,
-Chip
|
|
|
|
|
12-23-2010, 07:01 PM
|
#50
|
|
Platinum Member
Join Date: Mar 2008
Location: Gig Harbor, WA
Posts: 372
|
Re: Photog's Lifted 2009 Roadtrek 190V
Front springs will get you at least two inches (stock height), and maybe a custom set of coils could get you two more. That will be the hardest part.
I should have a suggestion for rear springs by then also. I am currently using a simple 4" block. I don't like blocks, and I don't like riding on the overload springs. I plan to solve both problems at the same time.
I would not recommend a 4" lift spindle. I will make mine work, but it is not going to be easy. Although, when I get 4x4 installed, my modified spindles will become available (in a couple years).
__________________
Brian
2009 Roadtrek 190V, 5" lift - Build Thread
2004 Toyota 4Runner
2014 Honda CR-V
1965 Dodge Coronet 440
|
|
|
|
|
03-01-2011, 07:11 PM
|
#51
|
|
Platinum Member
Join Date: Mar 2008
Location: Gig Harbor, WA
Posts: 372
|
Re: Photog's Lifted 2009 Roadtrek 190V
Updated the first post, with a set of Before/After images.
__________________
Brian
2009 Roadtrek 190V, 5" lift - Build Thread
2004 Toyota 4Runner
2014 Honda CR-V
1965 Dodge Coronet 440
|
|
|
|
|
03-11-2011, 02:55 AM
|
#52
|
|
Platinum Member
Join Date: Sep 2009
Location: Flathead Lake, Montana
Posts: 108
|
Re: Photog's Lifted Suspension 2009 Roadtrek 190V
Altho ya lost me on all the tech discussion.... I was interested to read that Roadtreks had/have an issue with low clearance black valve. I thought it was a Bigfoot flaw.... I nearly solved it with air bags. The air bags brought the van (Ford E-350) into a much nicer looking, level appearance instead of the rearward "slump" it had. Probably 2-3 inches higher in the rear. Previously, I had trouble just getting an elbow on the black drain. Now I can do it easily.
I also carry a few chunks of 2-4 to level the van in camp mode. When I need to dump, I drive the rear wheels up on a couple of these, to make elbow and hose attachment and drainage easier. Still not a pleasant chore.... Pass the rubber gloves, please.......
|
|
|
|
|
03-11-2011, 05:19 PM
|
#53
|
|
Platinum Member
Join Date: Mar 2008
Location: Gig Harbor, WA
Posts: 372
|
Re: Photog's Lifted Suspension 2009 Roadtrek 190V
As this Roadtrek project proceeds, we will be adding skid plate protection for the delicate underparts. To make the protection strong enough, we will probably loose at least an inch of clearance, adding the necessary structure.
Another issue with our model is that it is a 2008 Chevy van. The wheelbase is very long. So it does not take much of a hump, to high-center in the middle. This is why we want some decent protection in this area.
A typical Class C RV has great ground clearance, compared to a typical Class B. The 4x4 Sportsmobiles are an exception to this rule.
We intend to go places other than highways and RV campgrounds, but the DW was set on a Roadtrek, not a Sportsmobile.
This particular spot, just off a Forest Service road, was riddled with deep ruts, from a time when the ground was soggy. We were able to back into this spot for the night, without any problems. This would not have been possible before the 4" lift.

__________________
Brian
2009 Roadtrek 190V, 5" lift - Build Thread
2004 Toyota 4Runner
2014 Honda CR-V
1965 Dodge Coronet 440
|
|
|
|
|
03-11-2011, 08:40 PM
|
#54
|
|
Platinum Member
Join Date: Aug 2007
Location: Minnesota
Posts: 5,967
|
Re: Photog's Lifted Suspension 2009 Roadtrek 190V
The lowest clearance point on my Great West Van Legend is 7.5" were the generator exhaust pipe comes out. On my previous Pleasure-Way Plateau it was 8.5".
__________________
Davydd
2021 Advanced RV 144 custom Sprinter
2015 Advanced RV Extended body Sprinter
2011 Great West Van Legend Sprinter
2005 Pleasure-way Plateau TS Sprinter
|
|
|
|
|
03-11-2011, 08:45 PM
|
#55
|
|
Bronze Member
Join Date: Dec 2010
Posts: 23
|
Re: Photog's Lifted Suspension 2009 Roadtrek 190V
Photog you should read Amy and Erik Badger's blog if you haven't already.
http://www.badgertrek.com/
They did some serious 4x4 excursions.
He gives a lot of detail about adjustments, repairs and modifications. Mind you he had a Ford, built by Sportsmobile.
Also skim the blog, though there is great detail where he describes his van, there are additional tidbits in the blog.
|
|
|
|
|
03-11-2011, 09:00 PM
|
#56
|
|
Platinum Member
Join Date: Mar 2008
Location: Gig Harbor, WA
Posts: 372
|
Re: Photog's Lifted Suspension 2009 Roadtrek 190V
Quote:
|
Originally Posted by tontobird
Photog you should read Amy and Erik Badger's blog if you haven't already.
http://www.badgertrek.com/
They did some serious 4x4 excursions.
He gives a lot of detail about adjustments, repairs and modifications. Mind you he had a Ford, built by Sportsmobile.
Also skim the blog, though there is great detail where he describes his van, there are additional tidbits in the blog. |
Thanks Tontobird. I remember reading Badger's Sportsmobile (SMB) adventure on the Expedition Portal Forum. SMB was a little cranky, at first, that Badger posted all the negative info. Then SMB decided to correct all those problems, in their following builds. Now they ask owners for problem areas to correct, and now SMB is in a constant state of improvement.
The previous issues and lower build quality, is why the DW did not want a SMB. I think Sportsmobile
vans are made much better now, due largely to the Badgers.
A friend of mine has an SMB, and noticed an issues with the wiring in the cabinet that has the water pump. He is an electrician, so he corrected the problem, and made some recommendations to SMB. SMB implemented those changes in their next vans.
I have looked at my friend's SMB, as a reference for rear suspension upgrades for our R/T.
__________________
Brian
2009 Roadtrek 190V, 5" lift - Build Thread
2004 Toyota 4Runner
2014 Honda CR-V
1965 Dodge Coronet 440
|
|
|
|
|
03-11-2011, 11:45 PM
|
#57
|
|
Bronze Member
Join Date: Dec 2010
Posts: 23
|
Re: Photog's Lifted Suspension 2009 Roadtrek 190V
Yes, I did get the impression that Sportsmobile used the info from the various problems to make improvements to their product.
I wasn't suggesting that Sportsmobile was poorly built.or anything.
But the Badgers did some serious off-roading, and lived in their van for a few years in some pretty extreme weather conditions. I found their site very interesting and informative. For someone who does intend to go off-roading, there is plenty of information about what parts get badly stressed.
|
|
|
|
|
03-12-2011, 10:26 AM
|
#58
|
|
Platinum Member
Join Date: Sep 2009
Location: Flathead Lake, Montana
Posts: 108
|
Re: Photog's Lifted Suspension 2009 Roadtrek 190V
I was first attracted to the Westphalia idea, but they are a little too compact for me- I'm 5'10 barefoot. I couldn't see having to unfold "everything every night" to sleep. Also, no bathroom.
Then it was Sportsmobile, to be able to go "anywhere". But again the floor plans... have to unfold something to sleep and no bathroom. I read the Badger site-- they are the ones that inspired me to put a motorcycle carrier on the back.
Then it was Roadtrek, the Popular, for the big bed(s) and I searched and searched for one under $20K, that didn't have 150,000 miles or more on it...... no such animal.
Came across my Bigfoot , my price range, 35K miles, rear bed,that I leave made up all the time, and fully enclosed fiberglass bathroom.Ahhhhhh.....permanent bed, permanent bathroom/shower.
So I am willing to compromise on the lousy ground clearance.....
|
|
|
|
|
03-21-2011, 05:55 PM
|
#59
|
|
Platinum Member
Join Date: Mar 2008
Location: Gig Harbor, WA
Posts: 372
|
Re: Photog's Lifted Suspension 2009 Roadtrek 190V
Well, I have been mentally working on the issues with the bump-steer. Bump-steer is not the only geometry problem with these 4" spindles/knuckles. The upper end of the knuckle is also about an inch to low. In other words, the distance between the two balljoint points, is less than the stock knuckle.
To correct these issues, I will need a fab shop to cut a few weld, and move the upper balljoint point and the steering arm.
Since this will take some time, I decided to swap in a set of springs like Booster used, and the factory knuckles. This is good for at least 2". So I came down from a 4" lift, to a 2" lift (for now).
Getting everything apart was easy, compared to getting it all back together. I did it all in about 6 hours. If I did it again, it would take less than 4 hours. The new springs, from Otto-Max (part number TTC-1617), are beefy. The wire thickness is larger than the factory springs. Because of this, it was difficult to install the spring cushions (top & bottom).
Otto-Max Part # 1617 springs are now available from SDTruckSprings.com. They are much less expensive than ordering from OttoMax directly.
http://www.sdtrucksprings.com/index.php ... s_id=10169
There is not enough down-travel left, to install a 2" spacer lift (to get us back to 4").
Now it needs an alignment, and we will be good to go; although the van will be high in the tail, until I get the rear springs sorted out. After the alignment, I will park it on level ground, get a photo for this thread, and measure the actual changes.
More to come. I plan to have the lift spindles modified, and re install them, with the new springs, for a total of 6". That has been the goal, from the beginning. We will see how it turns out.
__________________
Brian
2009 Roadtrek 190V, 5" lift - Build Thread
2004 Toyota 4Runner
2014 Honda CR-V
1965 Dodge Coronet 440
|
|
|
|
|
04-05-2011, 07:38 PM
|
#60
|
|
Platinum Member
Join Date: Mar 2008
Location: Gig Harbor, WA
Posts: 372
|
Re: Photog's Lifted Suspension 2009 Roadtrek 190V
Update.
The alignment is done (yesterday), and we are ready to travel. It drives so much easier now. No bump-steer, and better scrub angles. Also, the front suspension is now off the bump-stops, is it rides much more smoothly.
The rear is still at 4" lift, and front at 2" lift. The tail-high look is not very noticeable, due to the long wheelbase.
I have a fab shop lined up to discuss the modifications to the 4" lift knuckle.
__________________
Brian
2009 Roadtrek 190V, 5" lift - Build Thread
2004 Toyota 4Runner
2014 Honda CR-V
1965 Dodge Coronet 440
|
|
|
|
|
|
 Posting Rules
|
You may not post new threads
You may not post replies
You may not post attachments
You may not edit your posts
HTML code is Off
|
|
|
|
 » Recent Threads
 |
|
|
|
|
|
|
|
|
|
|
|
|
|
|
|
|
|
|
|
|
|
|
|
|
|
|
|
|
|
|
|
|
|


 Linear Mode

