 |
|
 12-14-2006, 06:59 PM
|
#1
|
|
Platinum Member
Join Date: Oct 2006
Location: New Brunswick, Canada
Posts: 8,828
|
 Spare Tire Carrier Spring Lift
I read that Leisure Travel offers a spare tire carrier that is similar to Roadtreks Continental tire kit. I think I also read that you can get the Leisure Travel spare tire carrier with optional springs to help with the lifting and lowering. I could be wrong
Can anyone here confirm this?
Id love to see a photo of the Leisure Travel spare tire carrier with springs.
I wonder if I could add springs to my Roadtrek Continental tire kit?
Theyd have to be heavy duty and removable when/if you have to actually take the tire off. If not, the upright might spring back when the weight is removed.
It would be great if the springs reduced the effective weight of the spare tire when raising or lowering it.
Anyone have any ideas for this?
|

|

|
|
12-17-2006, 03:15 PM
|
#2
|
|
Platinum Member
Join Date: Oct 2006
Location: New Brunswick, Canada
Posts: 8,828
|
This is how I think the springs could be placed:

I'd put one on each side, sufficiently spaced so as not to scratch anything. They'd have to heavy duty. The tire is heavy.
Maybe a sliding bar could 'lock' the carrier in the down position so it wouldn't spring back when the tire is removed.
Anyone think this could work? Maybe it could reduce the effective weight of the tire by 50% ? ? ?
|
|
|
|
|
12-27-2006, 08:26 PM
|
#3
|
|
Platinum Member
Join Date: Oct 2006
Location: New Brunswick, Canada
Posts: 8,828
|
|
|
|
|
|
03-03-2007, 08:33 PM
|
#4
|
|
Platinum Member
Join Date: Oct 2006
Location: New Brunswick, Canada
Posts: 8,828
|
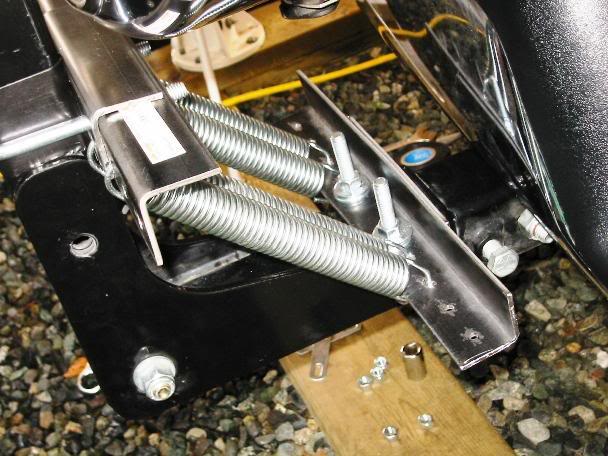
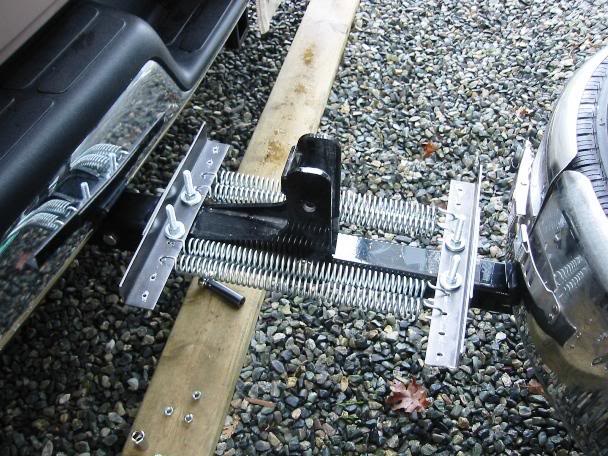
Adding springs to help lift the spare tire works great for me!
Please use caution if you try my idea. You need to be very careful as you are dealing with a lot of weight and a lot of tension on those springs. Trying this is done at your own risk, I'm not responsible for any damage, or injuries that may occur.
Fairly easy job. I did not have to weld anything or drill in Roadtrek's Tire Carrier.
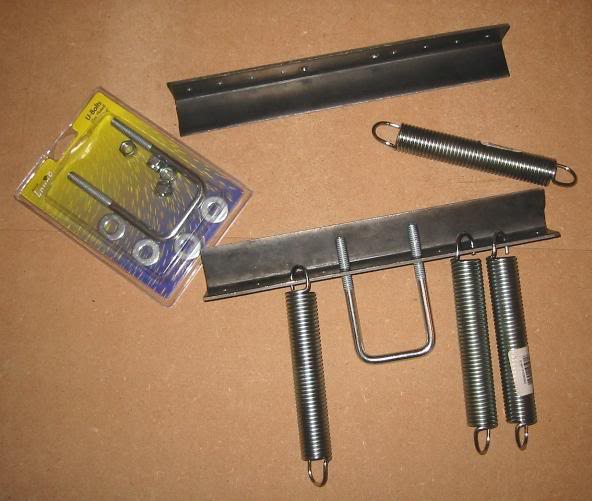
I picked up 4 awning springs from Camping World, a piece of angle iron from Home Depot and a package of heavy duty square U-bolts from a marine store. The square u-bolts are 3/8" thick.
I made it so that I could add more springs. I think I'll try two more when I can get them. Then I'll trim it smaller, clean it up and paint it.
|
|
|
|
|
03-03-2007, 08:36 PM
|
#5
|
|
Platinum Member
Join Date: Oct 2006
Location: New Brunswick, Canada
Posts: 8,828
|
I can raise and lower the tire with one hand! - and I'm a small guy.

My wife like it. It's much easier for her.
|
|
|
|
|
03-03-2007, 08:39 PM
|
#6
|
|
Platinum Member
Join Date: Oct 2006
Location: New Brunswick, Canada
Posts: 8,828
|
Two more springs for a total of six will probably be the most I'll add. It will get harder to lower with too many springs.
|
|
|
|
|
03-03-2007, 08:41 PM
|
#7
|
|
Platinum Member
Join Date: Oct 2006
Location: New Brunswick, Canada
Posts: 8,828
|
You probably could drive without the locking pin but I won't do that.....
|
|
|
|
|
03-03-2007, 08:44 PM
|
#8
|
|
Platinum Member
Join Date: Oct 2006
Location: New Brunswick, Canada
Posts: 8,828
|
I will add a sliding bar to lock it in the down position when removing the tire. It stays down no problem with the weight of the tire but it would "snap" back it you take the tire off.
|
|
|
|
|
03-03-2007, 08:47 PM
|
#9
|
|
Platinum Member
Join Date: Oct 2006
Location: New Brunswick, Canada
Posts: 8,828
|
I must repeat my words of caution. If you try this idea, please be careful as you are dealing with a lot of weight and a lot of tension on those springs. Trying this is done at your own risk, I'm not responsible for any damage, or injuries that may occur.
If I think of ideas to make it better or safer I will post them.
As noted above. Once I've determined the optimum number of springs I will trim off the excess angle iron, clean it up and paint it to make it look better.
|
|
|
|
|
03-03-2007, 09:25 PM
|
#10
|
|
Platinum Member
Join Date: Dec 2006
Location: Kansas City, Ks. Suburb
Posts: 896
|
Now that is a neat idea. Once it's cleaned up it will look factory too.
What do you think about maybe welding those new brackets onto the RT tire frame once you get it all figured out for length, spring number etc? Then it would look just like the factory did it originally!
Are the springs made of a material that won't corrode over time?? Maybe break in a couple years?
If not, check out this website: www.por15.com
They make some excellent coatings that are well known in the classic car restoration market. That's from personal experience.....
__________________
Bob & Sharon
2019 Winnebago Travato K (2018 Chassis)
Past RV's: 2013 WGO ERA 70A, Chevy PW Lexor
Itasca Navion, 29' Jayco 5th Wheel
|
|
|
|
|
03-03-2007, 09:28 PM
|
#11
|
|
Platinum Member
Join Date: Dec 2006
Location: Kansas City, Ks. Suburb
Posts: 896
|
Hey, maybe you ought to patent this! 
__________________
Bob & Sharon
2019 Winnebago Travato K (2018 Chassis)
Past RV's: 2013 WGO ERA 70A, Chevy PW Lexor
Itasca Navion, 29' Jayco 5th Wheel
|
|
|
|
|
03-03-2007, 10:49 PM
|
#12
|
|
Platinum Member
Join Date: Oct 2006
Location: New Brunswick, Canada
Posts: 8,828
|
Thanks bobojay.
I could see welding a bar on instead. Then you could get the springs on easy, just slip them on.
With the bolt on angle iron I had the springs in place then I tightened the nuts. The springs are loaded when the tire carrier is upright.
A welded solution would look good - maybe chrome springs !
I'd be happy to see others improvements to this idea. Hopefully they'll post them here.
I just took it off again - easy, only 4 nuts to remove. I don't want to leave it out until I get the angle iron painted so it doesn't rust. POR-15 looks interesting.
I probably have to use a spray protectorant on the springs to keep them from corroding. I think they are galvanized.
|
|
|
|
|
03-04-2007, 01:44 PM
|
#13
|
|
New Member
Join Date: Jan 2007
Location: Homosassa,FL
Posts: 3
|
Great Idea
Markopolo,
Your idea looks great. I too cannot raise the tire when it is down.
My new RT in now in the shop for some paint work. When I get it back I will try your idea.
Thanks again for the great job you do on this forum.
Joe
__________________
Joe and Betty
2007 Roadtrek 210 Popular
|
|
|
|
|
03-04-2007, 03:06 PM
|
#14
|
|
Platinum Member
Join Date: Nov 2006
Location: Virginia
Posts: 764
|
I first seen your idea on RV.Net, and believe you have really come up with something that will be a big assist to any B owners with that set-up. Thank you for sharing your ideas and posting the photos...others can throw in their two-cents and together we all will benefit from a great idea. We purposely avoid putting anything on that side of our RT, just because I hate wrestling that spare - not much longer, ha!! Thanks again, and thanks for a great website. Ron J. Moore
__________________
Ron J. Moore
'15 RT210P
|
|
|
|
|
03-05-2007, 02:34 AM
|
#15
|
|
Platinum Member
Join Date: Oct 2006
Location: New Brunswick, Canada
Posts: 8,828
|
Thanks for the feedback Joe & Ron.
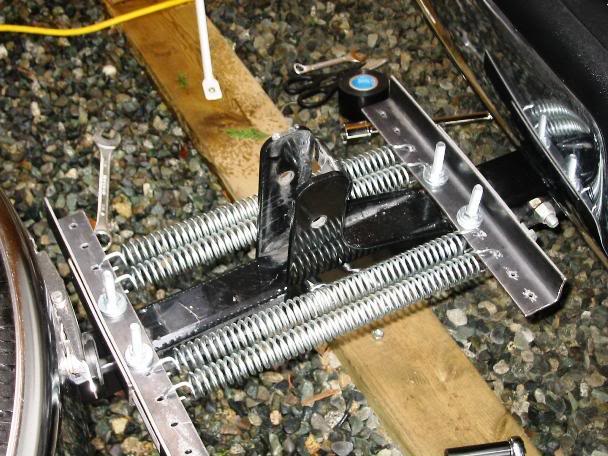
Just a bit more info for anyone who wants to do this. I put the springs on the brackets, then bolted the angle iron brackets in place.

In this next photo you can see I doubled up on the angle iron brackets where the bolts are. I had a piece left over so I figured I might as well use it.

Here's the package that the square u-bolts came in:

They are more heavy duty than what I saw in Home Depot.
I went to 3 local RV shops looking for 2 more awning springs. None in stock. Four springs work pretty good. Six springs might make it hard to initially get the tire moving down.
|
|
|
|
|
03-05-2007, 02:41 AM
|
#16
|
|
Platinum Member
Join Date: Dec 2006
Location: Ohio
Posts: 432
|
I'll add to the list, the idea looks good. I wll add a couple points.
You mentioned rusting, use stainless steel it is stronger anyway
You mentioned something in referance to safety, possibly a spring break. Put a moveable cover over the springs. If they break the cover can contain it. One side can slide inside the other one.
I would add one more comment. Is it on the side so you can open at least one back door from the inside with the tire up?
I have a Dodge with a single back door and it is mounted on the hinge.
|
|
|
|
|
03-05-2007, 03:00 AM
|
#17
|
|
Platinum Member
Join Date: Oct 2006
Location: New Brunswick, Canada
Posts: 8,828
|
Yes, the passenger side rear door opens when the tire is up. That door opens from the inside.
|
|
|
|
|
03-08-2007, 03:12 AM
|
#18
|
|
Platinum Member
Join Date: Dec 2006
Location: Kansas City, Ks. Suburb
Posts: 896
|
So how's the project going?
__________________
Bob & Sharon
2019 Winnebago Travato K (2018 Chassis)
Past RV's: 2013 WGO ERA 70A, Chevy PW Lexor
Itasca Navion, 29' Jayco 5th Wheel
|
|
|
|
|
03-08-2007, 01:11 PM
|
#19
|
|
Platinum Member
Join Date: Oct 2006
Location: New Brunswick, Canada
Posts: 8,828
|
It's on hold for the moment.
I can't find anymore springs locally so, if I want them, I'll have to order them. I should finish it using the 4 springs and just leave holes for the extra two.
Another note for anyone who wants to do this:
Position and fasten the angle iron on the upright post first. That piece has to clear the part of the tire carrier where the locking pin goes. It's easier to position it when there is no tension on it.
|
|
|
|
|
05-12-2007, 02:41 AM
|
#20
|
|
Platinum Member
Join Date: Oct 2006
Location: New Brunswick, Canada
Posts: 8,828
|
I trimmed the angle iron so that only 6 springs will fit (3 on each side) and also painted it when I painted the angle iron used to support my hitch mount generator box.
The finish coat didn't like the primer and cracked a little in a few areas. I probably put it on a bit too thick. Funny, the paint didn't crack on the angle iron used on the hitch mount. Same primer used as well. I think I'll go ahead and mount the tire lift springs then do a bit of touch up after.
|
|
|
|
|
|
| Thread Tools |
|
|
| Display Modes |
 Linear Mode Linear Mode
|
 Posting Rules
|
You may not post new threads
You may not post replies
You may not post attachments
You may not edit your posts
HTML code is Off
|
|
|
|
 » Recent Threads
 |
|
|
|
|
|
|
|
|
|
|
|
|
|
|
|
|
|
|
|
|
|
|
|
|
|
|
|
|
|
|
|
|
|


