 |
|
 06-17-2015, 12:04 AM
|
#21
|
|
Platinum Member
Join Date: Dec 2014
Location: East of world famous Sedro Woolley, west of Concrete
Posts: 210
|
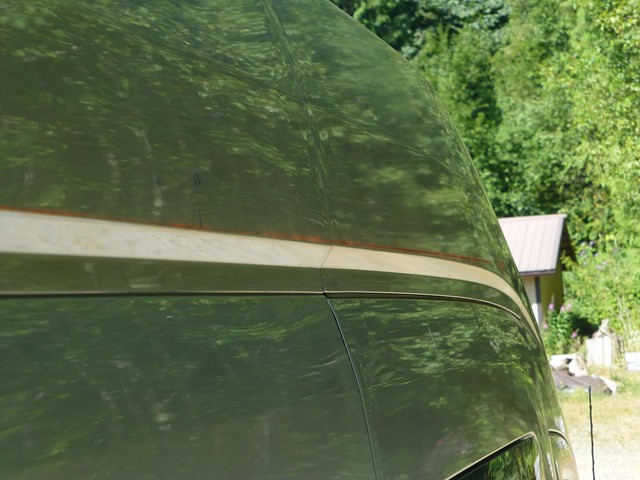
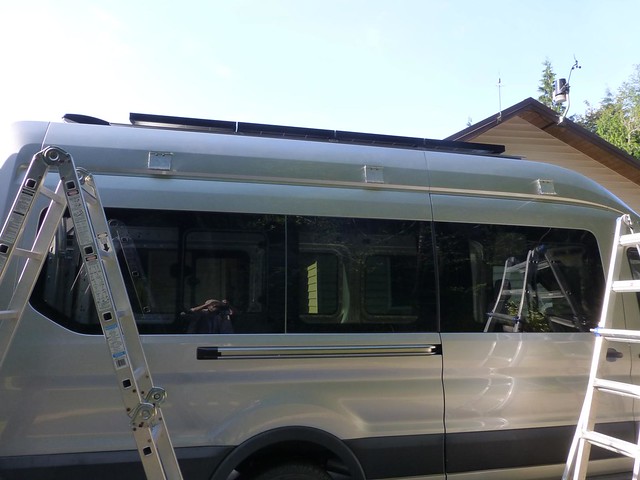
 Finalizing the panel installation (almost)
Yesterday and today I shimmed the panels, and wired them into the van.
I raised the panels with sticks of wood to get the shimming in. The shims are silicon.
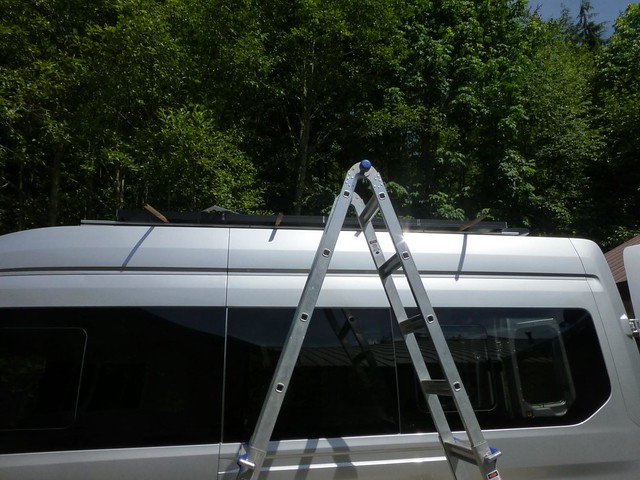
Shimming goes where the panel frames rest on the channel.
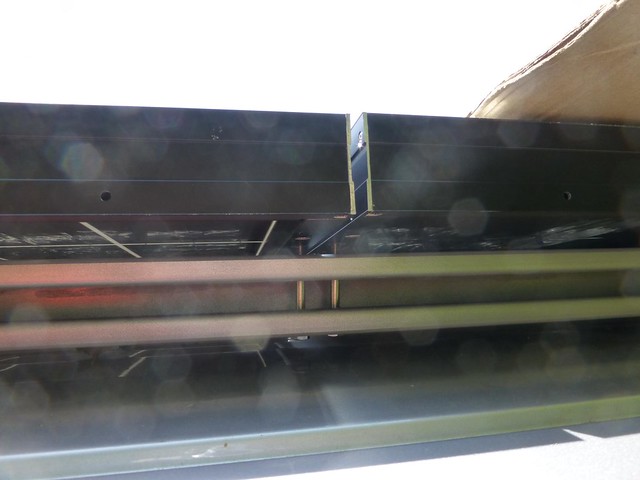
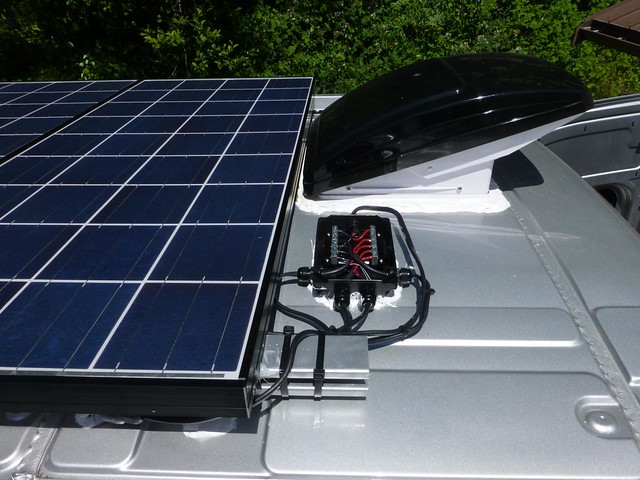
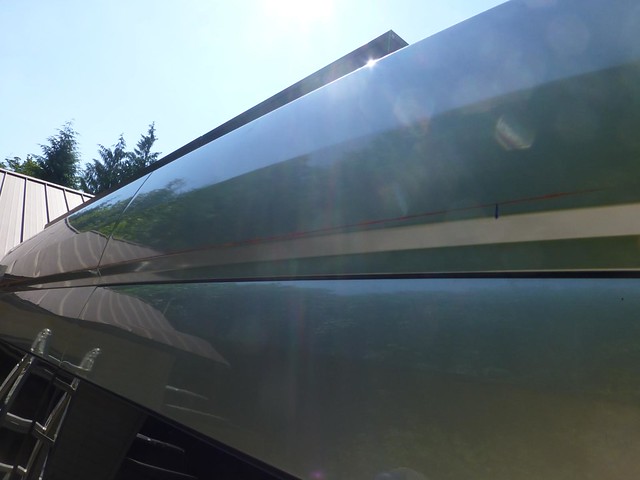
The panels are wired into the combiner box, so is the downfeed cable. Note that the downfeed cable is routed on top of the channel. I did that because it was easier to place under a cable tie. I will probably move it to under the channel. The combiner box is VHB taped to the roof, and it ain't going nowhere.
All buttoned up.
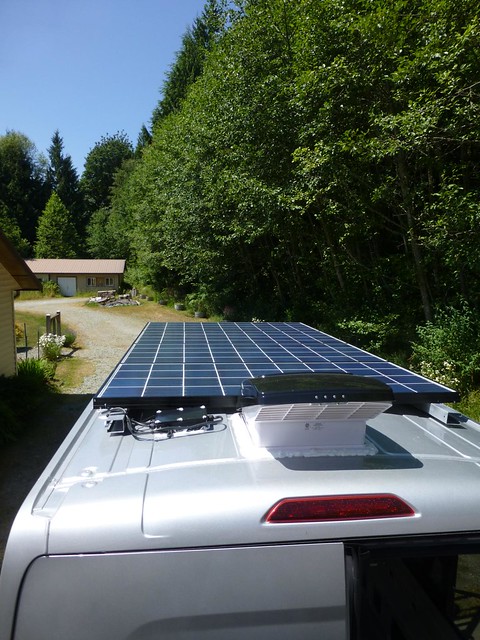
I took Annie for a spin, and all seems very quiet on pavement, but I can hear some rattling up there on dirt roads. Tomorrow, I'll make sure everything is truly snugged down. Hope it's not some basic design flaw!
__________________
Turning a 2015 Ford Transit into a camper. Her name is Annie.
You can watch it all happen here:
https://anniebuild.blogspot.com/
Now, with trip reports!!!! 
|

|

|
|
06-18-2015, 12:01 AM
|
#22
|
|
Platinum Member
Join Date: Jun 2012
Location: SoCal
Posts: 792
|
Top notch work.
|
|
|
|
|
06-18-2015, 06:47 PM
|
#23
|
|
Platinum Member
Join Date: Sep 2012
Posts: 978
|
In hot weather the air gap between the panels and the van pretty much make the van shaded all the time. Quite useful. Plus, 540 watts of solar (peak) would more than cover amp draw from an absorption fridge.
The setup I'm looking at to have upfitted by SMB probably at best would wind up with half the OP's wattage, due to the space on the roof the A/C would take up.
|
|
|
|
|
06-27-2015, 12:12 AM
|
#24
|
|
Platinum Member
Join Date: Dec 2014
Location: East of world famous Sedro Woolley, west of Concrete
Posts: 210
|
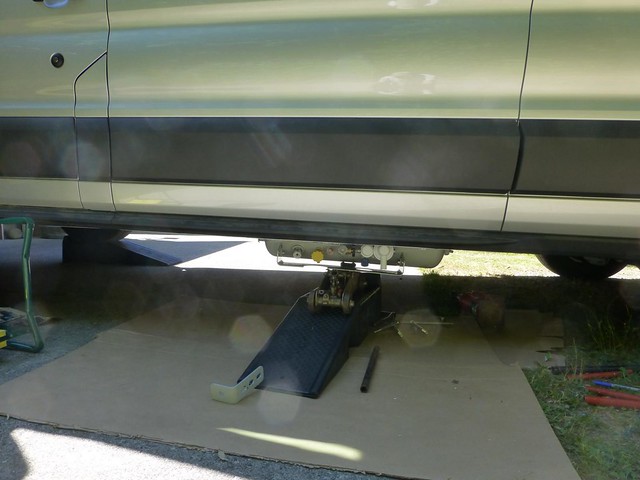
Installing the propane tank
Over the last few days, we installed the propane tank.
It's a Manchester 30# unit, about 12" diameter and 32"length.
The tank comes with 2 mounting flanges, adjustable in height.
We are mounting it on the driver's side, roughly working aft from the forward pop-out window.
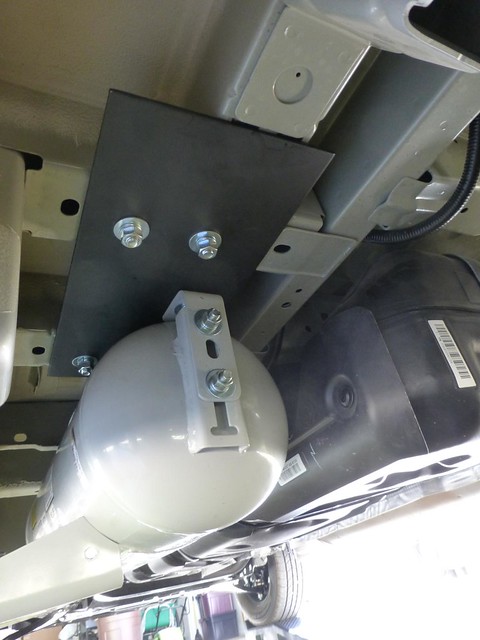
Of course, the tank doesn't line up with anything particular on Annie, but there are 2 transverse members just forward of the rear wheel's spring mount.
So I made a mounting plate that ties into the transverse members, with a hole located for the tank's rear mounting flange. In this pic, looking left is looking toward the rear
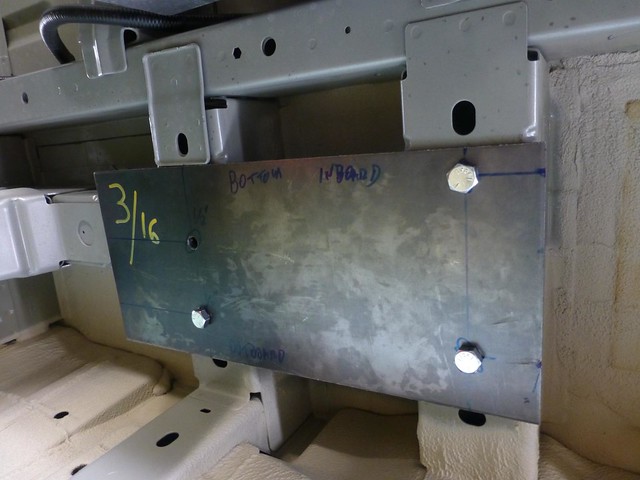
This is where the hole for the forward tank bracket will be drilled
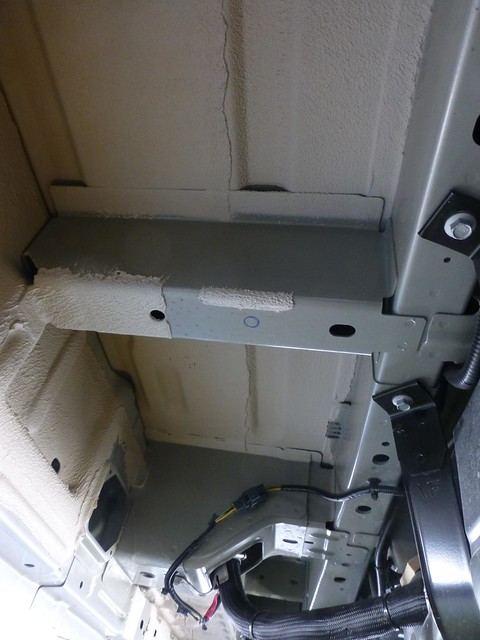
All the holes into Annie are located, drilled and painted. I'm using 1/2" bolts running through existing holes in the transverse members (for the rear mounting plate) and with a new hole for the forward tank bracket.

The mounting plate will also be held by VHB tape.
__________________
Turning a 2015 Ford Transit into a camper. Her name is Annie.
You can watch it all happen here:
https://anniebuild.blogspot.com/
Now, with trip reports!!!!
|
|
|
|
|
06-27-2015, 12:13 AM
|
#25
|
|
Platinum Member
Join Date: Dec 2014
Location: East of world famous Sedro Woolley, west of Concrete
Posts: 210
|
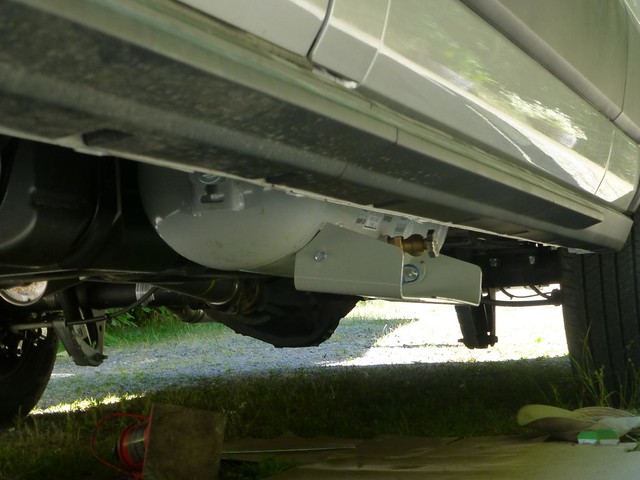
The mounting plate is primed and painted. I've also located and drilled the tank bracket hole.
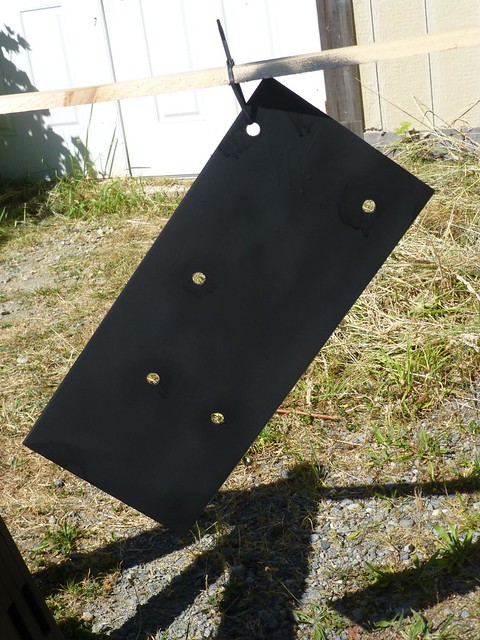
Lifting the tank into position
Tank is mounted.
__________________
Turning a 2015 Ford Transit into a camper. Her name is Annie.
You can watch it all happen here:
https://anniebuild.blogspot.com/
Now, with trip reports!!!!
|
|
|
|
|
06-27-2015, 12:13 AM
|
#26
|
|
Platinum Member
Join Date: Dec 2014
Location: East of world famous Sedro Woolley, west of Concrete
Posts: 210
|
And looks thus.
The actual LPG tank is an inch or so below the ground clearance of the fuel tank, but the skid plate is a couple of inches lower than that. We'll see if clearance is an issue, Clarence. 
I painted all the bolts and nuts, and took Annie for a drive on some badly rutted/washboarded logging roads. Nothing fell off or came loose.  This is probably a good thing.
I will be running the LPG plumbing once I have a clearer sense of the inside floor layout.
Next step will be installing the awning. Just getting the awning was an "interesting"  experience, which I'll describe better once the work starts
__________________
Turning a 2015 Ford Transit into a camper. Her name is Annie.
You can watch it all happen here:
https://anniebuild.blogspot.com/
Now, with trip reports!!!!
|
|
|
|
|
07-02-2015, 11:51 PM
|
#27
|
|
Platinum Member
Join Date: Dec 2014
Location: East of world famous Sedro Woolley, west of Concrete
Posts: 210
|
Mawnings Spent Installing an Awning...Part 1
It's been really toasty here, so we've only been working mawnings 
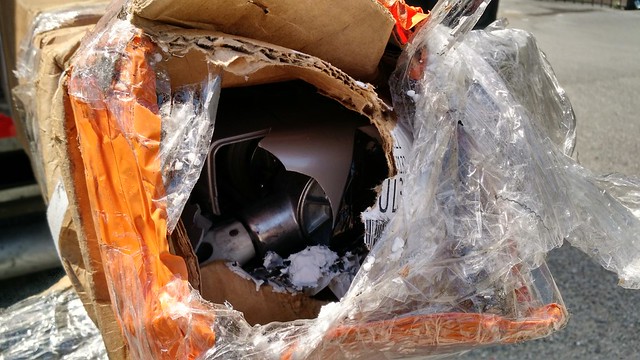
The installion almost didn't happen at all. We ordered a Carefree Freedom wall mount awning through an on-line dealer. It was about 10 days between my order placement and the delivery. The unit was drop-shipped from Carefree.
Carefree packaging was inadequate to protect against the shipper they chose. The awning's box arrived in this condition:

Someone evidently tried to stop the box from bleeding out by wrapping the poor thing in shrink wrap. Maybe it was the murderer trying to hide the evidence.
It was too late. The awning was DOA on arrival: 
__________________
Turning a 2015 Ford Transit into a camper. Her name is Annie.
You can watch it all happen here:
https://anniebuild.blogspot.com/
Now, with trip reports!!!!
|
|
|
|
|
07-02-2015, 11:52 PM
|
#28
|
|
Platinum Member
Join Date: Dec 2014
Location: East of world famous Sedro Woolley, west of Concrete
Posts: 210
|
Mawnings Spent Installing an Awning...Part 1
I refused shipment, and the dealer immediately started the process of getting a replacement. Very friendly, cooperative folks at the dealer!  . From this point on out, I dealt with Carefree customer service.
About 10 days after the awning was re-ordered, the replacement showed up (via another carrier and with Fragile stickers on the box). Evidently, the Fragile stickers did their job. The box was damaged very much like the first one, but not so badly that the awning was crunched. We opened the box ends at the loading dock to be sure.
Got the box home, and discovered that whoever packed it cleverly left out the mount brackets, hardware, and crank handle. (This is a manual opening awning). They did generously include a redundant pair of leg support latches (in black...). The awning is silver, and so was the other set of the leg supports.
I called customer support. They said that this problem also just happened to someone else. They also said they'd ship out the missing stuff right away. Actually shipped about 2 or 3 days later, by UPS Ground. So, the awning just sat around for another week.
The package arrived this past Friday. It did have the mounting brackets and HW, but not the crank handle. 
Had to recall customer service, and got the crank handle shipped "overnight". It showed up Tuesday. SO, I am less than whelmed with the competency of Carefree's picking/packaging/shipping decisions. If, as I suspect, this happens regularly, there is a real problem with management in those areas. I should be clear that I have no complaints about the Carefree customer service folks I talked with. They were uniformly friendly, and seemed to want to get this all resolved.
Well, I finally got the awning and parts kit, so now we can talk about the install.
I decided on the Carefree wall mount for a few reasons:
- My solar panels don't provide enough space for a roof mount unit or brackets.
- The Fiamma units only seem to be available with vinyl fabric. I wanted acrylic
- I couldn't find anyone selling manually operated Fiammas.
- Fiamma had a longer delivery lead time than Carefree. (Although as things turned out, Carefree took about as long to get something functional/installable out here.)
I'll talk about getting the awning mounted here. In Part 2 I'll talk about what I had to do to get the thing to stop rattling. I need to take a few pics for that, and it's too **** $%@%#^&$(&*^* HOT to do that now.
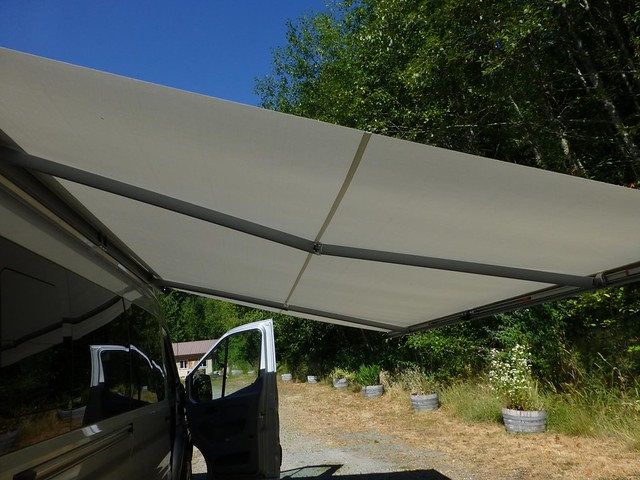
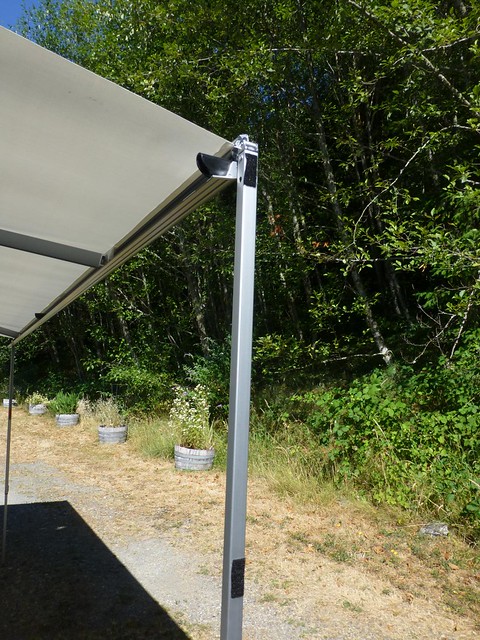
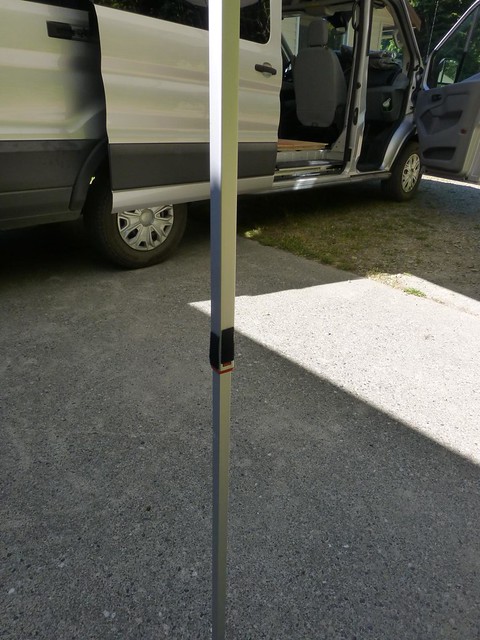
We chose a 4M long awning to cover the passenger side from just forward of the slide to just about aft of the rear window. The problem is that Annie's front slopes down and gets narrower, starting over the sliding door.
The vertical slope was easy to measure with a snap line.
__________________
Turning a 2015 Ford Transit into a camper. Her name is Annie.
You can watch it all happen here:
https://anniebuild.blogspot.com/
Now, with trip reports!!!!
|
|
|
|
|
07-02-2015, 11:53 PM
|
#29
|
|
Platinum Member
Join Date: Dec 2014
Location: East of world famous Sedro Woolley, west of Concrete
Posts: 210
|
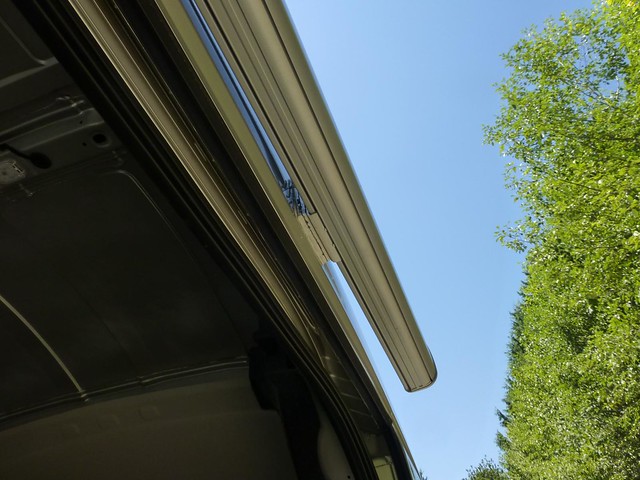
Mawnings Spent Installing an Awning...Part 1
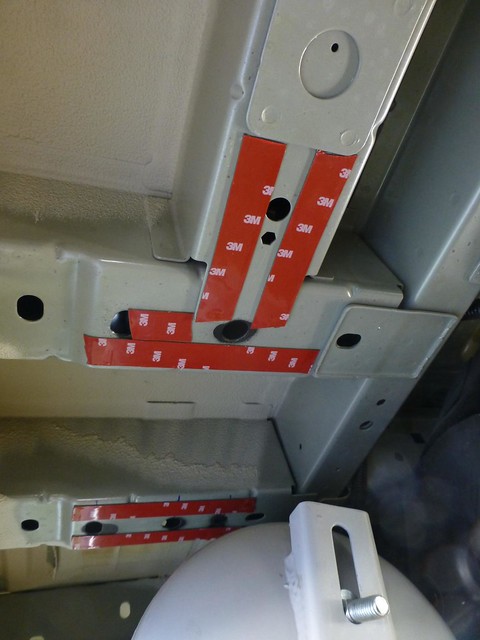
So, it was easy enough, following Carefree's instructions, to locate where the mounting brackets needed to go.
Then hang the awning on the rear 2 brackets.
Each bracket has 2 mounting holes. I made some 3/4" ply backer plates. I made 'em as long as possible to fit into the space between Annie's inner wall frame and her skin. The brackets also are just about as wide as the flat(ish) wall panel area where the brackets mount.. They are VHB'd to the outer wall.
The rear two brackets line up very close to Annie's wall braces (that connect the inner and outer walls). That means there is little to no flex to the outer wall's sheet metal, even when the awning is fully extended.
__________________
Turning a 2015 Ford Transit into a camper. Her name is Annie.
You can watch it all happen here:
https://anniebuild.blogspot.com/
Now, with trip reports!!!!
|
|
|
|
|
07-02-2015, 11:54 PM
|
#30
|
|
Platinum Member
Join Date: Dec 2014
Location: East of world famous Sedro Woolley, west of Concrete
Posts: 210
|
Mawnings Spent Installing an Awning...Part 1
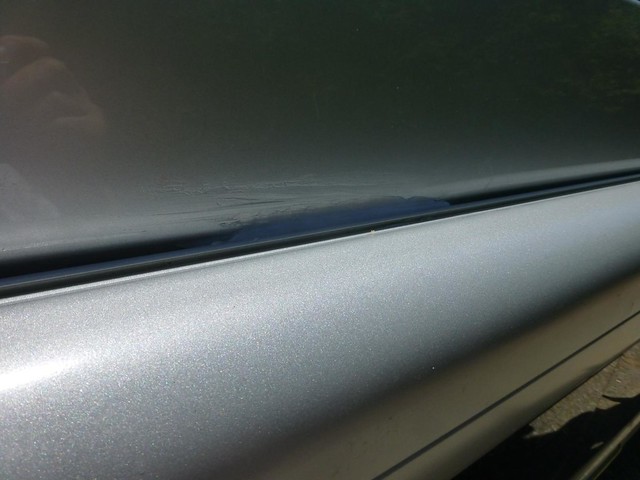
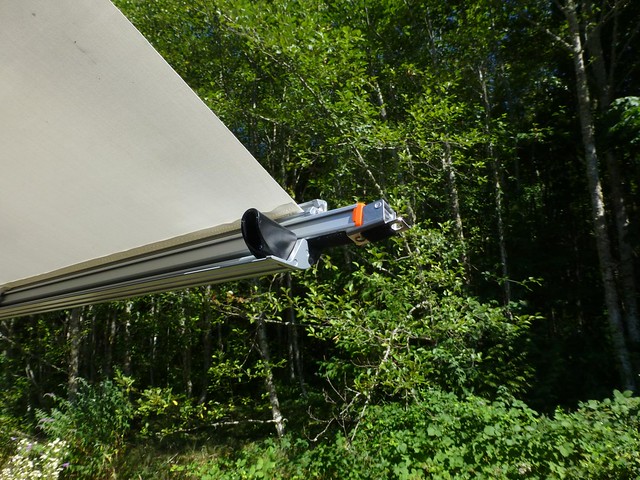
Not so lucky with the front bracket.
Because the front of Annie narrows, the front bracket needs to be shimmed. Turns out that it needs about 1/2". I used 2 thicknesses of 1/4" aluminum flat stock, cut to size, drilled and VHB'd together and to the bracket.
The front bracket also falls far from any internal wall supports, so I made up an wooden internal brace that sandwiches snugly (unloaded) between the 2 walls. This way the awning torque force is transferred to the very strong interior wall.
I took Annie out for a spin, and the mounting seemed stable. However, there was a heck of a lot of rattling coming from the awning itself, especially as I drove on rutted dirt roads. I think I've got that mostly handled now, and that'll be the topic of part 2.
Stan
__________________
Turning a 2015 Ford Transit into a camper. Her name is Annie.
You can watch it all happen here:
https://anniebuild.blogspot.com/
Now, with trip reports!!!!
|
|
|
|
|
07-02-2015, 11:59 PM
|
#31
|
|
Platinum Member
Join Date: Jun 2015
Location: Pennsylvania
Posts: 691
|
Quote:
Originally Posted by skagitstan

Not so lucky with the front bracket.
I took Annie out for a spin, and the mounting seemed stable. However, there was a heck of a lot of rattling coming from the awning itself, especially as I drove on rutted dirt roads. I think I've got that mostly handled now, and that'll be the topic of part 2.
Stan
|
Looking good. When you finished up the solar panels you said:
" I took Annie for a spin, and all seems very quiet on pavement, but I can hear some rattling up there on dirt roads. Tomorrow, I'll make sure everything is truly snugged down. Hope it's not some basic design flaw!"
Did you figure out the solar panel rattling?
|
|
|
|
|
07-03-2015, 12:01 AM
|
#32
|
|
Platinum Member
Join Date: Dec 2014
Location: East of world famous Sedro Woolley, west of Concrete
Posts: 210
|
Yup, just some of the mounting bolts needed to be snugged down. Was my bad.
The awning rattle is a very different (hopefully solved) problem
__________________
Turning a 2015 Ford Transit into a camper. Her name is Annie.
You can watch it all happen here:
https://anniebuild.blogspot.com/
Now, with trip reports!!!!
|
|
|
|
|
07-03-2015, 07:10 PM
|
#33
|
|
Platinum Member
Join Date: Dec 2014
Location: East of world famous Sedro Woolley, west of Concrete
Posts: 210
|
Mawnings Spent Installing an Awning...Part 2
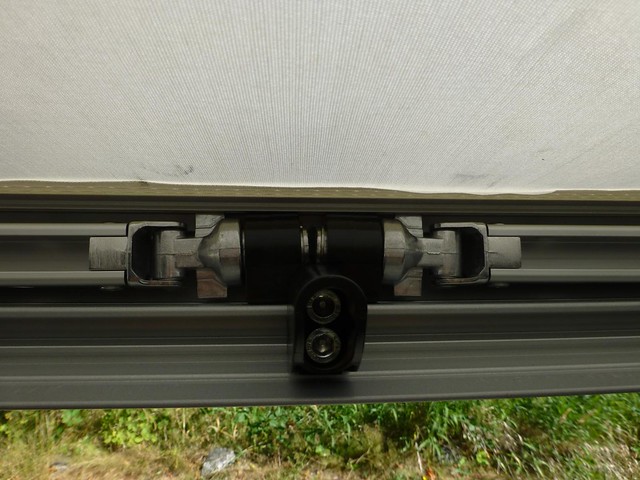
I tracked the awning clanks and rattles down. The problem is one of generally loose/sloppy clearances in the awning design. 
There were 2 main issues.
1. The awning mounts are not tightly contoured to snugly fit the awning. The awning is fastened to its mounts by two small sheet metal screws at the base of each mount. Even with those screws, the awning can wiggle around quite a bit. This allowed the awning to loudly bounce against the mounts on a rough road. I added a bunch of silicon seal to the wiggly space. This largely eliminated the clanking.
__________________
Turning a 2015 Ford Transit into a camper. Her name is Annie.
You can watch it all happen here:
https://anniebuild.blogspot.com/
Now, with trip reports!!!!
|
|
|
|
|
07-03-2015, 07:11 PM
|
#34
|
|
Platinum Member
Join Date: Dec 2014
Location: East of world famous Sedro Woolley, west of Concrete
Posts: 210
|
Mawnings Spent Installing an Awning...Part 2
__________________
Turning a 2015 Ford Transit into a camper. Her name is Annie.
You can watch it all happen here:
https://anniebuild.blogspot.com/
Now, with trip reports!!!!
|
|
|
|
|
07-03-2015, 07:12 PM
|
#35
|
|
Platinum Member
Join Date: Dec 2014
Location: East of world famous Sedro Woolley, west of Concrete
Posts: 210
|
Mawnings Spent Installing an Awning...Part 2
I was also a bit surprised that the fabric has a seam down the middle.
This seam does not show up on any of the Carefree site's awning pictures that I found. Also, we had a larger acrylic awning on a Class C that we had some years back. It had no seam. Hopefully, this will not become a maintenance/wear problem down the road.
Generally speaking, I'm a bit disappointed in the quality of the awning. It should be serviceable, but it's definitely flimsier than I'd like to see on an item subject to constant shaking.
Since I found no other viable product, given Annie's restrictions on mount locations, I'd still buy this again. But if someone doesn't have the same solar panel or awning material driven constraint, I would suggest looking at other brands.
This pretty much concludes installing the major externally mounted items, with the possible exception of the gray water tank (location TBD). The next steps will be to identify exactly where all the internal stuff will go, in order to plan out plumbing, gas, and electric runs, then to start insulation (along with installing any runs embedded in insulated areas).
So, there will probably be a bit of silence here until I've got some pretty pictures of new stuff ready post.
Stan
__________________
Turning a 2015 Ford Transit into a camper. Her name is Annie.
You can watch it all happen here:
https://anniebuild.blogspot.com/
Now, with trip reports!!!!
|
|
|
|
|
07-15-2015, 12:32 AM
|
#36
|
|
Platinum Member
Join Date: Dec 2014
Location: East of world famous Sedro Woolley, west of Concrete
Posts: 210
|
Starting the floor
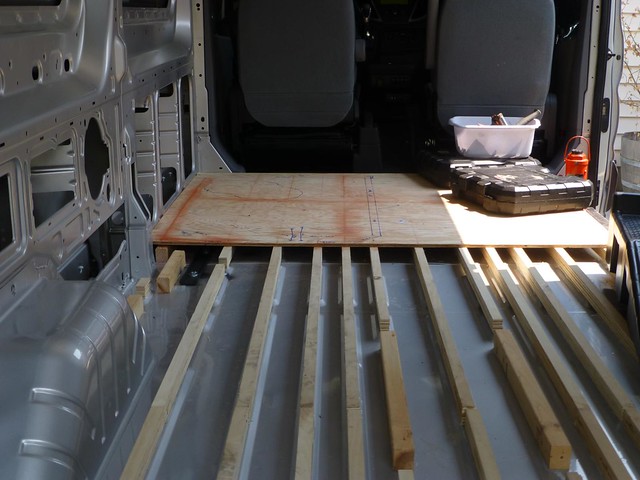
Starting on the forward-most section.
First layout where the bathroom will go.
Next we insulate the floor in between the joists. A layer of 1" rigid foam (the pink stuff) and 1/2" of aluminum backed rigid foam. There is expanding foam filling any gaps. Each foam board is glued down with 3m 90 spray contact cement.
then cover it with Reflectix
The floor is screwed down on top of the Reflectix
Here's the bathless bathroom's layout
Since taking this last pic, we've taken a closer look, and we think we can move the left -hand (aft) wall forward about 3" and still have enough floor space to maneuver. That will give us a bit more clothes closet/storage space aft of the fridge.
__________________
Turning a 2015 Ford Transit into a camper. Her name is Annie.
You can watch it all happen here:
https://anniebuild.blogspot.com/
Now, with trip reports!!!!
|
|
|
|
|
07-15-2015, 12:37 AM
|
#37
|
|
Platinum Member
Join Date: Dec 2014
Location: East of world famous Sedro Woolley, west of Concrete
Posts: 210
|
Tweaking the Layout
We've decided to change some of the layout in order to provide better mounting and exhaust locations for the furnace and water heater. We also decided to put the gray water tank inside, instead of below the floor. We are moving the gray and fresh H2O tanks in between the wheel wells, almost directly above the axle. We'll lose a bit of hard-to-reach space by putting the gray H2O above the floor, but it improves the weight distribution, and centralizes/simplifies the plumbing and propane runs. We're moving the battery slide to have access via the rear doors. The solar controller, MS2012, and breaker/fuse box will actually have a shorter run to the batteries. This should also be at an easier location to run power lines around Annie, and opens up a better place to feed the propane line up through the floor and into the driver side appliances.
__________________
Turning a 2015 Ford Transit into a camper. Her name is Annie.
You can watch it all happen here:
https://anniebuild.blogspot.com/
Now, with trip reports!!!!
|
|
|
|
|
07-15-2015, 12:51 AM
|
#38
|
|
Platinum Member
Join Date: May 2014
Location: Greer, South Carolina
Posts: 2,611
|
Did you look into getting the Truma system? Could simplify your installation as well as save space.
|
|
|
|
|
07-15-2015, 01:17 AM
|
#39
|
|
Platinum Member
Join Date: Dec 2014
Location: East of world famous Sedro Woolley, west of Concrete
Posts: 210
|
Quote:
Originally Posted by wincrasher
Did you look into getting the Truma system? Could simplify your installation as well as save space.
|
Which Truma?
The Combi doesn't do instant hot water as far as I can see. That's one of our requirements to reduce water & propane usage. Since we won't have a shower, a heated tank doesn't do too much for us.
The Aquago is about the same size as the Atwood I've selected. It's probably a nicer unit, but I seem to remember that it was quite pricey compared to the Atwood.
__________________
Turning a 2015 Ford Transit into a camper. Her name is Annie.
You can watch it all happen here:
https://anniebuild.blogspot.com/
Now, with trip reports!!!!
|
|
|
|
|
07-15-2015, 01:23 AM
|
#40
|
|
Platinum Member
Join Date: May 2014
Location: Greer, South Carolina
Posts: 2,611
|
Do you think it really saves water? Every one I've encountered, you have to run the water a bit for it to activate.
|
|
|
|
|
|
 Posting Rules
|
You may not post new threads
You may not post replies
You may not post attachments
You may not edit your posts
HTML code is Off
|
|
|
|
 » Recent Threads
 |
|
|
|
|
|
|
|
|
|
|
|
|
|
|
|
|
|
|
|
|
|
|
|
|
|
|
|
|
|
|
|
|
|


 Linear Mode

