Location: Red-Neck Riveria - (Fort Walton Beach, FL)
Posts: 198
2008 170 Popular Electrical Mods/Upgrades
Greetings
First real posting about our van. It is a 2008 Roadtrek 170 Popular, on a 2008 Chevy chassis. Both were coincidentally produced in Canada. Having come from a sailing/cruising life, small spaces and preparing to live off-grid are not new. I am an engineer, inveterate tinkerer, and often willing to; not leave well enough alone.
The van (yet un-named) has few, if any, upgrades from the original. There is a black tank dump port on the passengers side which we understand was a mod, and some new carpet and cushions. The starting battery is brand new, the previous one having failed on our second night aboard during our delivery trip from the NE to our home in the Florida panhandle.
When the starting battery failed, I was disappointed that we couldnt just turn a switch (1-2-Both) to get going. The small capacity of the House Bank was also surprising. A third item of surprise, the only on/off for the propane was just a manual valve on the tank. For over 30 years of cruising and living aboard, we had become accustomed to using a 12V solenoid routinely and the on-deck shut-off only for longer term. We were pleased with the convenience of that configuration. It should be easily adaptable to this van. These mods will be definite upgrades in the program, and early on.
With a draft to do list, I mapped out a set of improvements and additions. Rather than tackle them all at once, or in a haphazard fashion, I set them out in a phased approach. The picture might help explain, save me a bit of typing, and you a bit of reading.
For image clarity, obvious connections are not shown; alternator wiring, all 110 socket locations, 12V lights, planned additional 12V accessory sockets fore and aft in the cabin, etc. Ill outline each of the PHASES as we tackle them and, and hopefully be able to document the progress in this thread once it warms a bit outside. [Temps in the 40s make for slow work in the driveway]. So, here goes the first step of the plan.
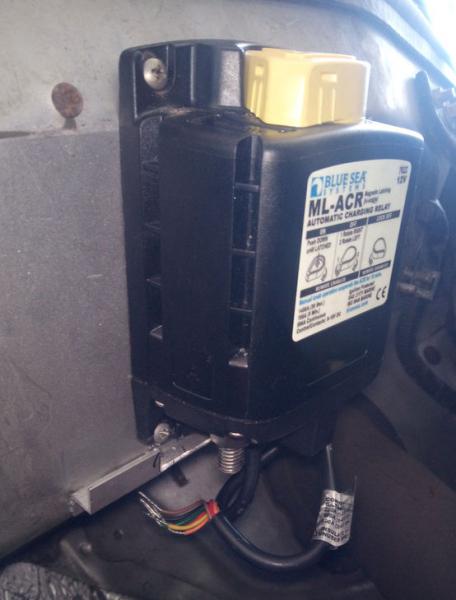
PHASE 1: Install a Blue Sea ML-ACR #7622. This automatic charging relay should provide us the peace of mind (and opportunity for control) to isolate and combine the starting and house battery banks. We believe we can then also join for charging, and when necessary, give a little boost. Not to concerned about the technology, seems well established and although the installation will require some engine bay disassembly nothing to dramatic. Simultaneously, Ill pop-in a cheap battery monitor, just to see how the house battery is doing; volts, amps, Ah in/out, etc. It comes with a shunt and hopefully performs as advertised. The Blue Sea charging relay is inbound and should arrive in a few days.
But we expect the outside air temps will drop to the teens for a week, so dont expect an update here too soon! Ill take some snaps, but dont expect a YouTube Video either.
I look forward to everyone's encouragement. I've read what seems like over 1000+ pages of the forum. There are some very well though out (and documented) upgrades I'll be "praising" by replication!
on my van the starting work around is connecting terminals at the battery separator with cables- although I've never had to.
keep in mind a duff chassis battery can destroy the charging system- with an unknown as you had on a newly purchased van I would assume that battery to be duff until tested good.
energy use can be helped by replacing bulbs with LEDs. I use philips with a warm color temperature in bayonet adapters- cost about $8 per. well worth it.
R/T did provide a LP solenoid on earlier models ( on the dodge, I think)
I don't have a solenoid on my PW.
Enjoy your projects !
__________________
Mike
2006 Pleasure Way Lexor TD on a Chev 3500
Previous: tent strapped to Electra-Glide
Location: Red-Neck Riveria - (Fort Walton Beach, FL)
Posts: 198
My first "D'oh" was; "Whow - wish I packed the Jump Battery!" She says; "Sorry dear the checked bag was full of sleeping bags, so I took it out, sorry."
Our plan after the first elements of the mod/upgrade, are to do a few local sorties. We'll record some data/information on system use and help fill out the "Consumption Spreadsheet." It's something we are used to doing - and modifying, but just might save some excess battery bank purchasing. Fingers crossed.
Our hope is the Blue Seas ML-ACR will do the "disconnect," and keep the House Battery from dragging down the new Starting Battery. Just in case - The Jump Battery is in the van!
LEDs - great for amp saving - and I like them a lot. But, getting the "right" temperature is always a "Crap shoot" for me. I like bright for work lights - daylight - they tend toward tend to blue, but otherwise a softer one. Would be nice if they could be "throttled" to present a range. Hmm I wonder... NOPE too much to do!
Cheers - Jim
We tend to mix and match the LED colors, both at home and in our Roadtrek Chevy. Most of ours are cool white, so very white/blue with lots of light per watt. That color just looked good to us in the van and when we did it we were early on in our modifications so had a small battery bank. Cool white gives the most light per watt. More recently we converted the overhead fluorescent lights to dimmable LED strip lights in the original fixtures. The first and second from the front are cool white and the one over the bed is warm white. The dimmers are a great feature to have on them all.
Would be nice if they could be "throttled" to present a range. Hmm I wonder...
The latest generation of LED strips have five channels: R, G, B, Cool-White, and Warm-White. There are controllers to go with them, so what you describe is not difficult.
We are using these throughout our new van.
__________________
Now: 2022 Fully-custom buildout (Ford Transit EcoBoost AWD)
Formerly: 2005 Airstream Interstate (Sprinter 2500 T1N)
2014 Great West Vans Legend SE (Sprinter 3500 NCV3 I4)
From a fellow tinkerer.... I really like the 7622 battery separator and I've used the manual control switch more often than I thought I would. The auto setting works flawlessly. Seems like a solid unit and the lifetime warranty is great. I did make a braced bracket with rubber mounts for the 7622.
Odds and ends that may be of interest or can give you some ideas.... Like others we've got all led interior lighting and I've added additional led floods for those dark campsite arrivals.
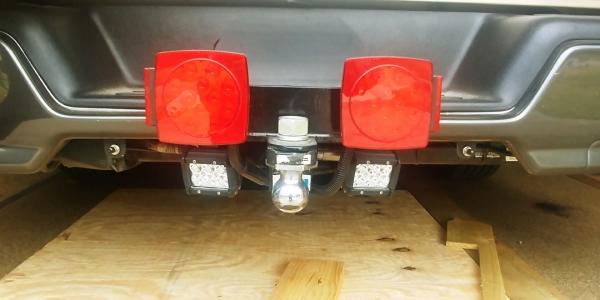
I made a hitch drawbar with led backups (connect to van backup circuit) and led tail/brake/turns (connected to van taillight circuit). I never tow but if I needed to it just flips around. Everything is on weatherpack connectors. Additional tails are to add some extra visibility. I left the stock taillight halogen bulbs in place so there's no issue with rapid flashing with the addition of the lower led lights.
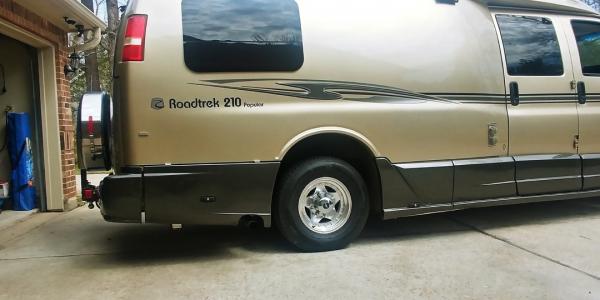
Side floods are switched from fused constant 12v source. Very good at lighting up rear quarter areas, easy to see where the heck the utility connections are. They don't hit anything - they are above the bottom edge of the hitch frame. You can see them peeking out under the rear compartment.
Exterior "patio" light got replaced with an led setup. I also added a removable cover as a courtesy to other campers, with the cover on the light is limited to the side door step.
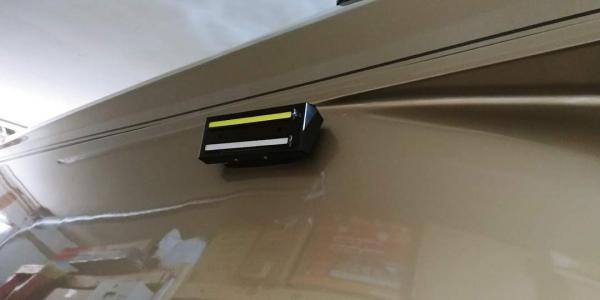
And also like others, we have front/rear dashcams and I also have a constant-on rear camera with dash mount monitor, used in forward or reverse. I installed an inexpensive battery monitor that's much better than the status lights on the panel monitor.
Location: Red-Neck Riveria - (Fort Walton Beach, FL)
Posts: 198
WOW - Such a flood of great information and inspiration!
And it is still too cold to get to work!
booster - once again thank you! I am also looking at the overhead "florescents" for a swap out. I did an CFL to LED swap on a number of overheads on the boat and was very pleased. Equal lighting white/red and no amps! The dimable option seems like a great feature. PWM - I guess?
avanti - ready, off the shelf options are good. Often much easier to integrate and less effort. Any links for what you are satisfied with?
TX-Trek - Like the bracket. Just a quick question - what is the red/green switch on the panel? The LEDs you use for for later arrivals - are those mounted under chassis - or mounted elsewhere? Perhaps they are the side mounts you showed? NICE. Constant rear cam is something I'll want to integrate - towing a race car. The PO added a rear cam - haven't figured out making it full time yet.
Location: Red-Neck Riveria - (Fort Walton Beach, FL)
Posts: 198
I'll quickly apologize about my reference to it being TOO COLD here in Florida.
I note that a number of members here are in Minnesota and up north:
C-a-na-d-a.
Let me say, I understand where your are.
I am FROM Fargo!
TX-Trek - Like the bracket. Just a quick question - what is the red/green switch on the panel? The LEDs you use for for later arrivals - are those mounted under chassis - or mounted elsewhere? Perhaps they are the side mounts you showed? NICE. Constant rear cam is something I'll want to integrate - towing a race car. The PO added a rear cam - haven't figured out making it full time yet.
Jim, the red switch is for the rear side led floods. The green switch is a spare for something added later if I want - it was easier to install both into the dash slot. Both are illuminated switches as a reminder that something is on. The rear side leds are simply mounted thru the bottom of the rear fiberglass compartments. They're fairly thick and I used fender washers to help clamp them firmly in place. They are located just at the spot where they peek out under the compartment.
The rear camera operates on 12v as do many of the home security system cameras you can get. Power comes from the rear undershelf light (I've replaced it with led strips) and is fused. Video is run from camera to the dash mounted monitor - I think it's called a BCA cable - and the camera power is a plug. Meaning that if the camera goes out I can simply disconnect and connect a new one.
I've run a number of feeds or cables from front to rear and it's been much simpler to use pvc pipe as a conduit under the van. The pvc can be heated and bent if needed to conform to contours and protects the wiring , plus if you leave a pull string in it, it's easy to pull new wiring through. Much better than fishing a wire loom through nooks and crannies.
Location: Red-Neck Riveria - (Fort Walton Beach, FL)
Posts: 198
I am new to the Class B Roadtrek 2008 Chevy 6.0 170 Popular. I am willing to do a bit of research before asking questions that have already been addressed. Weather this past week precluded working on the van, or the race car (no shop so I am relegated to the driveway). So in my "time off," I completed nearly 4000 page searches of the forum (validated with the past 7 days' history). Fortunately, I was able to speed read the associated posts. In spite of many interesting diversions, I was able to capture a total of nearly 50 members' information. While each is not complete, and we could talk about statistical significance, the attached spreadsheet is a start, and serves my immediate purpose. BTW, appreciate each of those 4000 links were pages in the "History." With each, there were multiple posts on each page. I think I've read the equivalent of the Gulag Archipelago.
Thanks to InterBlog for that work, booster for asking the question, and all that contributed. It would be nice if more forum members provided their information too. It would definitely increase the fidelity and utility for upgrade planning.
My Interest: may be obvious when looking at the summary:
My Motivation: Because this land-based "cruising" is different (more like coastal/day sailing), the requirements can be significantly different from our experience. I have done the necessary estimate of our Consumption, so we can consider our desired Capacity, and then the necessary Charging. The 3 Cs [Consumption, Capacity, Charging] are something we have used for a very long time on our boat, and also assisting others in upgrading their systems.
My Apologies: Many of the details I would like to have captured were missing, as the posts were in relation to other topics. The Data I captured frequently was gathered from statements like; "...we replaced our AGM with 2 Battle Born drop-in..." Not any mention of solar, alternators, etc, because that was not the topic at hand. But as Open Source Intel, I find it useful in making my conclusions. Perhaps others will too.
The Fun Part: Alliteration is always fun. So to the 3 Cs I now add, Construction, Connection(s), Consequence(s), and of course, Cost. (That makes 7, and its fun to have one more than in the 6 -Cs Model!)
As the weather improves, I'll get on to PHASE 1. And an UPDATE; the Remote Control for my Sterling Alternator to Battery Charger has arrived from the UK (PHASE-2), so I'll be sourcing the necessary wire for that next step in the upgrade.
Soon I'll get on to making a "real" wiring diagram.
Thanks to all.
Cheers - Jim
Have you been using the Google advanced search to do the research. It is much more efficient and accurate than using the normal search on the forum. I use it a lot.
Location: Red-Neck Riveria - (Fort Walton Beach, FL)
Posts: 198
Quote:
Originally Posted by booster
Have you been using the Google advanced search to do the research. It is much more efficient and accurate than using the normal search on the forum. I use it a lot.
Hey Jim - Thanks - good one. Just trialed it, and worked well. Especially for the single topic search - sort of a linear look. Definitely something the forum search is not so good at.
With the approach I used, I'd grab a thread - follow it to conclusion, capture the responding members, chase each of those individually, and from those (many) pages reaping the results, and branching at each member:
Also, in the process I got a LOT of insight into the Forum, the my-to-me Van, and many members.
I was going to say; "Pencils Down," but now will re-engage on the Google Advanced to see what I can fill in. Not like it's a big deal (for you folks up north), but we have sleet and snow on today's forecast in the Florida Panhandle. Lucky I didn't de-winterize as I planned...
Location: Red-Neck Riveria - (Fort Walton Beach, FL)
Posts: 198
Phase-1: Dashboard/engine bay
Parts on order, so Time to catch up on what I've done:
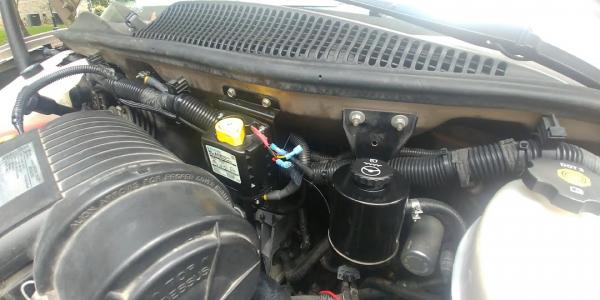
My first efforts were making sure I had charging to both battery banks, engine (starting) and House. I followed the lead of a number of members here and went to the Blue Sea ML-ACR. I went with the 7622, which was a bit of an upgrade, but invest once and be done. Im very familiar with the Blue Sea Systems and have used their product for a number of years, so no concerns there.
I removed the Heyr/Proline Combiner/Isolator (again, with the help and advice of the forum).
Next, I installed the ACR with little difficulty. Here are a few of the Parts Removal pics, and the install.
You can note I modified the lower bracket used by the Heyr as a landing/secure point to save drilling in a real tight spot and slipped the ACR into it.
Now, about drilling. The pass through to the cabin was going to be a challenge. I found some help on YT, and fortunately, Chevy put a noticeable dimple in the firewall. Once located, I needed to size the hole for more than a few items. Here is a link to locating the dimple go to time stamp 1:20 NOTE this video is for a Sierra/Silverado, but the same dimple is on the Express Vans too. LINK:
The wire count to pass through firewall were:
1. The switch for the ACR (4 wires)
2. Power and sense for my Start Battery SOC (4 wires)
3. Temperature probes for the Alternator(s) Temp Gauge (2 wires)
4. Power for the Temp Gauge (switched off others)
5. A spare set of Red/Black for unforeseen requirements (2 Wires)
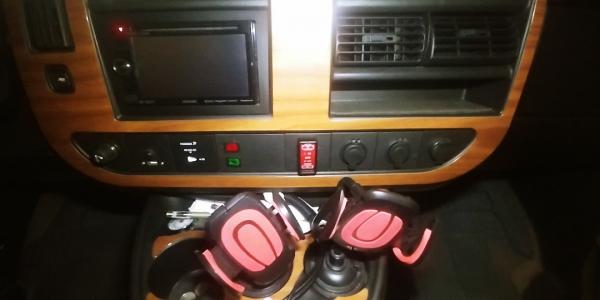
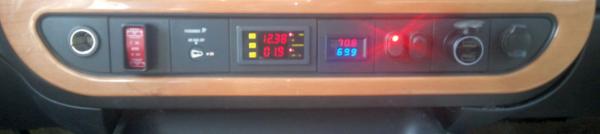
Mounting. Removing the mini-panels on the Chevy lower dash is not too difficult. But as a word of caution, what ever you mount, note there is a top and bottom to each of the panels! The top has a key that fits into a slot on the dash. It will be obvious when you get one out. You can note it on the following image, the little tab at 12 oclock:
The SOC for the Start Battery is the same as we used for a number of years, it proved to be reliable, and just as simple as you could imagine.
The 2-line temperature monitor is a new item for us, but I did some testing with it of several different probes and found it responsive and accurate. And Cheap as Chips! For the engine bay temp and alternator, I'll be using the "pill" style temperature sensor/probe. The Balmar was consistently "off" through full range - ice bath to hot coffee. Obviously a different resistance probe.
To combine and share a number of switch terminals, I sourced a clever connector. There are several types for joining multiple connections on a single terminal. One is a Vee, one a Square-Y, and another a Chair. I was just about out of the Vees and they wouldnt work on the toggle switches. I found the Square-Y and bought a pack of 100 for a bit more than the price of 10. I cant use them all so will share some. If you need a few, send me a PM, Ill pass you my address, then you send a SSAE, and Ill send you some for your project too. Better hurry, theyll go fast I reckon. If you need a close look search these: Morris Products 10712 Double Male Tab Single Female Slip On, .25 NEMA Tab
The completed effort to my eye, it looks pretty nice, and reasonably professional. From left to right; I have the switch for the ACR, (The factory Airbag switch), the SOC for the Starting Battery, a pair of toggle-illuminated switches to power the SOC and the auxiliary plug. The auxiliary plug is fitted with a dual USB and volt/amp meter for the House Bank. Nothing fancy, just eyes on while driving. {The Real SOC will be mounted aft.}
More to follow as I get the images squared away...
Parts on order, so Time to catch up on what I've done:
My first efforts were making sure I had charging to both battery banks, engine (starting) and House. I followed the lead of a number of members here and went to the Blue Sea ML-ACR. I went with the 7622, which was a bit of an upgrade, but invest once and be done. Im very familiar with the Blue Sea Systems and have used their product for a number of years, so no concerns there.
I removed the Heyr/Proline Combiner/Isolator (again, with the help and advice of the forum).
Next, I installed the ACR with little difficulty. Here are a few of the Parts Removal pics, and the install.
You can note I modified the lower bracket used by the Heyr as a landing/secure point to save drilling in a real tight spot and slipped the ACR into it.
Now, about drilling. The pass through to the cabin was going to be a challenge. I found some help on YT, and fortunately, Chevy put a noticeable dimple in the firewall. Once located, I needed to size the hole for more than a few items. Here is a link to locating the dimple go to time stamp 1:20 NOTE this video is for a Sierra/Silverado, but the same dimple is on the Express Vans too. LINK:
The wire count to pass through firewall were:
1. The switch for the ACR (4 wires)
2. Power and sense for my Start Battery SOC (4 wires)
3. Temperature probes for the Alternator(s) Temp Gauge (2 wires)
4. Power for the Temp Gauge (switched off others)
5. A spare set of Red/Black for unforeseen requirements (2 Wires)
Mounting. Removing the mini-panels on the Chevy lower dash is not too difficult. But as a word of caution, what ever you mount, note there is a top and bottom to each of the panels! The top has a key that fits into a slot on the dash. It will be obvious when you get one out. You can note it on the following image, the little tab at 12 oclock:
The SOC for the Start Battery is the same as we used for a number of years, it proved to be reliable, and just as simple as you could imagine.
The 2-line temperature monitor is a new item for us, but I did some testing with it of several different probes and found it responsive and accurate. And Cheap as Chips! For the engine bay temp and alternator, I'll be using the "pill" style temperature sensor/probe. The Balmar was consistently "off" through full range - ice bath to hot coffee. Obviously a different resistance probe.
To combine and share a number of switch terminals, I sourced a clever connector. There are several types for joining multiple connections on a single terminal. One is a Vee, one a Square-Y, and another a Chair. I was just about out of the Vees and they wouldnt work on the toggle switches. I found the Square-Y and bought a pack of 100 for a bit more than the price of 10. I cant use them all so will share some. If you need a few, send me a PM, Ill pass you my address, then you send a SSAE, and Ill send you some for your project too. Better hurry, theyll go fast I reckon. If you need a close look search these: Morris Products 10712 Double Male Tab Single Female Slip On, .25 NEMA Tab
The completed effort to my eye, it looks pretty nice, and reasonably professional. From left to right; I have the switch for the ACR, (The factory Airbag switch), the SOC for the Starting Battery, a pair of toggle-illuminated switches to power the SOC and the auxiliary plug. The auxiliary plug is fitted with a dual USB and volt/amp meter for the House Bank. Nothing fancy, just eyes on while driving. {The Real SOC will be mounted aft.}
More to follow as I get the images squared away...
Cheers - Jim
Do you have the source and P/N for the two temp digital reader? Aternator temps are hard to find a way to attach a sensor to the hottest parts of the alternator, I have found. I had thermocouples on them, but they failed pretty quickly, probably from vibrations.
I know it works on a 9volt battery (used for testing) then set it up switched on the panel.
Then got a slightly smaller unit also on A>Z. Figure for less than 15 bucks, a few years and replace if needed - but doubt will need too. They are used for fish tanks - so have waterproof probes. Usually find them good to about 250F.
Two line read out is nice - dual color makes remembering which is which too!


 Linear Mode


