 |
|
 02-23-2022, 02:27 PM
|
#21
|
|
Platinum Member
Join Date: Aug 2010
Location: Minnesota
Posts: 11,984
|
Klaassyybrand, you may also be able to get offset bushings for the upper control arm, commonly called camber bushings, that will be able to move the upper control arm out and reduce the negative camber. Over time the frames of the vehicles tend to bend in somewhat, so it is very common to have older units not be able to get enough positive camber.
|

|

|
|
02-23-2022, 03:16 PM
|
#22
|
|
Platinum Member
Join Date: Aug 2020
Location: TX
Posts: 179
|

Quote:
Originally Posted by klaassybrand

Yes i noticed Booster (and others) has been extremely helpfull also.
Thanks for pointing out the D-height, i missed that. I will have a look in a few weeks as my van is currently at body repair shop because of bad rockers.
I'm a little bit of an odd man out i think. I have the 2002 Express Explorer conversion van with 8 lug axle setup. I stripped completely last year and have been rebuilding it to a small camper van with a pop top. It's a light weight compared to the RTs i think. The combined weight is +-2900Kg (+- 6400 lbs)
My interest in the forum came with all the info regarding the suspension setups on this type of van, at least the 96-2002 version. I followed topics from Markopolo and Mattmobile as an example. Really helpfull!
Already done upgrades:
- Upgrade front coil springs to taller ones: Moog 81008
- Upgraded tires to 235/85/16 Yokohama Geolandar AT
- added the rear lift block 1.5" which leveled it out
- some minor trimming on front fenders
Of course for my type of lighter van this was a bit of an (expensive) experiment. But i really wanted to generate some more ground clearance because of the same style ground effects on these conversion vans
After the "lift" I had some issues with the downtravel of the front upper control arm. As some already pointed out in other topics.
It was too close to the frame. Also the alignment would not workout and because of too much negative camber.
After some research i found out there are balljoint spacers available for the 90's C2500/3500 trucks which use the same control arms as Express 96-2002 vans.
I ordered them have now installed the spacers in between the balljoint and control arm. This virtually extends the control arm and gives a more horizontal upper arm. Right now have to find out if alignment is getting back to normal and if i will get enought caster with the correct camber angles.
I also am trying to see if the current shocks (Billstein B4600) will be tall enough and perhaps will upgrade them to taller ones for the 2003-later models. They do fit but i think are really limiting downtravel.
Will have to find out in a few weeks.
I'm in no means to hijack your topic TX-Trek...
but i think it needed a little explanation.
|
Very good overview!
Adding to this topic is no problem to me, but I'm thinking that this may be worth a new thread for those that are converting Express vans vs. messing with the Roadtreks. Big difference in weight to deal with - I believe that your van is around 3,000 lbs less weight so the drive characteristics are different.
Anyway, I remembered that Air Lift and Firestone plus probably other aftermarket mfg. make air bag spacers for installing bags where there is more distance (greater D-height). This may be of help in your van if needed.
If your van has the same rear leaf springs (4 + overload) as mine, I wonder if the rebound will be substantial, especially if you add air bags. This topic by Booster may be of interest:
https://www.classbforum.com/forums/f...leaf-6715.html
He removed the heavy/harsh overload spring from his 190 with good results. This may worth thinking about if you experience less than desirable ride results after the air bags. The overload spring is about .5" or .75" thick at the pad, so if you had to remove the leafs anyway to get the overload out, you could install a 2" or 2.25" spacer to maintain the current 1.5" spacer + overload leaf dimension. That's if the current D-height dimension is ok for you, otherwise you can of course change the spacer or remove it entirely and depend more on the air bags. That's more experimentation though.
I've seen some videos by Weldtec on raising these Express vans - there may be a few nuggets of info that can apply to your van as well. I don't know much about them, I only looked at their info as part of my research.
|
|
|
|
|
02-24-2022, 09:46 AM
|
#23
|
|
New Member
Join Date: Mar 2020
Location: Netherlands
Posts: 5
|
Quote:
Originally Posted by booster
Klaassyybrand, you may also be able to get offset bushings for the upper control arm, commonly called camber bushings, that will be able to move the upper control arm out and reduce the negative camber. Over time the frames of the vehicles tend to bend in somewhat, so it is very common to have older units not be able to get enough positive camber.
|
Thanks Booster! I forgot to mention that. I already did install them right away because in my earlier experience before the lift in the front i already had caster issues..
So did that and installed the bushings for max caster: Lined up the holes to get the front side max out and the rear the other way. Still it looks like i have too little caster. Unfortunately alignment shops in NL don't have a lot of experience with these american vehicles. All they do is set the correct toe and say everything is within tolerances.
I'm willing to try a DIY alignment later..
|
|
|
|
|
02-24-2022, 10:04 AM
|
#24
|
|
New Member
Join Date: Mar 2020
Location: Netherlands
Posts: 5
|
Quote:
Originally Posted by TX-Trek
Very good overview!
Adding to this topic is no problem to me, but I'm thinking that this may be worth a new thread for those that are converting Express vans vs. messing with the Roadtreks. Big difference in weight to deal with - I believe that your van is around 3,000 lbs less weight so the drive characteristics are different.
Anyway, I remembered that Air Lift and Firestone plus probably other aftermarket mfg. make air bag spacers for installing bags where there is more distance (greater D-height). This may be of help in your van if needed.
If your van has the same rear leaf springs (4 + overload) as mine, I wonder if the rebound will be substantial, especially if you add air bags. This topic by Booster may be of interest:
https://www.classbforum.com/forums/f...leaf-6715.html
He removed the heavy/harsh overload spring from his 190 with good results. This may worth thinking about if you experience less than desirable ride results after the air bags. The overload spring is about .5" or .75" thick at the pad, so if you had to remove the leafs anyway to get the overload out, you could install a 2" or 2.25" spacer to maintain the current 1.5" spacer + overload leaf dimension. That's if the current D-height dimension is ok for you, otherwise you can of course change the spacer or remove it entirely and depend more on the air bags. That's more experimentation though.
I've seen some videos by Weldtec on raising these Express vans - there may be a few nuggets of info that can apply to your van as well. I don't know much about them, I only looked at their info as part of my research. |
Thanks TX-Trek
Yes I can understand the rebound could be alot different. Although my van would be loaded at least another 1000 lbs heavier, +-7400lbs i think. It has the same leafspring 4+1 indeed. But i have the Bilstein shocks on the rear also. SHould be Ok i think.
I followed that topic from Booster earlier about the overload. I did that. Well i "disabled" it by just flipping them upside down ") So it is still there but not in contact and probably will never be. This seems to work great.
I will get back into it in a few weeks and let you know about the airbags.
|
|
|
|
|
02-24-2022, 03:10 PM
|
#25
|
|
Platinum Member
Join Date: Aug 2020
Location: TX
Posts: 179
|
Yes I think the Bilsteins will be my next change when my current oem shocks wear out.
Look forward to hearing of your results, it's interesting to see how the suspension changes work with your van.
|
|
|
|
|
02-26-2022, 10:34 PM
|
#26
|
|
Platinum Member
Join Date: Aug 2020
Location: TX
Posts: 179
|
I'm not sure if I'm seeing an issue with the new leaf spring u-bolts. They are grade 8, 5/8" and about 11" long, ordered from Stengel Bros, who provide all sorts of suspension components. I don't believe this to be a quality issue.
When I installed them, I checked the torque sequence and rating. These are unplated Gr8 that have a torque spec of 170 ft-lbs. I installed them to 155 ft-lbs (I checked torque with 2 different torque wrenches) as I thought this would provide plenty of clamping load. Plated u-bolts have a spec of 120 ft-lbs.
I've only put about 30 miles on the van, but as I've checked the torque 4-5 times now, I've noticed that they typically loosen up by about 10-12 ft-lbs. That's even while sitting in the garage. I've installed u-bolts before but not this length - other shorter u-bolts seemed to reach and hold torque without repeated need to re-torque.
We're heading out Monday on a 200 mile trip and I'm taking my torque wrench with me to check them. But it's bothering me and I keep trying to understand what's going on here. To add to this, I checked the factory manual and it shows a torque spec of 103 ft-lbs  .
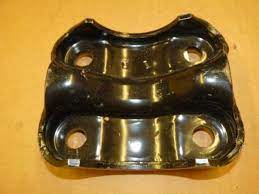
Spring leafs and spacer are fine so that leaves either the u-bolts still stretching or the spring plate getting distorted. Here's a pic of the spring plate (stock photo but correct part number). It's a robust, thick piece with very good bearing on the axle tube at the ends and in the middle. I can't visually see any deformation - I'll see if I can get a straightedge on it though.
The bolt holes in the spring plate aren't extended out from the main part of the plate, and are very well supported by the way the plate is designed to rest against the axle. The axle tubes themselves look ok and don't seem to be distorted. Right now I'm inclined to see if the torque lands on something consistent, but I can certainly replace all u-bolts and spring plates if needed as none of them is a high dollar item.
Any input is appreciated, thanks.
Edit, I should also mention that I used the deep style nuts (not nylock) and extra thick washers provided with the bolts, threads were oiled, with a very light smear of antiseize on the washers.
|
|
|
|
|
02-27-2022, 01:54 AM
|
#27
|
|
Platinum Member
Join Date: Aug 2010
Location: Minnesota
Posts: 11,984
|
Quote:
Originally Posted by TX-Trek
I'm not sure if I'm seeing an issue with the new leaf spring u-bolts. They are grade 8, 5/8" and about 11" long, ordered from Stengel Bros, who provide all sorts of suspension components. I don't believe this to be a quality issue.
When I installed them, I checked the torque sequence and rating. These are unplated Gr8 that have a torque spec of 170 ft-lbs. I installed them to 155 ft-lbs (I checked torque with 2 different torque wrenches) as I thought this would provide plenty of clamping load. Plated u-bolts have a spec of 120 ft-lbs.
I've only put about 30 miles on the van, but as I've checked the torque 4-5 times now, I've noticed that they typically loosen up by about 10-12 ft-lbs. That's even while sitting in the garage. I've installed u-bolts before but not this length - other shorter u-bolts seemed to reach and hold torque without repeated need to re-torque.
We're heading out Monday on a 200 mile trip and I'm taking my torque wrench with me to check them. But it's bothering me and I keep trying to understand what's going on here. To add to this, I checked the factory manual and it shows a torque spec of 103 ft-lbs .
Spring leafs and spacer are fine so that leaves either the u-bolts still stretching or the spring plate getting distorted. Here's a pic of the spring plate (stock photo but correct part number). It's a robust, thick piece with very good bearing on the axle tube at the ends and in the middle. I can't visually see any deformation - I'll see if I can get a straightedge on it though.
The bolt holes in the spring plate aren't extended out from the main part of the plate, and are very well supported by the way the plate is designed to rest against the axle. The axle tubes themselves look ok and don't seem to be distorted. Right now I'm inclined to see if the torque lands on something consistent, but I can certainly replace all u-bolts and spring plates if needed as none of them is a high dollar item.
Any input is appreciated, thanks.
Edit, I should also mention that I used the deep style nuts (not nylock) and extra thick washers provided with the bolts, threads were oiled, with a very light smear of antiseize on the washers. |
They could be stretching, or the springs could still be settling in as they need to slide on each other get fully bedded in. I retorqued our std length ones a couple of times.
They may also be overtightened because of the oiled threads which can put more force on the ubolt than if done dry. It all depends on how the rated the torque for them, although most bolts seem to say dry or with a specific and often furnished lube on the bolts. A call to the seller may be in order. 155# is very high, you must get a good workout while lying on ground.
|
|
|
|
|
02-27-2022, 03:10 AM
|
#28
|
|
Platinum Member
Join Date: Aug 2020
Location: TX
Posts: 179
|
Yes, it's pretty tough under there lol. I've got a 1/2 torque wrench with plenty of capacity but I also use a 3/4 torque wrench that's heavy but easier to pull. Instructions noted threads should be lubricated with oil or anti-seize.
I'll contact Stengel but it will be after we've headed out Monday unfortunately. The best I can do is run it and see what happens. I'm not as concerned about a bolt snapping than I am about the spring and or axle wiggling around. I did put some witness marks at the plate edge to see if it moves at all.
I checked again with lower settings - first 130 and then 140, and got a click on both. So maybe they are not loosening up as much as I first thought, or as you said they are simply still just getting used to their new home.
I'll post as I get a bit further with this in the coming week, including my torque check when we get to our 200 mile destination. I think based on the factory spec of 103, if these bolts are still clicked at 140 I may leave them alone. But I will call the supplier regardless.
Thanks.
|
|
|
|
|
02-27-2022, 06:55 PM
|
#29
|
|
Platinum Member
Join Date: Aug 2020
Location: TX
Posts: 179
|
Looks like some installer oversight here ....
I did look again at the instructions for these (Dayco) u-bolts. They state that the mfg. torque specs should always be followed unless they are not available. In that case refer to the u- bolt torque chart.
So evidently I only focused on the u-bolt chart which showed a max torque of 170 vs the 103 per express factory manual. Granted there's always an allowable fudge factor, but I think that the current torque of 140-150 ft lbs is 40%-50% over spec and a bit too much.
I drove around this morning, got fuel, errands, and checked the torque setting. They all immediately clicked at 140 which told me they are a bit higher.
If these were at 120 I wouldn't really be too concerned, but knowing how I am about things, I'm considering swapping in new spring plates and u-bolts when we get back. I've already got a spare two u-bolts, so all it would be is one more set of u-bolts and 2 spring plates. Minimal cost and an easy replacement.
There's no evidence of axle tube or spring plate damage but that's just eyeballing with a strong light. What's your opinion? An I overthinking all this? Should I just leave it alone and see where the torque setting lands or replace these parts?
|
|
|
|
|
02-27-2022, 07:20 PM
|
#30
|
|
Platinum Member
Join Date: Aug 2010
Location: Minnesota
Posts: 11,984
|
Quote:
Originally Posted by TX-Trek
Looks like some installer oversight here ....
I did look again at the instructions for these (Dayco) u-bolts. They state that the mfg. torque specs should always be followed unless they are not available. In that case refer to the u- bolt torque chart.
So evidently I only focused on the u-bolt chart which showed a max torque of 170 vs the 103 per express factory manual. Granted there's always an allowable fudge factor, but I think that the current torque of 140-150 ft lbs is 40%-50% over spec and a bit too much.
I drove around this morning, got fuel, errands, and checked the torque setting. They all immediately clicked at 140 which told me they are a bit higher.
If these were at 120 I wouldn't really be too concerned, but knowing how I am about things, I'm considering swapping in new spring plates and u-bolts when we get back. I've already got a spare two u-bolts, so all it would be is one more set of u-bolts and 2 spring plates. Minimal cost and an easy replacement.
There's no evidence of axle tube or spring plate damage but that's just eyeballing with a strong light. What's your opinion? An I overthinking all this? Should I just leave it alone and see where the torque setting lands or replace these parts?
|
I the torque chart is their chart for their U bolt size and strength level, I can't think that the bolts are damaged. If they had yielded you probably would have felt that and they would not go higher torque after that.
Damage to other parts would be more likely, but probably not an issue.
I would just watch them and see how low they go, but backing them off and redoing the torque would work also and probably be more accurate
One thing to remember is when you recheck torque you have to deal with breakaway force adding to the torque. The actual torque the bolt was at can be quite a bit lower than what a retorque showed if you put the wrench on and go. A test to see how much breakaway you are dealing with would be to torque to your level and just take all the force off the wrench for a few seconds, then torque again to see what it read in breakaway.
|
|
|
|
|
02-27-2022, 08:07 PM
|
#31
|
|
Platinum Member
Join Date: Aug 2020
Location: TX
Posts: 179
|
Thank you for some sanity lol and excellent advice. I forgot about the breakaway vs rotational torque while all this other stuff was swirling away in my brain. The irony here is that I'm in the middle of assembling a 454 and just made a chart of breakaway vs rotational torque readings as I installed each piston, then also for the assembly. Geez you'd think I'd have remembered that...
Even with the higher than factory torque I know I'm not anywhere close to the max value of 170 so I believe the u bolts themselves are fine. I'll leave them as they are and check them on our trip. Hopefully this all turns out to be a non-issue.
Thank you!
PS a sidenote - I finished loading up the van and also filled the rear (interior) water tank. Using the new airbags is great - it let me tailor each side ride height to compensate for heavier driver side load as well as help both rear springs
. I noticed the driver airbag took about 45 psi to level it up to passenger side which took about 30 psi. I'll maybe tweak the pressures if needed as we head down the road.
Current fender lip height, loaded, ready to go:
Front 36"
Rear 36.75"
|
|
|
|
|
02-27-2022, 08:17 PM
|
#32
|
|
Platinum Member
Join Date: Aug 2010
Location: Minnesota
Posts: 11,984
|
Quote:
Originally Posted by TX-Trek
Thank you for some sanity lol and excellent advice. I forgot about the breakaway vs rotational torque while all this other stuff was swirling away in my brain. The irony here is that I'm in the middle of assembling a 454 and just made a chart of breakaway vs rotational torque readings as I installed each piston, then also for the assembly. Geez you'd think I'd have remembered that...
Even with the higher than factory torque I know I'm not anywhere close to the max value of 170 so I believe the u bolts themselves are fine. I'll leave them as they are and check them on our trip. Hopefully this all turns out to be a non-issue.
Thank you!
|
Yep, I agree. Of course I am sure you know that the oil theads will be closer to set than the dry ones.
Built a new Buick 350 LT1 Gen2 reverse cooling engine for my 96 Roadmaster last winter so had all the torque stuff reminded again. I was surprises how vehement ARP was on using their, and only their, lube on head bolts and other critical parts. Of course they had a big contradiction as they also said to use their, and only their, sealant on the head bolts that went into the water jacket. Never figured out how to do that  By the way, don't ever use their headbolt sealant as it very, very prone to leakage. I use either Permatex non hardening or Rightstuff for headbolts and other into the jacket sealing and both have been very good to me.
What is the 454 going into? I have been following a 454 build on the GM Longroof forum that a guy is doing for the second time since the first one failed.
|
|
|
|
|
02-27-2022, 11:39 PM
|
#33
|
|
Platinum Member
Join Date: Aug 2020
Location: TX
Posts: 179
|
Booster , first a thanks for your great help, really appreciate it.
Engine's going back into my 57 but as a higher hp version. I originally built it from 85-90, then drove it, then it sat, then drove, repeat. In 2019 I decided to give the car a complete refresh meaning I'm essentially building it again. MK IV 454/th400/F9.
Funny you mention about ARP sealing - I'm using their fasteners for main studs, cam bolts, balancer and the SCAT rods come with their bolts. Good stuff and I use their lube for those. But since the head bolts go into the water jacket I only use Permatex #2. Last time the engine went from 1987 to 2019 with zero leaks using it.
|
|
|
|
|
02-27-2022, 11:55 PM
|
#34
|
|
Platinum Member
Join Date: Aug 2010
Location: Minnesota
Posts: 11,984
|
Quote:
Originally Posted by TX-Trek
Booster , first a thanks for your great help, really appreciate it.
Engine's going back into my 57 but as a higher hp version. I originally built it from 85-90, then drove it, then it sat, then drove, repeat. In 2019 I decided to give the car a complete refresh meaning I'm essentially building it again. MK IV 454/th400/F9.
Funny you mention about ARP sealing - I'm using their fasteners for main studs, cam bolts, balancer and the SCAT rods come with their bolts. Good stuff and I use their lube for those. But since the head bolts go into the water jacket I only use Permatex #2. Last time the engine went from 1987 to 2019 with zero leaks using it.
|
That is the Permatex I use also. Very good stuff. No regular silicone anymore, just Great Stuff for those areas.
|
|
|
|
|
02-28-2022, 12:07 AM
|
#36
|
|
Platinum Member
Join Date: Aug 2020
Location: TX
Posts: 179
|
Quote:
Originally Posted by booster
That is the Permatex I use also. Very good stuff. No regular silicone anymore, just Great Stuff for those areas.
|
I've also found Hondabond to be an excellent sealant.
|
|
|
|
|
02-28-2022, 02:16 AM
|
#37
|
|
New Member
Join Date: Jul 2018
Location: CA
Posts: 15
|
Hello Tx-Trek and Booster—
Thanks so much for this detail! I have a C210 Popular (50,000 mi) which I suspect is pretty much stock, I’m the third owner and not nearly as skilled or educated as you guys, but I’ve had the rough suspension as well and had only considered upgrading to Billsteins and maybe going on a diet. Thanks again for sharing! We love our 210, but know it needs some upgrading here and there. —Jim
|
|
|
|
|
02-28-2022, 09:17 PM
|
#38
|
|
Platinum Member
Join Date: Aug 2020
Location: TX
Posts: 179
|
250 miles later I'm happy to report the van was rock steady, a real pleasure to drive. Soaked up bumps and dips very well and was much more composed going down the road. This suspension work was worth every penny and time spent. A recheck of the u-bolts yielded all tight, all seems to be fine.
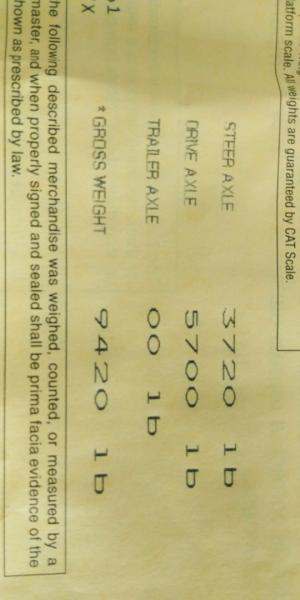
I also weighed it, full gas tank, full rear (interior) water tank, empty front water tank, standard genset and about 50 lbs of tools and stuff in the very back, 2 people, supplies. Front was a bit lighter than I thought.
|
|
|
|
|
03-05-2022, 01:08 PM
|
#39
|
|
Platinum Member
Join Date: Aug 2020
Location: TX
Posts: 179
|
Here's some info after this first road trip - about 550 miles total.
As I've mentioned the ride is light-years away from the original suspension version. I was particularly pleased with those overpass transitions that caused the van to either slam into them or bounce skyward. Much better absorption and more importantly control. We encountered crosswinds that certainly you could feel against the van, but again the ability to control without much drama was a big benefit.
The increase in ground clearance was a plus, especially at the macerator pump. We stopped at a state wildlife refuge where a couple of the side roads had some significant ruts and potholes that we very slowly crept through. Nothing ever touched underneath.
I did check hub/tire temps but it was not an immediate check, meaning it was after hitting an exit and pulling into a gas station, so I'm guessing there was a bit of cool-down time. Ambient temperature 63d, sunny, speed between 65 and 70. Temp taken at center of wheel and at tire sidewall. I was more interested to see if there was a corner that was out of range of the others, but this wasn't the case.
Front hubs 95-100d, front tires about 110d
Rear hubs 115-120d, rear tires about 120-125d
As expected the front springs have settled a bit:
First installed - LF 36.5" RF 36.5" Z-height 4.8"
After 500 miles - LF 36" RF 35.75" Z-height 4.5"
No drama from the rear airbags. I simply checked the height at LR and RR before we left and before we returned and made a very slight adjustment if needed to get the rear heights as close together as I could.
|
|
|
|
|
03-05-2022, 02:22 PM
|
#40
|
|
Platinum Member
Join Date: Aug 2010
Location: Minnesota
Posts: 11,984
|
Quote:
Originally Posted by TX-Trek
Here's some info after this first road trip - about 550 miles total.
As I've mentioned the ride is light-years away from the original suspension version. I was particularly pleased with those overpass transitions that caused the van to either slam into them or bounce skyward. Much better absorption and more importantly control. We encountered crosswinds that certainly you could feel against the van, but again the ability to control without much drama was a big benefit.
The increase in ground clearance was a plus, especially at the macerator pump. We stopped at a state wildlife refuge where a couple of the side roads had some significant ruts and potholes that we very slowly crept through. Nothing ever touched underneath.
I did check hub/tire temps but it was not an immediate check, meaning it was after hitting an exit and pulling into a gas station, so I'm guessing there was a bit of cool-down time. Ambient temperature 63d, sunny, speed between 65 and 70. Temp taken at center of wheel and at tire sidewall. I was more interested to see if there was a corner that was out of range of the others, but this wasn't the case.
Front hubs 95-100d, front tires about 110d
Rear hubs 115-120d, rear tires about 120-125d
As expected the front springs have settled a bit:
First installed - LF 36.5" RF 36.5" Z-height 4.8"
After 500 miles - LF 36" RF 35.75" Z-height 4.5"
No drama from the rear airbags. I simply checked the height at LR and RR before we left and before we returned and made a very slight adjustment if needed to get the rear heights as close together as I could.
|
Always great to see the final results, especially when the results are good, thanks for posting.
The huge band into the overpasses because of poor transition on approach was exactly what irritated us the most as it really banged on some of them. That all went away on ours also, which I credit to the bumpers in the bags, I think.
|
|
|
|
|
|
 Posting Rules
|
You may not post new threads
You may not post replies
You may not post attachments
You may not edit your posts
HTML code is Off
|
|
|
|
 » Recent Threads
 |
|
|
|
|
|
|
|
|
|
|
|
|
|
|
|
|
|
|
|
|
|
|
|
|
|
|
|
|
|
|
|
|
|


 Linear Mode

