Journey with Confidence RV GPS App RV Trip Planner RV LIFE Campground Reviews RV Maintenance Take a Speed Test Free 7 Day Trial ×


Reply
 
Thread Tools Display Modes
 
Old 10-24-2022, 08:21 PM   #1
New Member
 
Join Date: Oct 2021
Location: Ca
Posts: 6
Default R&R propane hose

2008 Roadtrek with hitch receiver. Must remove hitch,
8 bolts. Leak was found at the BBQ connection. Replaced 7” hose with a standard 12” Amazon purchase, under $25. Required relocating mount because of the added length, but easy with self tapping screws.

Hint on reinstalling receiver. Bolts are NOT attached to the frame, but simply drop through holes. Makes it tough to retighten bolts by being loose. Manufactured plates with corresponding holes, welded bolts to the plates, dropped them in the frame and was very easy to tighten bolts that didn’t move.
Landsub is offline   Reply With Quote
Old 10-24-2022, 09:06 PM   #2
Platinum Member
 
Join Date: Oct 2010
Location: VA
Posts: 993
Default

Quote:
Originally Posted by Landsub View Post
2008 Roadtrek with hitch receiver. Must remove hitch,
8 bolts. Leak was found at the BBQ connection. Replaced 7” hose with a standard 12” Amazon purchase, under $25. Required relocating mount because of the added length, but easy with self tapping screws.

Hint on reinstalling receiver. Bolts are NOT attached to the frame, but simply drop through holes. Makes it tough to retighten bolts by being loose. Manufactured plates with corresponding holes, welded bolts to the plates, dropped them in the frame and was very easy to tighten bolts that didn’t move.
I found that I did not need to remove the hitch entirely on my 2006 210. I removed the bolts on the right side. Then I started loosening the bolts on the left side. The right side will drop down. Just loosen the left side bolts as much as needed to drop the right side enough to get access to the propane regulator.
peteco is online now   Reply With Quote
Old 11-08-2022, 02:57 PM   #3
Platinum Member
 
Join Date: Aug 2020
Location: TX
Posts: 179
Default

I know this has been up for a while, just some added info on a 2010 210... Not sure if you're was a similar setup but this was from my complete r&r of the propane regulators and hoses. Easier to overhaul the whole thing than to keep chasing seeping leaks.

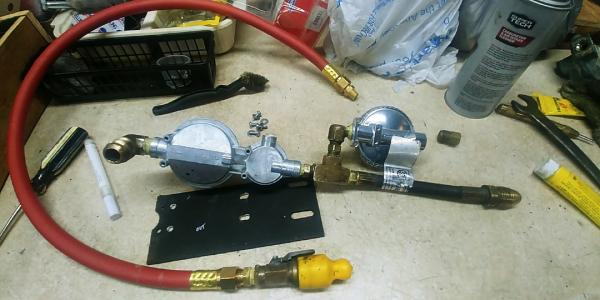
You can see the new primary and secondary regulators but I recommend that every fitting be disassembled , threads cleaned and refitted using gas rated sealant. I use Rectorseal #5.

Removal - I first loosened the fitting at the main line from regulator to coach. Lefty loosey. I then removed the bolts attaching the black mount plate from the propane tank so that the propane "manifold" so to speak was loosened from the tank. Next was loosening the short black hose from the tank valve. Righty loosey and support the valve itself as you work the fitting. I also removed the BBQ hose from the secondary regulator. After removing the fitting from the main inlet line the manifold can be maneuvered out thru the tank fill access hole in the bumper. Reassembly is the opposite just remember the first connection needs to be at the main tank. I didn't need to remove or even loosen tank or hitch.

In my case I needed to be sure I used a vertical vent regulators with the vent pointing down. I also had to slot a couple of the holes in the black plate for the new primary regulator - just a hair difference in the mounting, no big deal. And important last step, leak/soap test every connection under a strong light, use a small mirror if needed to look all around every fitting.

TX-Trek is offline   Reply With Quote
Reply


Posting Rules
You may not post new threads
You may not post replies
You may not post attachments
You may not edit your posts

BB code is On
Smilies are On
[IMG] code is On
HTML code is Off
Trackbacks are Off
Pingbacks are Off
Refbacks are Off


» Featured Campgrounds

Reviews provided by

Powered by vBadvanced CMPS v3.2.3

All times are GMT. The time now is 03:05 PM.


Powered by vBulletin® Version 3.8.8 Beta 4
Copyright ©2000 - 2024, vBulletin Solutions, Inc.