| Storysrvwego's Albums | |||
| Album Title | Pictures | Last Picture | |

|
Bathroom improvement(s)
This picture shows the medicine cabinet in the Travato 59K with two lights added to each side of the mirrored door. The provided overhead light in the 59K is "ok". A bit yellowish light, I popped off the cover and found that it was a #1141 bayonet incandescent bulb. Wow, how old school is that, considering that WB is using LED's everwhere else in the coach. Since the fixture itself is ok (maybe not pretty but head-smacking-smart), I will someday buy an LED replacement that will go into the same bayonet socket. But that still does not solve getting sufficient light in front of your face at the mirror. Why? Because the overhead light is behind you when facing the mirror and sink. My wife was the first to make a comment after putting in contacts and other activities while staring into the mirror. Need more light she said. I complied with this implied directive and sought out something that would look nice and more importantly, do the job.
I came up with a strip of LED's that are mounted in an 18 inch long by 1/2 inch tall and 1/2 inch wide aluminum U shaped extrusion. It has a milk white lens so it might provide excellent light without blinding you. This fixture he fixture is available from superbrightled.com. I guesstimated that their brilliance for "Face Time" in the bathroom would be just about right. With their 1/2 inch square dimensions, these light fixtures can be placed each side of the mirrored door without door open/close interference. I ran their 12 volt DC power wires over to to the wall switch that turns on the factory overhead light. Now all three lights come on together and the lighting is near perfect for the entire bathroom now. You can see yourself in the mirror just fine. |
1 | 06-27-2018 06:23 PM |
|
Ham Radio and your WINNEBAGO Travato
A few of us travelers are Amateur (aka Ham) Radio folks. Some of us do this as a hobby. Some also do this to assist with emergency services. Either way, if you have an expensive Class B that you don't want to poke holes in, it can be daunting to engineer ways around that.
And then of course there is how to keep your antennas from being destroyed by things like tree branches and other objects near to your roof line. I operate HF as well as VHF and UHF. Since I only desire to operate HF while stationary, this made the installation of a reasonable antenna, reasonably easy to accomplish the no-holes in the van thing. I have the WB factory available roof rack with rear door ladder storage bracket (and ladder). I drill-mounted an antenna mount bracket on the ladder storage bracket to mount the base component of an ALPHA Moto multi-band antenna. When I am parked, I have a six foot, a 9 ft and a long wire that I can attach to the base of this antenna. It is just a quick climb of the ladder to twist-lock the vertical whips in place. If I really want to capture and transmit signals, I attach a long wire instead in an end fed style setup and the world of contacts across several bands is improved. The ALPHA Moto antenna is an interesting product. It would seem that it's electrical characteristics are not ideal. Until you use one. Yes there are more efficient antennas. I am not talking about SWR specifically. I am talking about Inductance, capacitance and the whole mind warping stuff of antenna theory. Just know that the antenna works pretty darn good as I have made worldwide contacts with this antenna on my JEEP Wrangler over the last two years. Now it has a home on the Travato. Two for two on the first two CW calls by other hams on the air. One a few states away and the other one in Rhode Island; just about as far away in the CONUS-48 states from Idaho as I can get. So I am satisfied that Germany, Japan, Italy, etc. will still be contacts I can make just like this antenna did when installed on the JEEP JK. For now here are two pictures that show the ALPHA Moto and my VHF antenna. The latter is an unusual "slot" antenna design, posted in the March issue of QST on page 38. After contemplating using the typical vertical antenna for mobile vehicles with a motorized raise/lower device, this antenna just appeared in the QST magazine one day. Perfect solution for VHF; it's omni directional with a vertical polarization, can be magnetic attached and yet does not require the roof as a ground plane. AND it is ONLY three inches tall. I would wipe the Air Conditioner off the roof of the Travato (ahh, not good!) before this antenna would get nailed. Collected parts to fabricate per the magazine article and in just a few days, wala - a perfectly working, amazing performance VHF antenna. It is placed on a spot on the roof just to the right of the Off the Air TV antenna. The forward side of the antenna is close to the forward cross rail of the roof rack. Antenna Analyzer results look very good. For a 0 gain omni-directional antenna, I am hitting repeaters of reasonable distance away as well as operating Simplex with no problem. At 50 milliwatts from a KENWOOD TH-D72A handheld and 12 feet of kinda lossy (but only 12 ft) RG58 coax. I started out at 5 watts, then low pwr on the '72 and then EL/extra low power at 50mw. Yes I need to do more testing for range but this initial testing is very good with one repeater just under 10 miles away. Try that on a CB radio at average 3-4 watts output (and what is it at the antenna??) in a mobile using RS coax. Good luck. More to come with additional pictures of the final VHF & UHF cabling. The UHF is a separate little 6 inch tall vertical on an aluminum plate. This plate is mounted in the corner of the front roof rack cross rail and the long side rail of same rack. That mounting is work in progress. And I need a short length of coax to connect it to the diplexer which is yet to be mounted up top too. So many projects, so little time but I will include more on this whole setup, later. VHF/UHF radio will be a KENWOOD TM-D710GA when I can get the CEO (my wife) to authorize funding. Essentially the big version of my TH-D72A hand held. Along with the TS-480SAT already installed, KNWD Sky Command can be used for HF operation from the HT, through the '710. Or I can just do simple cross band VHF/UHF repeater so the HT can have peppy RF output while I sit outside the Travato or take a hike for few miles of range between me and the "repeater" in the Travato. Again, stay tuned; more to follow. And still there will be no added holes in the body of the Travato. 16May18 - I just completed my DC wiring for the radios. Using 10 gauge red/black stranded zip wire, I setup 12vdc from the chassis battery between the front seats as well as a line directly from the pair of AGM batteries under the coach. The wires from the AGM batteries are sheathed in plastic wire loom all the way forward where the wires enter the chassis battery box. From the battery box, I ran wires from the coach and chassis batteries up to a Double Pole, Double Throw (DPDT), 20 amp rated switch that I mounted in the dash. This allows me to select whether I am taking power from the chassis battery, or the pair of AGM coach batteries. The coach batteries are tied to roof top solar and thus have the advantage of running the radio when stationary without putting a drain on the chassis battery. And solar recharging, depending on whatever other devices are operating in the coach. A pair of wires from the center poles of the DPDT switch are routed down to the center of the dash behind the lower cup holders. Here is where I have four pairs of Power Pole (PP) connectors; one pair used to connect this feed line. One pair of the remaining three PP taps connects a TS-480SAT HF rig. A second tap is for the UHF/VHF rig. The third and final PP port is a spare for whatever other device I might want to plug in. Overall the appliances, lighting, etc in the Travato are RF-quiet. Except for the Insight TV used by WINNEBAGO. That thing is RF noise crazy when it is turned on. I might have to encase the TV in lead. Or smack it with a hammer until I find the point where the noise stops. Ok ok, just kidding. Just keeping it turned off while operating radios works fine. Gene / K7TXO |
5 | 06-27-2018 06:06 PM |
|
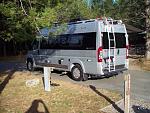
Waste Pipe Storage Travato 59K
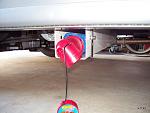
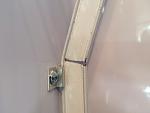
For my wife and I, the WINNEBAGO Travato 59K was the best solution to our type of travel. One issue I think most Class B folks with typical USA waste system is where to store the pipe to connect to dump stations. The 59K comes with an adequate 10 ft flex hose but no place to really store other fittings. And if you want a heavier duty and/or a longer hose, forget it. Unfortunately there is no place to put a storage tube under the 59K. Or... is there. Bearing in mind the minimum height of everything else under the 59K, there actually is a place for a 4 foot long, 5x5 fence post. And I set it up with a quick and easy to use cover latch. The only thing I will add to what you see is a strap between the box and the cap. The first time my wife used this, she set the cap on the running board. I opened the slider door and the bottom of the door slid across the top of the cap. No damage to the door edge or plastic cap but a hanging strap for the cap will fix that. The tube is a standard end post for a 3 rail fence. I used the bottom-end of the post, cutting it at 48 inch length. This provided about 1/2 of a rail slot at the removable cap end. I placed this slot downward and will glue an open mesh screen here. This will allow any remaining moisture to drain while traveling but also keep wasps or other bugs and such from making a home inside the pipe and tube. Two brackets were bent from 1/8 inch x 3/4 wide flat steel to mount the tube to the underside of the Promaster "frame" with the tube angling downward at the passenger side of the chassis. A 1/8 x 1/2 inch wide aluminum flat was used to make the fence post cap-cover-bail that hinges freely on carriage head bolts. These bolts are nutted in a way to secure to the tube while allowing free movement of the bail. The rear of the tube has another fence post cap that I PVC glued and screwed in place. This back end of the tube is firmly secured about 1/2 inch away from a horizontal heat shield under the chassis so that the tube does not have contact with potentially hot metal that could melt the tube.
Now the WINNEBAGO provided, light duty flex hose can be stored with say, a 45 deg clear fitting (my preference) on the van connection end and half of a 90 deg universal dump station fitting on the dump-end of the hose. Actually I could notch-modify the tube to allow the entire 90 degree fitting to remain on the hose when stored but I am satisfied with how I have it setup now. The other half of the 90 deg fitting is stored in a heavy duty sealing bag in the rear of the Travato for now. I have other ideas for that too. If the dump station was reasonably clean upon arrival, I can extract the hose already setup as described, complete the black & grey dump, wash down and store everything in short order. And nothing but the 2nd piece of the 90 deg elbow and my gloves gets stored inside the Travato's rear cubby hole within two sealing bags that takes up hardly any room at all. What to do now with the short, two foot long tube built into the side of the Travato? Ours was never used so it is still clean. Storage being at a premium, two backpack fishing rods fit here nicely. But if I can find a ground mat to use at the slider door entrance that I can fold & roll to fit in this tube, that is what I would like to use it for. We have not looked around yet to see if we can get a decent mat that is also thin enough to limply fold & roll into this tube but still be worth using as a ground mat. Onward to complete VHF, UHF and HF ham radio installation. |
4 | 05-03-2018 03:23 PM |
|
Erwin Hymer Group Camping World Sunshine Van One
Misc Interior pictures
|
5 | 10-16-2017 06:17 AM |


