|
Installation of Victron Battery Monitor
|
My Roadtrek's original battery configuration was one 12V rated at 90 ampere hours. I found this inadequate when the propane function of my refrigerator went out and I had to run on 12V, while staying in in a state park with no shore tie and very limited hours when generators could be run.
I upgraded the battery to two 6V Golf cart batteries rated at 235 aH. This has proven much better for our typical 2 or 3 days of boondocking.
I also felt battery monitoring would be advisable so I could determine how fast we were depleting and plan charging needs accordingly.
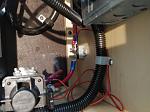
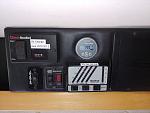
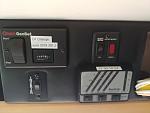
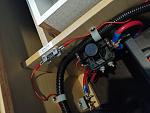
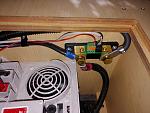
The Victron utilizes a shunt between the 12V system and Battery negative terminal. It allows you to determine current draw of equipment and estimate the amount of time before batteries need external charging. I mounted the shunt in the Roadtrek's "electrical compartment" close to where the negative lead to the battery was located. I put the control interface on the Roadtrek's "Control Center."
The pictures show the basic Victron Monitor, but I subsequently upgraded to the bluetooth model which gives me a full readout on my phone. |
|
|
All times are GMT. The time now is 04:48 AM.