 |
|
 04-30-2017, 08:42 PM
|
#1
|
|
Platinum Member
Join Date: Apr 2017
Location: Quebec
Posts: 206
|
 Gandalf the Roadtrek
This thread will be dedicated to the build of my 1998 Roadtrek Versatile 200.

My wife, Alfie (12lbs. Chihuahua) and I are planning the following trips for now:
- Summer 2017: 3 weeks in Newfoundland (trial run)
- Summer 2018: Go across Canada and Yukon
- Summer 2019: Start going south... then keep going south... until we don't feel like it anymore. The objective is to eventually reach Ushuaia.
- Someday: Ship to Europe and keep going...
You can also read my intro thread to get a little more background: intro thread link.
Here's what I need to do:
- I'm not looking to convert it to 4WD (I can't say I'm not tempted though... :drool  . I don't think it's necessary for what we want to do. Others will agree (check out this conversation as an example). I do plan on making sure I don't get stuck too often and that it's easy to get myself out of trouble.
- We like the idea of slow travel.
- I don't want to build this thing forever. It's gotta be at least almost done by 'Nov 2017.
- I want this vehicle to be reliable.
- I want to be able to boondock anywhere... But we'd rather pay a minimal fee to be in nature than have free Wal-Mart parking lot camping.
The build
( I will update this section with links as the build progresses.)
- Add ground clearance in the suspension (currently discussing with Weldtec).
- New tires for ground clearance that can be deflated for reasonnable beach driving.
- Powder-coated stock steel wheels.
- Solar panel with corresponding electrical system.
- Steel front bumper with winch and recovery points.
- Steel rear bumper with spare tire mount and extra fuel.
- Roof rack for surf and SUP boards (for Baja per bucket list).
- Mount for MaxTrax or equivalent.
- Coat running boards with bedliner.
That's about it. The rest should be minor details.
The challenge
- Limited availability of parts for the 1996-2003 2WD Chevy Express (I wish I had found a Ford... but I love this one).
- The whole camper part is a big Fiberglass bubble. This means: - There's no gutters to install the standard roof racks for the surf board,
- There's no doors in the back so no hinges to install an Aluminess bumper.
This means the whole storage system will have to be custom. For now, and this may seem over the top (pun intended), but this is my inspiration:

(Photo courtesy of my friend VirtualVanner)
- I don't have a garage (we sold the house and downsized to a condo) so I have to work at my friend's (to whom I lent ALL my tools long term... he owes me), in my dad's driveway or have the work done by somebody else (thankfully it's already in great condition).
Thanks for following along or if you're a fan of Instagram you can find me at @matsirois .
|

|

|
|
05-02-2017, 01:54 AM
|
#2
|
|
Platinum Member
Join Date: Aug 2014
Location: Brampton,Ontario
Posts: 244
|
It sure sounds like your going to be busy with all those plans, we did the Newfoundland trip last year, and it was truly amazing, probably one of our best trips ever in our 1997 Roadtrek, slept on the ocean almost evry night, the people were some of the friendliest we ever met, They say the best time to go is the end July and the beginning of August, lots of festivals, and great weather too, please show some pics of your van and the upgrades your planning, we always like to see other handy work and new ideas,,,, good luck,,,,,
|
|
|
|
|
05-05-2017, 05:10 PM
|
#3
|
|
Platinum Member
Join Date: Apr 2017
Location: Quebec
Posts: 206
|
First quick question:
Looking at my sewer drain it seems rigged:

Does anybody have a photo of what it's supposed to look like from the factory?
|
|
|
|
|
05-05-2017, 11:18 PM
|
#4
|
|
Platinum Member
Join Date: Jul 2014
Location: Garland, Texas
Posts: 238
|
Hi Matt. Try these pictures for a factory drain example. Regards!
|
|
|
|
|
05-08-2017, 03:27 PM
|
#5
|
|
Platinum Member
Join Date: Apr 2017
Location: Quebec
Posts: 206
|
Thanks gklugie!
I think mine is pretty stock except for the hinge being bent. Easy fix!
Also, i think I have an extra hose coming from a tank on the passenger side which happens to be weeping. I'm not too worried as I think it's the fresh water tank but I still need to get it fixed. I'm also wondering why I can't see it in gklugie's picture. 
So saturday I spent some time removing the stripping decals at the meeting point between the white at the top and the blue part painted on the rocker panels. This was my priority because I might be bringing it soon to a supplier to have the line-x painted on the bottom.
Here it is after a quick wash to make sure I wasn't scratching with a bunch of sand and dust ("Before" picture):

Here's the tools I used:

I thought it would be more difficult but the decals came off pretty quickly. All i needed was to heat up the glue a little bit and it would pull off. I set the heat gun about 10" from the surface and at low heat/fan level. Any more heat would make the decals melt and break and making the job more difficult.
The plastic razor blades were useful but I only ended up using one. I'll probably end up using 2-3 more.
So it ended up taking about 2 hours to remove the bottom decals. I'll post an "after" picture once I finished the ones in the middle of the body.
|
|
|
|
|
05-15-2017, 03:09 PM
|
#6
|
|
Platinum Member
Join Date: Apr 2017
Location: Quebec
Posts: 206
|
Just a quick update on my progress.
I took Friday off to work on the van because it was supposed to be a beautiful day. It's been raining a lot around here lately including flooding that we've never seen in some neighborhoods. It's a good thing I did because it rained Saturday and Sunday.
Decal removal
I continued working on removing the decals. It was a very boring day. I only managed to removed the dried on glue between the blue rocker panels and the white of the body. Ugh...
So I placed an order for 2! Wizzy Wheels on Amazon. I should be receiving them tomorrow. I hope this works... There's only so many hours I can do this!  A/C inspection
I also took a bit of time to inspect the A/C. As the previous owner said, it really doesn't seem to work. The Vent low and high positions do not work which, in itself isn't too bad. But the A/C modes also do not seem to work. The unit only seemed to be pulling in the fresh air from outside. In other words, the fan was working but the refrigeration system didn't seem to be working. Finally, the thermostat was set at the lowest and it never turned off.
So I started researching. Most of my research is based on this really good thread. I tried to find the LG LW8016ER but, according to LG Canada, it can only be ordered from an installer.
It's not even available on Amazon.ca (even if it's available on Amazon.com). I tried to find other manufacturers and models but this seems to be the only one that fits.
I left a message at my local authorized RT parts retailer and I'm waiting for their reply. To be honest I'm not expecting much for a 20 year old RV/part. We'll see.
I also contacted a few installers that might help me.
The last resort is to go buy it at Home Depot in Plattsburgh, NY or order it from Amazon.com and have it delivered at Free Port at the border.
Any other Canadians have this issue with their A/C?
Refrigerator parts
I also took a bit of time to order parts for my RM2453 Dometic fridge. It works fine but some of the plastic is broken. So I placed an order for my Flap freezer door (#14, 2932650019) because the side tab broke as well as the Right Spring Casing (#16A, 2002236004). The plastic seems to have broken because it is fairly dried up so I also ordered the Left Spring Casing (#16B, 2002236012).

I also ordered a Shelf door because it's held together by duct tape (#11, 2932576016).

I ordered all these parts from GetRVParts.com and I'll let you know how it goes.
Suspension and roof rack
It's not huge progress for a whole weekend but my "suppliers" weren't available this week.
My Suspension guy was at the ExpoOverland for the weekend.
And my contact at the workshop for the roof rack was out of the office for the week.
This week should pick up!  I can't wait to get the ball really rolling!
|
|
|
|
|
05-29-2017, 05:03 PM
|
#7
|
|
Platinum Member
Join Date: Apr 2017
Location: Quebec
Posts: 206
|
I replaced my AC did this weekend on my 1998 Versatile 200 RT.

As noted previously, I had a really hard time finding the correct AC. It has to be a LG LW8016ER because of the dimensions (the height is the critical measurement). I ended up buying it from Amazon .com as Amazon .ca did not have it. The added difficulty was that Amazon.com does not ship to Canada so I had to ship it to Freeport Forwarding which is right next to the US/Canada border. The process was simple. I declared my purchase and paid my taxes as a good citizen and it was easy and painless. Going on a Wednesday afternoon was a great call as I had no line-ups!
So Saturday morning, I went to my parents and started the job with my Dad. You could do most things alone but removing and lifting the AC from the roof is definitely a 2 person job. Here's all the steps. Let me know if you have any questions:
Old A/C removal:
- Unplug the A/C from inside the rear driver side cabinet.
- Take off the 4 screws holding the cover in place.
- Disconnect the wiring for the clearance lights.
- Remove the top cover.
- Drill out the rivets holding the rear grill in place and remove it.
- Remove the panel below the A/C.
- Remove the drip tray below the A/C. Mine was held in place with odd hardware. I doubt it's what was there at the factory because it was pretty beat up so I can't give you guidance. The tube at the back is held by a collar.
- Remove the screws holding the A/C in place.
They're inside the cabinets. One on each side and are pretty hard to find. Note that they are at an angle. We didn't see them until we force the AC out so they don't hold very much.
- Cut as much of the silicone around the A/C as possible.
There's a lot! It might have been painted over in black for cosmetic reasons.
- Now's the fun part: removing the A/C. Just pull it out with someone else's help.
- Remove the baffles on the rear sides of the old A/C unit.
This is what it will look like after the old AC is removed:


- Remove all the old silicone and clean up the compartment.
1/2
|
|
|
|
|
05-29-2017, 05:41 PM
|
#8
|
|
Platinum Member
Join Date: Apr 2017
Location: Quebec
Posts: 206
|
New AC installation:
Below, you'll find how I did it. You might change up some things but this should give you a good idea. I decided to add aluminum angles to help block the space on the top and sides. It was also a good way to attach the A/C to the cabinets (there's now 6 screws holding it in place properly instead of 2 screws barely holding on). I put a 3/4" angle on top and 1" angles on the sides.
I suggest using Stainless steel hardware.
I used GE Silicone II clear silicone.
- Add a hole for the new A/C's bigger plug. The plug is too big (with an integrated breaker) to fit in the original hole of the cabinet. I ended up drilling a 2-1/8" hole with a hole saw at the bottom of the cabinet.
- Remove the bracket on top of the new A/C. It's held in place with 3 screws.
- Lift the A/C and put it more or less in place.
- Pass the cord through the hole.
- Place the A/C in the hole for final fitting (centered and not to inwards as to prevent the cabinet doors from opening).
- Cut the angles to size and, if necessary, file them down at the bottom for proper fitment.
Because of the rib and screw at the bottom of the A/C interfering with the angle, I decided to just grind out the angle to allow the angle to fit properly. Also, looking back, I would have made the side angles go as high as the top angles to help block the holes (in other words, 3/4" higher than the top of the A/C).
- At your work bench, drill three holes in each of the angles on the side that will be in contact with the A/C. (on each end at about 2" from the edge and one in the center).
I wanted #8 screws to pass through these holes in the angles and grab onto the A/C's housing so I used a 5/32" bit.
- Drill 2 holes on each of the angles on the side that will be in contact with the perimeter of the hole.
I wanted #6 screws to pass through these holes in the angles and grab onto the wood from the cabinet so I used a 9/64" bit. Make sure to drill them closer to the edge as the opening of the original A/C is a bit wider.
- With the A/C in place, you can install the top bracket by driving some #8 x 1/2" self-tapping screws. Put some silicone between the surfaces.
- Put the side angle irons in place and mark their location with a Sharpie.
- Pull out the A/C and attach the side angles in place. You can turn the A/C from one side to the other without removing it from the roof. Make sure you put some silicone between both surfaces.
- Using the same #8 x 1/2" self tapping screws, re-install the rear baffles on each side of the rear of the A/C unit.
- Push the A/C in place and find the location where you want to place foam underneath the unit to prevent vibration noise while driving.
I used the thin foam provided with the A/C but it was kinda flimsy. I placed it below the two feet on the front of the A/C and below the rear baffles.
- Drill the fiberglass with the same bit as you used for the side of the angles that will be mounted to the opening.
Since I wanted #6 screws to pass through these holes in the angles and the fiberglass to grab onto the wood from the cabinet I used the same 9/64" bit. Careful not to drill into the cabinets.
- Pull out the A/C back out and apply the silicone on the mating surfaces.
Make sure to put a big bead on the bottom of the tray and then some silicone on all the aluminum angles that were added.
- Push the A/C back in place firmly and spread the silicone around nicely. Don't be stingy on the silicone!
If you need to do some clean-up, use brake cleaner fluid.
- Drive your screws into the 6 holes you prepared.
I used #6 x 1" SS screws.
- Add silicone wherever you think it might be necessary.
The new AC in place:

From the inside:
 2/3
2/3
|
|
|
|
|
05-29-2017, 05:51 PM
|
#9
|
|
Platinum Member
Join Date: Apr 2017
Location: Quebec
Posts: 206
|
Closing up the outside
- Put the grill in place and attach it with rivets.
I think it's about 1/8" dia. x 1/4" long.
- Connect the clearance light wiring.
- Place the cover on top and screw in the 4 screws.
That's it!
Since my drip tray is in pretty poor condition (cracks, weird white sealing material, black caulking, etc...) I will patch it up with fiberglass and finish the inside next weekend.
 3/3
3/3
|
|
|
|
|
05-29-2017, 06:00 PM
|
#10
|
|
Platinum Member
Join Date: Apr 2017
Location: Quebec
Posts: 206
|
I just wanted to share this picture courtesy of this Expedition Overland article:
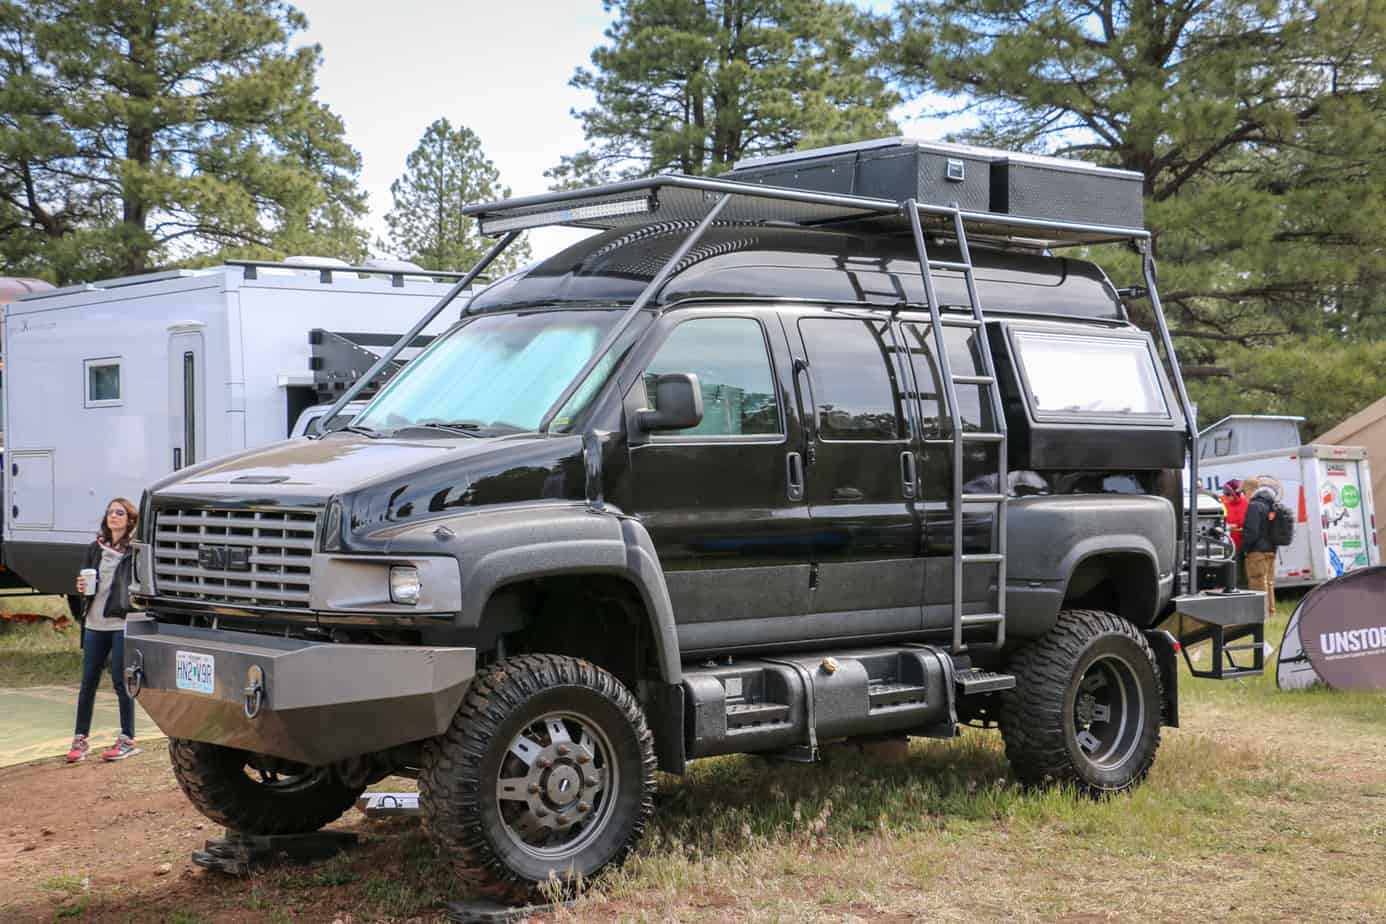
It's kind of the evil twin of my idea because my roof rack will be very similar!
We will call it the Dark Lord Sauron... but only behind it's back... 
|
|
|
|
|
06-12-2017, 04:02 PM
|
#11
|
|
Platinum Member
Join Date: Apr 2017
Location: Quebec
Posts: 206
|
I finally finished removing the stripes! Well.... Almost. I'm leaving the stripes on the roof and the Roadtrek lettering. I think the stripes on the roof help balance it out with the bottom and hide the awning on the passenger side.

I ended up using the Whizzy Wheel. It was so much faster!

The only thing is that you have to be careful on the fiberglass. In some situations, it would creat a bubble that seemed to grow with heat. Not big. Only about 1/4" in diameter. They would either "melt back in" if I let off the wheel or "burst" if I kept going. It happened at maybe 4 or 5 spots. Corners too!
But other than those 2 inconveniences, it was a necessity or I would have spent the whole summer removing the stripes!
|
|
|
|
|
06-15-2017, 09:08 PM
|
#12
|
|
Platinum Member
Join Date: Oct 2006
Location: New Brunswick, Canada
Posts: 8,828
|
Quote:
Originally Posted by Mat Mobile

...........................
- Limited availability of parts for the 1996-2003 2WD Chevy Express .............. .
|
My van is a similar vintage. For the van body, I think year range is 1997 to 2002. I'm fairly certain your RT200 is built on a cutaway chassis (not a van body) so there might be differences in parts particularly on the rear.
When I'm looking for parts, if the part fits a 1996 it is unlikely it'll fit my van. There may very well be some late in the year '96's and early in the year '03's that are similar to the '97 to '02 range but I don't think they are very common.
Folk with a 1996 run into similar problems with parts. Some of the parts sites show that '96 & '97 parts are the same but that is likely not correct.
This topic - http://www.classbforum.com/forums/f8...ings-4136.html - might have some useful info for you if you'll be looking for front coil springs.
|
|
|
|
|
06-16-2017, 01:42 PM
|
#13
|
|
Platinum Member
Join Date: Apr 2017
Location: Quebec
Posts: 206
|
Thanks for the info MarcoPolo!
That thread is very useful! If I can add any info later on, I will. Right now I'm not planning on changing the springs... I'm going with lifted spindles. But I'm open to changing the springs if it's worth it.
You're right, my van is a cutaway. Other than figuring it out by the way it's made (fiberglass on the whole back half), you can also confirm it with the wheel base.
For '98 Express van, the wheelbase is 135" or 155". For '98 cutaway, the wheelbase is 139", 159" or 177" (same as mine).
This got me intrigued so I did a VIN search and my model is a 139" WB E23.
Then you got me worried about the leaf spring dimensions... The capacity I'm not worried as the company that will be building the lifted spring to the weight I measured.
Thankfully, both the 3500 van and the cutaway have the same capacity of 6084 for the rear leaf so I'm pretty sure I'll be fine. I sent a text to the builder anyway... just in case.
|
|
|
|
|
06-23-2017, 11:46 PM
|
#15
|
|
New Member
Join Date: Jun 2017
Location: Arkansas
Posts: 6
|
Hi Peppster,
Could you tell me where you got the roof racks on your van?
Thanks,
Linda
|
|
|
|
|
06-25-2017, 03:39 PM
|
#16
|
|
Platinum Member
Join Date: Apr 2017
Location: Quebec
Posts: 206
|
Quote:
Originally Posted by Arkhikr
Hi Peppster,
Could you tell me where you got the roof racks on your van?
Thanks,
Linda
|
Hi Linda!
I haven't gotten them yet. They will be custom built by a local company. It's going to be a unique design that is attached in between the windshield and hood next to the A-pillars going all the way back to the rear frame. It's by no means a simple solution but will provide the flexibility I need for long term travel without drilling any holes in the body. It does come with a cost so it's not a low-budget solution.
Thanks for looking!
|
|
|
|
|
06-25-2017, 03:41 PM
|
#17
|
|
Platinum Member
Join Date: Apr 2017
Location: Quebec
Posts: 206
|
Quote:
Originally Posted by markopolo
|
I do need to run the RPO codes. Mostly to find out if I have the anti-slip diff.
Thanks for that thread. I had looked at it before and that's what pushed me to get a Chevy instead of a Dodge. I will need to spend a little more time on it and I might pick your brain later on front coil springs.
|
|
|
|
|
06-25-2017, 07:03 PM
|
#18
|
|
New Member
Join Date: Jun 2017
Location: Arkansas
Posts: 6
|
Thanks, Matt. I guess I posted this question in the wrong area. I meant for it to go to Peppster. Still learning how to navigate the forum.
|
|
|
|
|
06-26-2017, 02:54 PM
|
#19
|
|
Platinum Member
Join Date: Apr 2017
Location: Quebec
Posts: 206
|
Quote:
Originally Posted by Arkhikr
Thanks, Matt. I guess I posted this question in the wrong area. I meant for it to go to Peppster. Still learning how to navigate the forum.
|
Ha ha! No problem. I have to admit that I thought your question and calling me "Peppster" so casually was a little weird.
|
|
|
|
|
06-27-2017, 12:52 AM
|
#20
|
|
Platinum Member
Join Date: Aug 2014
Location: Brampton,Ontario
Posts: 244
|
Hi Arkhikr, I sent you a private message about the roof racks, I hope you received it, if not, let me know,,and Ill try again,,,,,,,
|
|
|
|
|
|
 Posting Rules
|
You may not post new threads
You may not post replies
You may not post attachments
You may not edit your posts
HTML code is Off
|
|
|
|
 » Recent Threads
 |
|
|
|
|
|
|
|
|
|
|
|
|
|
|
|
|
|
|
|
|
|
|
|
|
|
|
|
|
|
|
|
|
|


 Linear Mode

