Introduction and modification summary:
This thread will follow our quest to increase the ground clearance of our 2009 Roadtrek 190 Versatile. The goal is to increase ground clearance by 4" to 6". We want to use our R/T to travel the back roads (sometimes dirt), to enjoy the secluded areas of North America, and do our best to create pleasing photographic art.
Since there is no aftermarket support for these Chevrolet vans, this suspension modification will be something of an adventure. I will try to keep this first post updated, as to our current suspension system. Read all the pages of this thread, to follow along in the adventure. Other folks will add their modification ideas, pictures and experiences. I believe we will all learn something useful, by the time this adventure is complete.
Situation:
Well, we have had our Roadtrek 190V for since Sept 2009.
I must say that this thing is very low to the ground, and the long wheelbase makes for at lot of belly dragging. The problem is, the low point is the black/gray water valve. It was damaged while it was still on the sale-lot (fixed by the dealer), and I had to take the valve apart and re-assemble it once, because I drug-bottom.
My solution was similar to these:
http://cstsuspension.com/chevy-perorman ... ndles.html
These are 4" lift spindles for the front suspension. Very well made equipment.
The rear currently has 4" lift blocks, but will have a custom set of springs.
One issue with the 2008 Chevy 3500 Express: the rear brake hoses are not long enough, even for the factory setup. If you jack up the rear and support it under the frame, allowing the axle to hang freely, the brake hoses will be stretched very tight.
Since I added 4 more inches, I had the brake hoses lengthened an extra 7 inches, by a shop that builds brake lines for log trucks. These new lines are stout. That is 4" for the lift, and 3" because the factory was short to begin with.
Installing this lift is a serious job. I did it my self, but any good 4X4 shop could do it too. Check to see if they can deal with the weight of your RV.
Now I need to take it in for an alignment.
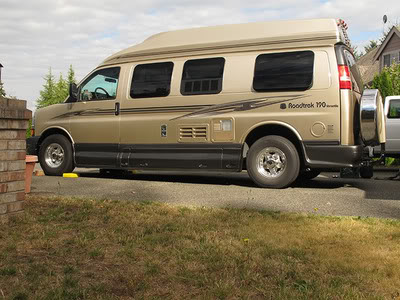
Here is the 'before' image: Notice where the lower edge of the body is, relative to the centerline of the axle. It is about level with the bottom of the wheel (top of tire sidewall).
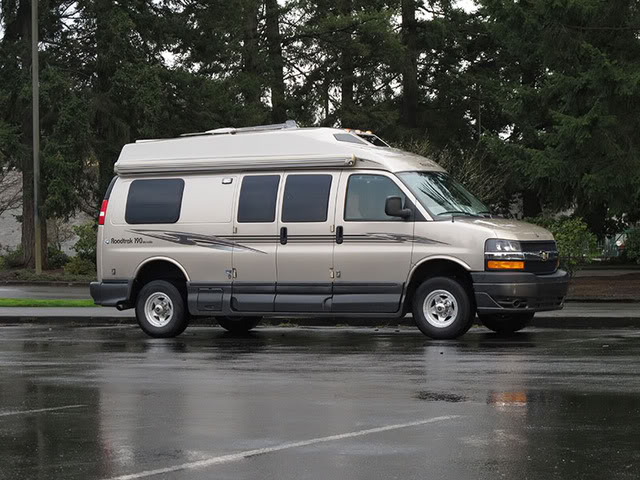
Here is an 'after' image: The lower edge of the body is now just below the centerline of the axle.
I have not had a chance to get a nice side view, but I will replace this one, when I do.
Suspension #2:
For a number of reasons, the lift spindles/knuckles did not work out. They will need to be modified, to match the geometry of the factory knuckles. So the knuckles came out, and a set of Otto-Max TTC-1617 coils went in. These coils are a little stiffer than the factory springs for the Diesel powered van. They provide 2" of lift, and a smoother ride. The ride is smoother, because it gets the front suspension off of the overload/bump-stop, helping the suspension follow the larger contours & dips in the highway. But the stiffer spring makes for a rough ride on dirt roads. Here is a link to their website.
http://www.otto-max.com/super-heavy-duty-coils.html
Here is what it looks like, with the new coils in the front, and 4" lift blocks in the rear.
Suspension #3
New 3" knuckles in the front, from Boulder Offroad, in Colorado. These knuckles are designed for the van. Perfect geometry that was easy to align properly. Rear still has 4" blocks.
Here is a link:
http://boulderoffroadvans.com/gm__chevy ... _lift_kits
and a photo of the parts (right click on the photo, and select "view image")

We also upgraded to an 18" wheel, and tires, to increase the load capacity of the tires well above the weight of the Class B. This new wheel has a +18mm offset. this is much closer tothe factory offset than the AR-23 wheels that come with the Roadtrek. They have an offset of -6mm. THis means the centerline of our tires have moved 24mm (1") inboard. This reduces the wear on the bearings, and improves the steering geometry and handeling.
These are the wheels we purchased: 18x8.5 - +18mm.
http://www.visionwheel.com/wheel.cfm?id=729

Sept 2012 - Current stature of our R/T 190. The front is about 1" taller than the rear. This will be corrected, when I have the rear springs replaced.
Sept 2012: Otto-Max TTC-1617 front springs, Boulder Offroad 3" front knuckles, Bilstein Shocks all around, 4" blocks under factory rear leaf springs, extended rear brake lines, added rear sway bar.
Each of these modifications is discussed in detail, in the posts and pages that follow.
Cheers


 Threaded Mode

