 |
|
 12-21-2023, 05:51 PM
|
#21
|
|
Bronze Member
Join Date: Jul 2020
Location: CA
Posts: 24
|
Quote:
Originally Posted by RT1997

"Level my RV " is an Apple product"
Though I resent control freak OS of the company but have to admit they have a lot of usefull apps.
|
us iOS users feel the same way about Google.
|

|

|
|
12-21-2023, 07:48 PM
|
#22
|
|
Gold Member
Join Date: Jul 2018
Location: Texas
Posts: 97
|

Here's what I have been using to level 7 RV's over a period of 45 years that is quick, cheap, foolproof, and accurate. Plus, to level the rig up you don't need to get out of the driver's seat unless you can't locate a spot without having to start using your choice of leveling blocks.
Buy a bullseye level like this one from Camco (via Amazon  https://www.amazon.com/gp/product/B0...?ie=UTF8&psc=1
Place it in the bottom of the fridge and get the rig as close as you can to have it showing perfectly level
Also buy this pair of Hopkins two-way graduated levels. (via Amazon
https://www.amazon.com/gp/product/B0...e?ie=UTF8&th=1. These are marked in increments of 1" away from level.
Total cost for both is around 20 bucks.
Find an area that is pretty close to vertical and 90 degrees from front to back on the dash that is large enough for one of the levels, and a similar close to vertical area to the left of the driver seat (I have found that above the door is best, but have had to use the interior door panel once).
Then position both levels as close as possible to indicate perfectly level. The one next to the door shows front to back degree of level and the one on the dash obviosly shows port to starboard level. These come with an adhesive foam mounting tape but it's just too flexible. Permantly mounting with screws is best, but if you don't want to put holes in your dash I would suggest using the black 3M two sided tape.
So now when you approach a parking spot you can easily see how close you are to level when behing the wheel. It is just so much easier for me than trying to use a bullseye level on the dash! No electronic gizmo required either.
|
|
|
|
|
12-21-2023, 08:19 PM
|
#23
|
|
Silver Member
Join Date: May 2021
Location: maine
Posts: 50
|
Quote:
Originally Posted by RT1997
Since Dometic 3 way fridge has pretty strict level requirements I hope you would share what kind of tools and gadgets you use.I watched some youtube videos.A lot of them advertizing electronic devices.3 degree angle measurement might require some of those.
|
I have my father's old combination t square thing I took the ruler/blade off and the bubble level is small and lives int he fridge
|
|
|
|
|
12-22-2023, 12:38 AM
|
#24
|
|
Gold Member
Join Date: Oct 2019
Location: CA
Posts: 86
|
Thank you all for your input.
I decided to try Beechlane permanenly calibrated tool with bluetooth phone connection for adjustment.
The device is only activated by the app when needed .2 AA batteries last for a year.Lifetime manufacturer warranty.
The link below includes all the info + video.I ordered the device from Amazon.
https://www.beech-lane.com/wireless-...eling-system-1
|
|
|
|
|
12-22-2023, 01:34 PM
|
#25
|
|
Platinum Member
Join Date: Sep 2020
Location: Earth
Posts: 119
|
I've done fine with a small $2 bubble level for about 20 years...
|
|
|
|
|
12-22-2023, 02:11 PM
|
#26
|
|
Platinum Member
Join Date: Nov 2022
Location: Minnesota
Posts: 114
|
Quote:
Originally Posted by RT1997
Thank you all for your input.
I decided to try Beechlane permanenly calibrated tool with bluetooth phone connection for adjustment.
The device is only activated by the app when needed .2 AA batteries last for a year.Lifetime manufacturer warranty.
The link below includes all the info + video.I ordered the device from Amazon.
https://www.beech-lane.com/wireless-...eling-system-1 |
That looks cool! An added benefit is that I would not step on my iPhone again . . .
|
|
|
|
|
12-22-2023, 02:22 PM
|
#27
|
|
Platinum Member
Join Date: Mar 2018
Location: Tinley Park IL
Posts: 348
|
KISS I've been using a $5 plastic level for years. Fridge runs just fine. You're allowed 1/2 bubble. I'll never understand why some like to make everything complicated. JMO Ex HVAC Tech many years ago, for what it's worth.
|
|
|
|
|
12-22-2023, 07:55 PM
|
#28
|
|
Platinum Member
Join Date: Aug 2020
Location: TX
Posts: 179
|
Quote:
Originally Posted by ChicagoTom
KISS I've been using a $5 plastic level for years. Fridge runs just fine. You're allowed 1/2 bubble. I'll never understand why some like to make everything complicated. JMO Ex HVAC Tech many years ago, for what it's worth.
|
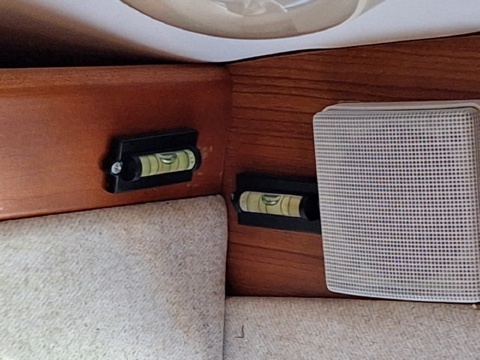
I'm in this camp.
I have 2 bubble type leveling indicators right above the driver, big enough to see wirh my old eyes. One's on the trim panel of the side shelf, one's on the trim panel under the front mini-cabinet that runs across the top of the windshield. Shows back to front and side to side levels.
They were initially set to level beds, not level van. It's all pretty close actually, but wanted to ensure we sleep with our heads just raised a bit - we use twin bed setup. I know where that point is just looking at the left side bubble.
Super simple, as I park I just look at the bubble levels. Then I know if or where to level. When they're good for us, they're good for the fridge. No problem after many, many stopovers.
|
|
|
|
|
12-25-2023, 01:50 AM
|
#29
|
|
New Member
Join Date: Mar 2017
Location: California
Posts: 8
|
Complete virgin, newbie here. Rented a Navion for a week so I have some knowledge.
Never owned, let alone leveled an RV before
Buying a new a '24 model from a high quality manufacturer for peace of mind.
Yes I know I should buy used, but scared I might end up with someone else's nightmare. Let's just say I can afford to take the depreciation hit and I'm not selling my house. Lost my wife to breast cancer and need to get out of the house before I start getting any crazier.
I'm getting up in age and it's now or never to experience and enjoy the open road and see all the wonders of North America. Will have lithium package so dry camping and boondocking will be feasible.
This leveling thing is something I didn't worry about with the rental.
Reading this thread, will these tools be sufficient to get me level enough to avoid damaging the fridge?
https://www.amazon.com/gp/aw/d/B000EDSSDO
Are these the correct lego leveling blocks?
https://www.amazon.com/dp/B0B7BSK625...hlbWF0aWM&th=1
Or are these the correct ones?
https://www.amazon.com/Camco-Levelin...00480BWCI?th=1
Thanks for any help you can provide
|
|
|
|
|
12-25-2023, 03:15 PM
|
#30
|
|
Platinum Member
Join Date: Jan 2022
Location: fl
Posts: 267
|
Like everything else people are different and have different camping styles, one person will go to camp snowshoe for 3 weeks and another like me stays no more than 2 nights when traveling. So we have different ideas and opinions.
I have used various levels over the years none of which I would say are bad. Mostly used scrap wood as levels. Wood can be slippery when wet so I painted and poured coarse sand into the wet paint. I ordered a set of the curved roll on levels and sent them back. I am anal about tires and the ramps are much narrower than the tires so have the potential to damage them. I made my own wider roll on levelers, yup out of scrap wood!
I am experimenting was a phone app leveler called camper leveler which is showing great promise.
The narrow ramps are not just my opinion, Roger is a tire engineer with decades of experience. https://www.rvtiresafety.net/search/...eling%20blocks
|
|
|
|
|
12-25-2023, 07:17 PM
|
#31
|
|
Platinum Member
Join Date: Aug 2020
Location: TX
Posts: 179
|
Agreed, lots of personal preference. I've used these for several years, as mentioned, one right above driver on front panel, the other above driver on side panel.
The panels I'm talking about are related to our 210 configuration, but essentially side to side and front to back.
I like the Lego pads, easier to store and stack. I also keep a couple of 2×4 blocks in case I need more leveling capability.
|
|
|
|
|
12-25-2023, 08:06 PM
|
#32
|
|
Platinum Member
Join Date: Jan 2022
Location: fl
Posts: 267
|
Pieces of wood are handy to have, put under jack for changing tire, run tire up on if needed another inch to get the jack under. I have ERS but not going to sit and wait all day for them.
|
|
|
|
|
12-26-2023, 04:43 PM
|
#33
|
|
New Member
Join Date: Jun 2023
Location: CA
Posts: 3
|
Easy Fridge Level Check
Quote:
Originally Posted by Urlauber
|
Agree, been using this one for years and it works great, just keep it handy.
TIP: First verify another surface like a countertop or table is the same as the fridge bottom, then you can check for the fridge being level by checking the other surface. Much easier than getting in the fridge to check.
|
|
|
|
|
01-01-2024, 02:44 PM
|
#34
|
|
Platinum Member
Join Date: Aug 2020
Location: TX
Posts: 179
|
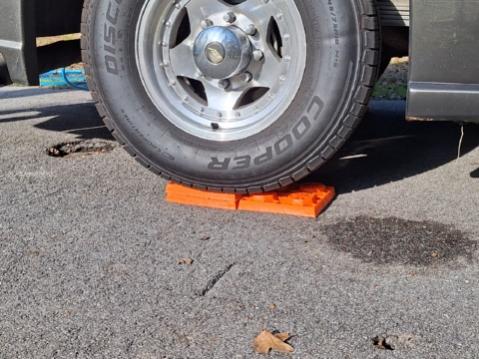
We're currently in a state park, using the KISS method...
Bubble levels above the driver, no need to get out of the van. If the bubble is anywhere close to the center marks, that's good enough.
Lego pads. I also keep a few 2x4 cut pieces to supplement as needed, sometimes you need a ramp of sorts to roll on more than a couple pads.
|
|
|
|
|
01-01-2024, 06:34 PM
|
#35
|
|
Platinum Member
Join Date: Mar 2014
Location: Herndon, Virginia
Posts: 494
|
Wow! That level seriously underestimates the actual angle. Thanks for posting this as I am sure many would take it at face value.
|
|
|
|
|
01-01-2024, 06:47 PM
|
#36
|
|
Platinum Member
Join Date: Aug 2020
Location: TX
Posts: 179
|
Quote:
Originally Posted by JohnnyFry
Wow! That level seriously underestimates the actual angle. Thanks for posting this as I am sure many would take it at face value.
|
Lol, it's actually fairly close, camera angle not 100%. Half a bubble is about 2 pads. Purposely, raises the back slightly so we don't sleep with heads lower than feet. I should have been more precise I guess - it's the internet.
But anyway....... back to the main point. Electronic gadgets are great, depending on your view, but not always needed. For me, this gets the job done just fine, zero fridge issues. Level bubbles = level van. Tweak to your own preference.
|
|
|
|
|
01-01-2024, 07:59 PM
|
#37
|
|
Site Team
Join Date: Jul 2013
Posts: 5,340
|
Our last van had a rather crude electronic "bubble" level that I built in 2014. Didn't look fancy but worked great.
spirit level.jpeg
Our new rig has a fancier one implemented in Home Assistant. Pretty much like this:
https://youtu.be/gv7vdad6qwY
Both the old and the new ones appear on a screen visible to the driver on the flick of a switch. I don't know how I ever did without them.
__________________
Now: 2022 Fully-custom buildout (Ford Transit EcoBoost AWD)
Formerly: 2005 Airstream Interstate (Sprinter 2500 T1N)
2014 Great West Vans Legend SE (Sprinter 3500 NCV3 I4)
|
|
|
|
|
01-04-2024, 07:33 PM
|
#38
|
|
Platinum Member
Join Date: Jan 2016
Location: California
Posts: 119
|
I use a bubble level in the console cupholder that allows me to see level while moving around. I assembled a stand that rests in the cupholder, and the bubble goes on top of that. Photos attached.
I built the stand with some ABS pipe, a pipe cap, and a round piece of wood.
Found a nice, level parking spot (anybody around probably wondered what the hell I was doing with my 4' level on the ground). Put the stand in the cupholder, put a blob of caulking on the bottom of the piece of wood, rested the level on top, and pressed down such that the bubble was level.
When I arrive at a camping spot, I put the bubble level in place and try different orientations in the site that get me closer to level. I can usually find a spot that is close. If not, I use the Truma iphone app which tells me how far off level I am for each wheel. I then can use leveling blocks to get me closer to level.
__________________
- Steve
'Blue' 2004 Chevy Roadtrek 190 Popular
|
|
|
|
|
01-09-2024, 06:59 PM
|
#39
|
|
New Member
Join Date: Sep 2023
Location: Virginia
Posts: 9
|
Quote:
Originally Posted by Urlauber
|
Isn't the longer the level the more accurate it is?
|
|
|
|
|
01-09-2024, 07:09 PM
|
#40
|
|
Platinum Member
Join Date: Aug 2010
Location: Minnesota
Posts: 12,012
|
Quote:
Originally Posted by kml123@gmail.com
Isn't the longer the level the more accurate it is?
|
Not necessarily. Levels are specified to an accuracy that is given decimal inches of error for a given distance of level length like and inch or foot.
.003" per foot would be an example.
That said, a longer level will give better results if you are going over uneven surfaces, like on the might have dips in it, as long as you are sitting on the end points that you want level to each other.
Stuck to a dash or counter top, length doesn't mean any benefit, but the rated accuracy does.
|
|
|
|
|
|
 Posting Rules
|
You may not post new threads
You may not post replies
You may not post attachments
You may not edit your posts
HTML code is Off
|
|
|
|
 » Recent Threads
 |
|
|
|
|
|
|
|
|
|
|
|
|
|
|
|
|
|
|
|
|
|
|
|
|
|
|
|
|
|
|
|
|
|


 Linear Mode

